Junos Packet Capture is an excellent utility for capturing real-time traffic over Juniper devices. It helps us analyze network traffic and is especially useful for network troubleshooting.
In this section, I will show you how to implement the packet capture feature in a Juniper SRX device.
Juniper SRX Packet Capture Example
To start implementing juniper SRX packet capture utility, let’s first review the topology on which we will capture the traffic.
Juniper SRX Packet Capture Topology Review
There are two vSRX devices connected to each other through ge-0/0/0 interface with IP subnet 10.10.10.0/24. Loopback interfaces connected to vSRX1 and vSRX2 have the IP address of 172.16.1.1/24 and 172.16.2.1/24.
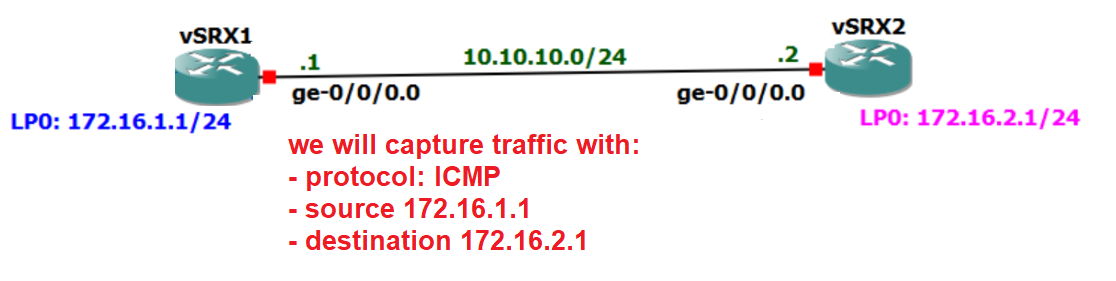
Routing between these two devices is already configured in previous sections and loopback interfaces are reachable over ge-0/0/0 interface.
In this example we want to configure a packet capture example to capture ICMP traffic from the source 172.16.1.1 to the destination 172.16.2.1 unidirectionally. no other traffic will be captured.
Juniper SRX Packet Capture configuration procedure
How packet capture is configured in juniper devices?
The first step is to enable packet capture and configure the capture output to be written to a file. I choose the filename “CAPTURE1” to save capture result.
set forwarding-options packet-capture file filename CAPTURE1Then we write a firewall filter to match the traffic that we are going to capture. here, we will match the ICMP traffic from 172.16.1.1, vSRX1 loopback interface to the destination 172.16.1.2, vSRX2 loopback interface.
Action of the traffic will be “sample” instead of “accept” or “discard”. sample here means to capture the matching traffic. here I enable also to count the number of matched traffic in addition to packet capture feature.
set firewall filter CAPTURE_FILTER term 1 from source-address 172.16.1.1/32
set firewall filter CAPTURE_FILTER term 1 from destination-address 172.16.2.1/32
set firewall filter CAPTURE_FILTER term 1 from protocol icmp
set firewall filter CAPTURE_FILTER term 1 then count COUNT1
set firewall filter CAPTURE_FILTER term 1 then sample
set firewall filter CAPTURE_FILTER term 2 then accept
And in the last step we will apply the firewall filter to the interface. In this example we will apply it to ge-0/0/0 in vSRX2 device.
set interfaces ge-0/0/0 unit 0 family inet filter input CAPTURE_FILTERthis is the result of configuration
rayka@vSRX2# show | compare
[edit interfaces ge-0/0/0 unit 0 family inet filter]
-        input FILTER2;
+        input CAPTURE_FILTER;
[edit]
+  forwarding-options {
+      packet-capture {
+          file filename CAPTURE1;
+      }
+  }
[edit firewall]
+   filter CAPTURE_FILTER {
+       term 1 {
+           from {
+               source-address {
+                   172.16.1.1/32;
+               }
+               destination-address {
+                   172.16.2.1/32;
+               }
+               protocol icmp;
+           }
+           then {
+               count COUNT1;
+               sample;
+           }
+       }
+       term 2 {
+           then accept;
+       }
+   }
We do not have to forget to disable the packet capture when we do not need it any more. The easiest way is to disable packet-capture in forwarding-options.
set forwarding-options packet-capture disable Junos Packet Capture configuration example on juniper SRX device
Now let’s copy and commit the configuration in vSRX2.
To check the configuration result, I will ping between 172.16.1.1 and 172.16.1.2 from vSRX1. I will also ping 172.16.2.1 with the source of outgoing interface to make sure that it is not captured.
The capture result will be stored in “/var/tmp/” directory and with the name of “CAPTURE1.ge-0.0.0”. the name of interface is automatically added to the name that I have configured for capture file.
Before checking the content of the file, we do not forget to disable the packet capture as I have already explained.
To see the content of the file, I will copy it to the windows machine to check it with Wireshark software.
rayka@vSRX2# run file copy /var/tmp/CAPTURE1.ge-0.0.0 scp://[email protected]:/home/majid
The authenticity of host '192.168.200.111 (192.168.200.111)' can't be established.
ECDSA key fingerprint is SHA256:412mlnEwbnrKiYYrvxz7NdwdXyVReC4LJiRXi5qpw98.
Are you sure you want to continue connecting (yes/no)? yes
Warning: Permanently added '192.168.200.111' (ECDSA) to the list of known hosts.
[email protected]'s password:
CAPTURE1.ge-0.0.0                                                                                                 100%  504    71.3KB/s   00:00

[edit]
rayka@vSRX2#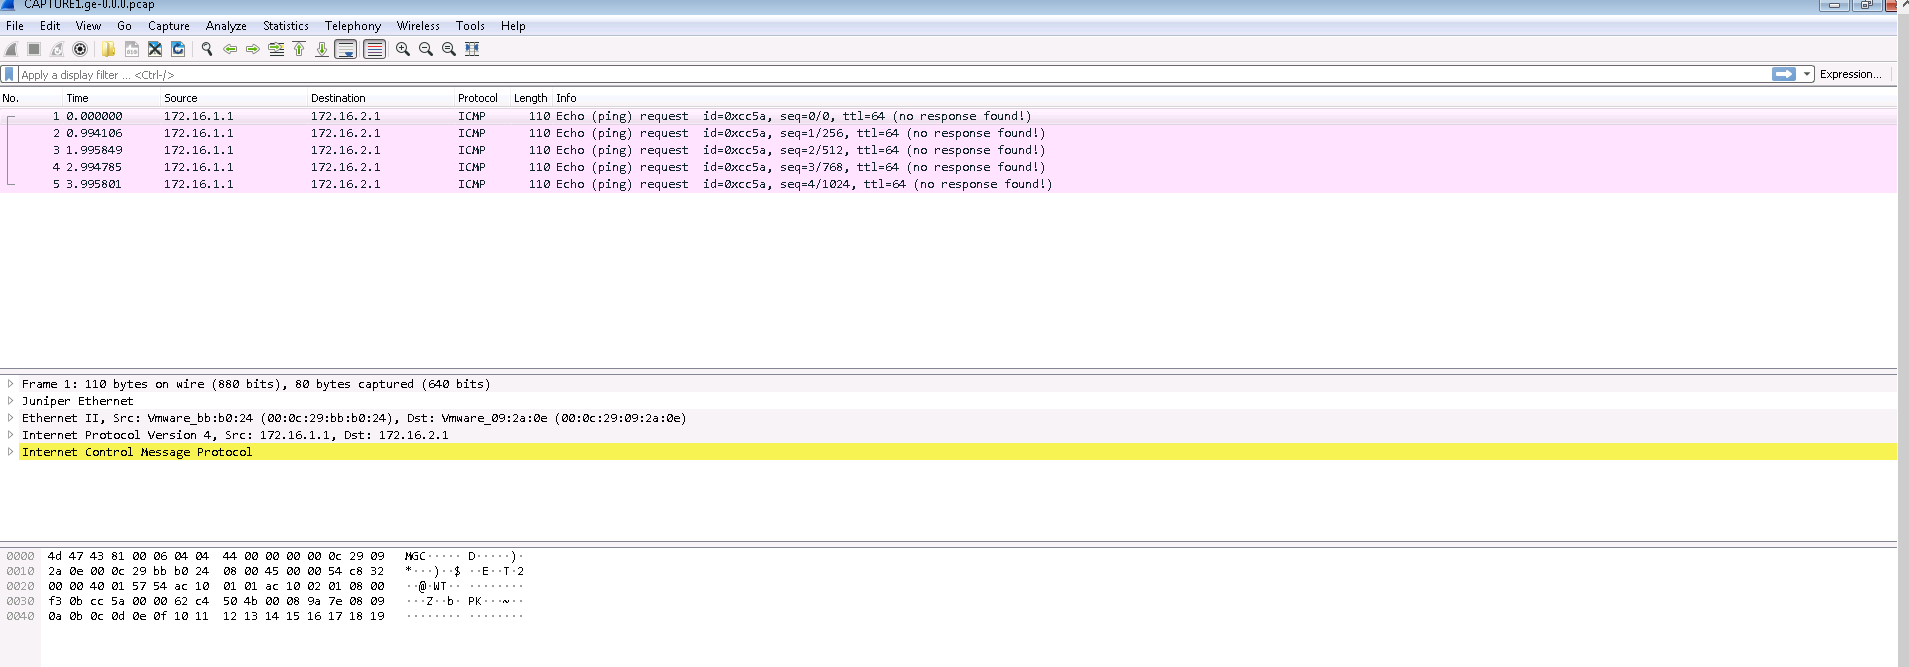
As you can see only unidirectional ICMP traffic from 172.16.1.1 to 172.16.2.1 is captured.
To show also the number of packets matched and captured, we can check the count with “show firewall” command.
rayka@vSRX2# run show firewall

Filter: __default_bpdu_filter__

...
Filter: CAPTURE_FILTER
Counters:
Name                                                Bytes              Packets
COUNT1                                                420                    5

[edit]
rayka@vSRX2#