Juniper SRX Source NAT allows users with a private IP address within the network to communicate over the Internet.
This is possible when private source IP addresses are translated to a public address when traffic are routed from an internal network to the Internet.
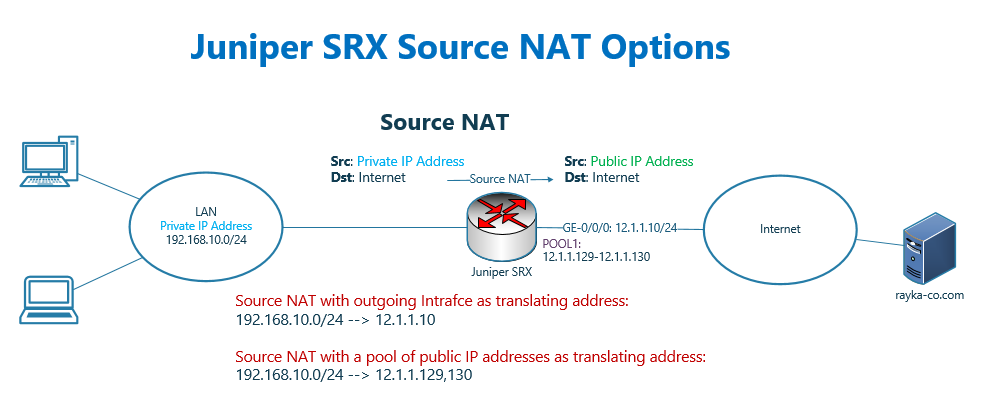
The source private IP address can be translated to the outgoing interface IP address which will be discussed in this section. It can also be translated into an IP address from a pool of IP addresses, which will be discussed in the next section.
Juniper SRX NAT Fundamental
In Juniper SRX device, like in any other firewall, we have the option to configure different types of NAT, which we will discuss in this section and upcoming sections.
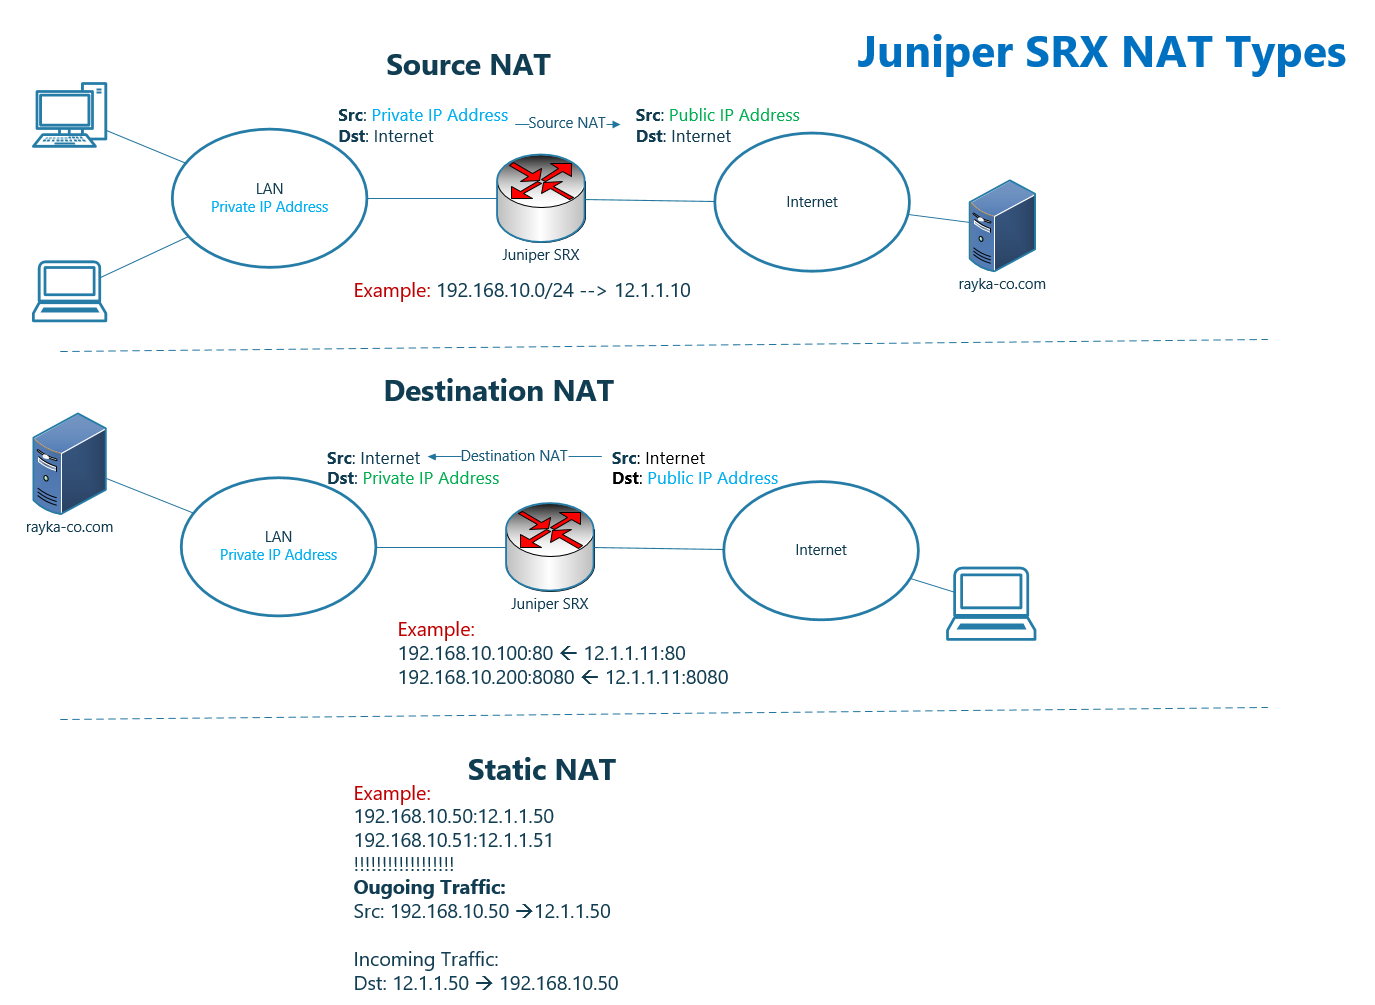
Just as an overview:
Source NAT is mainly used to connect computers with private IP addresses inside the network to the Internet. This becomes possible when we translate the source IP address of outgoing traffic from a private to a public IP address.
As an example in the source NAT, in the figure shows that all private IP address within the subnet 192.168.10.0/24 are translated to 12.1.1.10 public IP address.
Destination NAT is mainly used to make servers with private IP address be accessible over the internet but with a public IP address. This becomes possible by changing the destination public IP address of incoming traffic to the private IP address of the server.
As an example in the destination NAT, in the figure shows that, when a traffic with destination public IP address 12.1.1.11 and destination port 80 is received, it is translated to private IP address 192.168.10.100. But when destination port 8080 is, then it will be translated to 192.168.10.200.
Static NAT is a static one to one mapping between a private IP address and a public IP address. In other words, for each private IP address, there is a reserved public IP address.
Static NAT has the highest priority in the NAT rules and by default it will be used for both source and destination NAT.
In the figure shows that the equivalent of private IP address, 192.168.10.50 is public IP address 12.1.1.50. And also the equivalent of private IP address, 192.168.10.51 is public IP address 12.1.1.51.
This translation will be used in both direction by default. It means, outgoing traffic from computer with private IP address 192.168.10.50 will be translated to 12.1.1.50. And also incoming traffic with destination public IP address 12.1.1.50 will be translated to 192.168.10.50.
NAT is not necessarily between private and public IP address. In other words, NAT can be implemented between two private IP addresses. It can also be between two public IP addresses.
I will explain more about it in a few minutes.
Juniper SRX Source NAT interface configuration
What we are going to implement as the first scenario, is the source NAT.
As you know, by source NAT, clients with private IP addresses are able to communicate with the internet since the private IP address of outgoing traffic are translated to public IT address.
We have two option for the translating public IP address, the IP address of outgoing Interface of juniper SRX device or an IP address from a pool of public IP addresses.
In this section, we will only implement source NAT, with IP address of outgoing interface as translating address. It is because with a pool of public IP address, a new concept must be explained which will be discussed in the next section.
Juniper SRX NAT Source Interface topology
This is the topology, in which we are going to implement source NAT with IP address of outgoing interface as translating address.
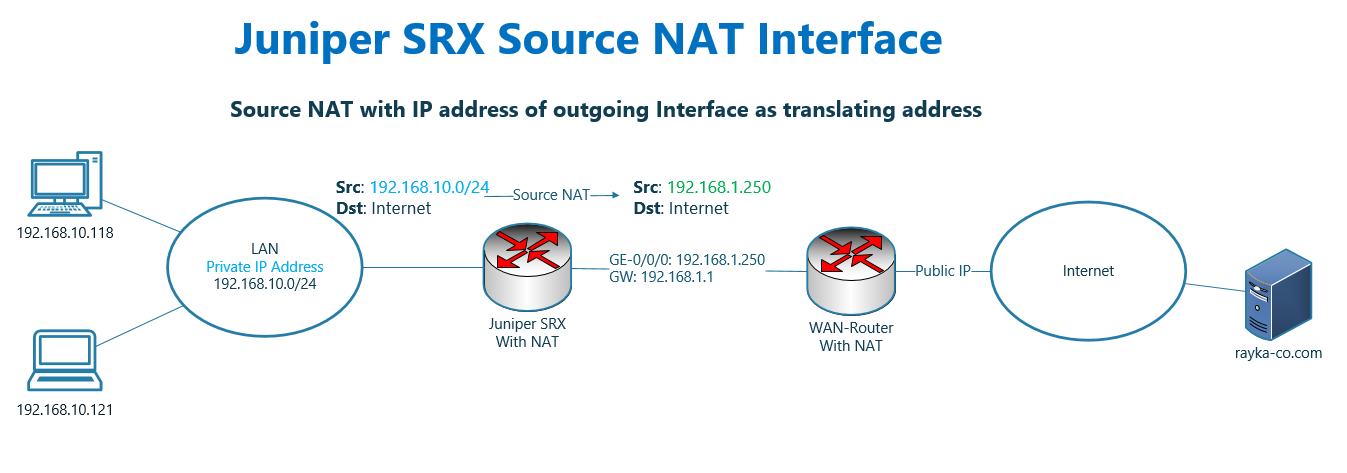
In our topology, both inside and outside IP address of juniper SRX, 192.168.10.0/24 and 192.168.1.0/24, are private IP subnet since we have another router in the topology which translate 192.168.1.0/24 to public IP address.
In other words, the traffic from 192.168.10.0/24 are translated twice. Once to 192.168.1.0/24 in juniper SRX and once from 192.168.1.0/24 to public IP address in WAN router.
What we show in this section is to translate source address of traffic coming from 192.168.10.0/24 behind Juniper SRX to the IP address of Juniper SRX’s outgoing interface, 192.168.1.250, when they are forwarded to the Internet.
Juniper SRX NAT Source Interface configuration
This is the configuration of source NAT with outgoing interface IP address as translating address.
set security nat source rule-set SOURCE-NAT from zone inside
set security nat source rule-set SOURCE-NAT to zone outside
set security nat source rule-set SOURCE-NAT rule PAT-INTERFACE match source-address 192.168.10.0/24
set security nat source rule-set SOURCE-NAT rule PAT-INTERFACE then source-nat interface
To configure source NAT, we start the configuration in the context of “security nat source” environment.
First we configure a rule-set. Each rule-set is used for a specific direction between two zones or interfaces. We configure “rule-set SOURCE-NAT” from inside to outside zone.
In each rule set, we can have as many rules that we wish. We have only one rule “rule PAT-INTERFACE”.
For each rule, there must be a “match” rule to match the traffic and “then” rule, which define the type of the NAT.
For “match”, we configure any traffic coming from the source of 192.168.10.0/24 from inside to outside zone will be matched with this rule.
For “then”, we configure “source-nat interface”, to translate the source address to the address of outgoing interface.
In the next section we will use one address form NAT pool instead of IP address of outgoing interface.
Juniper SRX NAT Source Interface monitoring and troubleshooting
Just to monitor the summary of NAT configuration, we can use the command “show security nat source summary”.
The output of this commands shows NAT rules, NAT direction and action of the NAT, which is from inside to outside and translate to interface IP address in our scenario.
rayka# run show security nat source summary
Total pools: 0

Total rules: 1
Rule name : PAT-INTERFACE
    Rule set  : SOURCE-NAT
    Action    : interface
    From      : inside                To : outside
But the best way to monitor NAT transactions is to send traffic and monitor session table and also log file.
Before sending traffic, we enable live monitoring of the log file with “monitor start FIREWALL” command. “FIREWALL” is the name of log file which is configured in previous sections.
Now we can send ICMP and http traffic. We generate http traffic to the destination google.com with command ‘telnet google.com 80’.
After sending traffic, with the command “show security flow session”, we can check session table.
rayka# run show security flow session
Session ID: 8589952790, Policy name: PERMIT-ICMP/15, State: Stand-alone, Timeout: 2, Valid
  In: 192.168.10.118/2958 --> 8.8.8.8/12;icmp, Conn Tag: 0x0, If: ge-0/0/1.0, Pkts: 1, Bytes: 84,
  Out: 8.8.8.8/12 --> 192.168.1.250/21969;icmp, Conn Tag: 0x0, If: ge-0/0/0.0, Pkts: 1, Bytes: 84,

Session ID: 8589952876, Policy name: PERMIT-ICMP/15, State: Stand-alone, Timeout: 2, Valid
  In: 192.168.10.118/2958 --> 8.8.8.8/13;icmp, Conn Tag: 0x0, If: ge-0/0/1.0, Pkts: 1, Bytes: 84,
  Out: 8.8.8.8/13 --> 192.168.1.250/11214;icmp, Conn Tag: 0x0, If: ge-0/0/0.0, Pkts: 1, Bytes: 84,

  In: 192.168.10.118/34674 --> 216.239.38.120/80;tcp, Conn Tag: 0x0, If: ge-0/0/1.0, Pkts: 3, Bytes: 140,
  Out: 216.239.38.120/80 --> 192.168.1.250/24824;tcp, Conn Tag: 0x0, If: ge-0/0/0.0, Pkts: 2, Bytes: 104,
Session ID: 8589953119, Policy name: self-traffic-policy/1, State: Stand-alone, Timeout: 1800, Valid
....
As you can see in the output, source IP address of outgoing traffic is 192.168.10.118 but destination IP address of return traffic is 192.168.1.250, which shows that the address 192.168.10.118 is translated to 192.168.1.250 which is the IP address of outgoing interface.
Also in the output of log file, it shows that the traffic is matched with “PAT-INTERFACE” NAT rule and “PERMIT-WEB” security policy rule.
It also shows the translation of IP address from 192.168.10.118 to 192.168.1.250. for both.
majid@insidedebian:~$ telnet google.com 80
Trying 216.239.38.120...
Connected to google.com.
Escape character is '^]'.


rayka# run monitor start FIREWALL
[edit]
rayka# Aug 24 10:26:10   RT_FLOW: RT_FLOW_SESSION_CREATE: session created 192.168.10.118/34680->216.239.38.120/80 0x0 junos-http 192.168.1.250/11932->216.239.38.120/80 0x0 source rule PAT-INTERFACE N/A N/A 6 PERMIT-WEB inside outside 8589976877 N/A(N/A) ge-0/0/1.0 UNKNOWN UNKNOWN UNKNOWN N/A N/A -1 N/A N/A N/A Off root N/A N/A
Aug 24 10:26:57   RT_FLOW: RT_FLOW_SESSION_CLOSE: session closed TCP FIN: 192.168.10.118/34680->216.239.38.120/80 0x0 junos-http 192.168.1.250/11932->216.239.38.120/80 0x0 source rule PAT-INTERFACE N/A N/A 6 PERMIT-WEB inside outside 8589976877 4(180) 4(184) 47 UNKNOWN UNKNOWN N/A(N/A) ge-0/0/1.0 UNKNOWN N/A N/A -1 N/A NA 0 0.0.0.0/0->0.0.0.0/0 NA NA N/A N/A Off root 0 N/A N/A