Juniper SRX Destination NAT allows services with private IP addresses to be published over the Internet.
In other words, servers with private IP address can be reachable from the internet with the help of destination NAT.
It is also known as pre-routing NAT because the destination NAT occurs before routing.
Juniper SRX Destination NAT Fundamental
As I have defined different types of NAT in the previous sections, with destination NAT it becomes possible to publish services over the internet even though servers have real private IP addresses.

With this solution we can publish many services with just one or a few public IP addresses.
For example, in this figure you can see that the public IP address 12.1.1.1 is used to publish two services with private IP addresses over the Internet.
When users connect to the public IP address, 12.1.1.1 and with destination port 22, it will be translated to the server with IP address 192.168.10.118 and with the same port.
However, when users connect to this IP address with destination port 2323, they are redirected to the server with IP address 192.168.10.121 and with port 23.
As you can see especially in the second example, destination NAT can be used as a port-forwarding solution. Since the port 2323 is translated to 23. It can be used to hide the real port that the server is listening on.
Destination NAT in Flow Diagram
If you remember, this is the Juniper SRX flow diagram that we discussed in the second lesson of this course called Juniper SRX Traffic Flow.
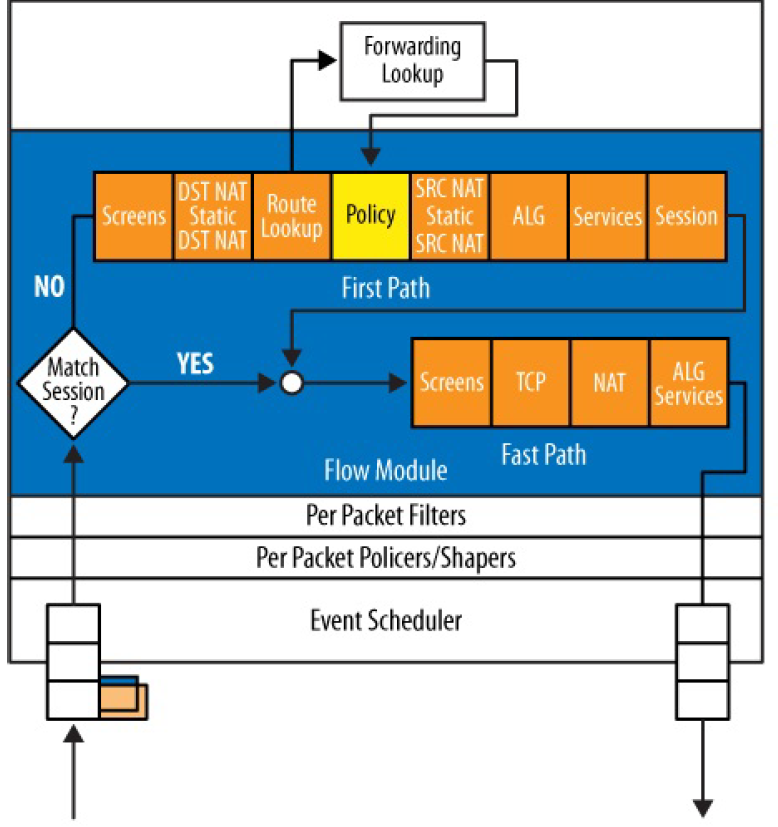
It shows that destination NAT occurs before routing decision. This is because, routing is based on destination IP address and destination IP address is changed in destination NAT.
Theredore first, Destination-NAT changes the destination IP address of the packet and then routing decides on which outgoing interface the packet should be forwarded.
It also means that at the time of destination NAT processing, the router does not know the packet’s outgoing interface and zone.
Therefore, unlike source NAT policies that are configured between two specific interfaces or zones, in destination NAT, only incoming interface or zone must to be configured.
Juniper SRX Destination NAT Configuration
This is the topology that we will use to configure destination NAT, and this is the same topology that we used in the previous sections.

As you can see in the topology, users inside the network with IP address subnet 192.168.10.0/24 are connected to the internet through two intervening devices.
The first device juniper SRX translate the IP address of users in the subnet 192.168.10.0/24 to the IP addresses in the subnet 192.168.1.0/24. This is implemented using the source NAT and in the previous section.
The second device, WAN router, which is not under my control, translates the IP addresses in the 192.168.1.0/24 subnet to a specific public IP address.
What we will implement in this section is to publish servers in the inside zone with IP address subnet 192.168.10.0/24 to be available with IP address subnet 192.168.1.0/24 in the outside zone.
When clients connect to the outside IP, 192.168.1.118 and port 22, then they will be redirected to the IP address, 192.168.10.118 in inside zone and with port 22.
Also when clients connect to the outside IP, 192.168.1.121 and port 2323, then they will be redirected to the IP address, 192.168.10.121 and port 23 in inside zone.
Only one pubic IP address was enough to redirect users to both servers. Just for the sake of simplicity, I used two IP addresses. So that the last octet of outside IP address and inside IP address are the same.
security policies in Juniper SRX Destination NAT
Before I start the destination NAT configuration, I will permit everything from outside to the inside zone so that we don’t get involved in the concept and configuration of security policies as we learned how to configure them in the previous sections.
This is the configuration to permit everything from outside zone to the inside zone.
set security policies from-zone outside to-zone inside policy PERMIT-ALL match source-address any
set security policies from-zone outside to-zone inside policy PERMIT-ALL match destination-address NET_192_168_10_0__24
set security policies from-zone outside to-zone inside policy PERMIT-ALL match application any
set security policies from-zone outside to-zone inside policy PERMIT-ALL then permit
set security policies from-zone outside to-zone inside policy PERMIT-ALL then log session-init
There is just one another important point to note here.
If you remember, and also what we discussed a few minutes ago, security policies occur in traffic flow after both destination NAT and routing.
Therefore, in the security policy, we use the actual IP address of internal servers as the destination IP address and not the IP addresses seen from the outside.
In our example, destination IP address 192.168.10.0/24 is used in the security policy and not the IP addresses visible from the outside.
Now we can copy and commit, this part of the configuration.
Juniper SRX Destination NAT Configuration Example
This is the configuration of the destination NAT.
set security nat destination pool SSH address 192.168.10.118/32
set security nat destination pool SSH address port 22

set security nat destination pool TENET address 192.168.10.121/32
set security nat destination pool TENET address port 23

set security nat destination rule-set DNAT from zone outside

set security nat destination rule-set DNAT rule SSH match destination-address 192.168.1.118/32
set security nat destination rule-set DNAT rule SSH match destination-port 22
set security nat destination rule-set DNAT rule SSH then destination-nat pool SSH

set security nat destination rule-set DNAT rule TELNET match destination-address 192.168.1.121/32
set security nat destination rule-set DNAT rule TELNET match destination-port 2323
set security nat destination rule-set DNAT rule TELNET then destination-nat pool TENET

set security nat proxy-arp interface ge-0/0/0.0 address 192.168.1.118/32
set security nat proxy-arp interface ge-0/0/0.0 address 192.168.1.121/32
The first four lines are the pool of internal servers which will be published in the outside zone.
The first two lines create a pool with the name of SSH, include the IP address 192.168.10.118 with port 22, pointing to the SSH server.
The port number is optional and it is configured when it is required.
The second two lines create another pool with the name of TELNET containing the IP address 192.168.10.121 with port 23.
Configuring the pool for the internal IP addresses, published in the destination NAT is always required.
Then we configure a rule-set with the name of DNAT which match with traffic coming from outside zone.
Unlike source NAT rule-set, which we configure between two zones or interfaces, in destination NAT, we only configure incoming zone or incoming interface. This is because, destination NAT occurs before routing in the traffic flow and at the time of destination NAT processing, outgoing interface is not still determined.
Then we configure two rules, with the name of SSH and TENET.
Rule SSH, matches traffic with destination address 192.168.1.118 and destination port 22. It translate destination IP address and port to what is configured in SSH pool, which is 192.168.10.118 and port 22.
Rule TELNET, matches traffic with destination address 192.168.1.121 and destination port 2323. It translate destination IP address and port to what is configured in TELNET pool, which is 192.168.10.121 and port 23.
And finally, proxy ARP must be enabled for the IP addresses 192.168.1.118 and 192.168.1.121 in the Juniper SRX since by default Juniper SRX does not respond to the ARP request for these IP addresses and traffic to these IP addresses never reach to the juniper SRX.
Now we can copy and commit the configuration
Juniper SRX Destination NAT Monitoring and Troubleshooting
To monitor and troubleshoot destination NAT, we first try to connect to the servers through their outside IP address and ports.
We create a SSH connection to 192.168.1.118 over default port and a also a telnet connection to 192.168.1.121 over port 2323.
Then we monitor session table with the command “show security flow session”.
rayka# run show security flow session | grep /22
  In: 192.168.1.88/46547 --> 192.168.10.118/22;tcp, Conn Tag: 0x0, If: ge-0/0/0.0, Pkts: 42, Bytes: 4654,
  Out: 192.168.10.118/22 --> 192.168.1.88/46547;tcp, Conn Tag: 0x0, If: ge-0/0/1.0, Pkts: 62, Bytes: 10701,


[edit]
rayka# run show security flow session | grep /23
  In: 192.168.1.88/46624 --> 192.168.1.121/2323;tcp, Conn Tag: 0x0, If: ge-0/0/0.0, Pkts: 11, Bytes: 503,
  Out: 192.168.10.121/23 --> 192.168.1.88/46624;tcp, Conn Tag: 0x0, If: ge-0/0/1.0, Pkts: 8, Bytes: 444,
As you can see in the output of both connections, destination IP address of incoming connection is the outside IP address but the source IP address of reverse outgoing connection is real inside IP address.
We can also monitor the live output of log file with “monitor start” command.
rayka# run monitor start FIREWALL | grep 23

[edit]
rayka# Aug 29 20:26:36   RT_FLOW: RT_FLOW_SESSION_CREATE: session created 192.168.1.88/46665->192.168.1.121/2323 0x0 junos-telnet 192.168.1.88/46665->192.168.10.121/23 0x0 N/A N/A destination rule TELNET 6 PERMIT-ALL outside inside 12884966498 N/A(N/A) ge-0/0/0.0 UNKNOWN UNKNOWN UNKNOWN N/A N/A -1 N/A N/A N/A Off root N/A N/A

[edit]
rayka# run monitor stop
The same IP and port translation can be seen also in the output of log file.
You can also see which NAT and policy rules traffic is matched against.
With the command “show security nat destination rule all”, you can see the details of the configuration and also if there is any “Translation hits” and “Successful sessions”.
rayka# run show security nat destination rule all
Total destination-nat rules: 2
Total referenced IPv4/IPv6 ip-prefixes: 2/0
Destination NAT rule: SSH
  Rule set                   : DNAT
  Rule Id                    : 1
  Rule position              : 1
  From zone                  : outside
    Destination addresses    : 192.168.1.118   - 192.168.1.118
    Destination port         : 22              - 22
  Action                     : SSH
  Translation hits           : 0
    Successful sessions      : 0
  Number of sessions         : 0
Destination NAT rule: TELNET
  Rule set                   : DNAT
  Rule Id                    : 2
  Rule position              : 2
  From zone                  : outside
    Destination addresses    : 192.168.1.121   - 192.168.1.121
    Destination port         : 2323            - 2323
  Action                     : TENET
  Translation hits           : 1
    Successful sessions      : 1
  Number of sessions         : 0