JNCIA-Junos Introduction and Lab Preparation is the topic of this section. Juniper Junos Associate course or JNCIA-Junos is a prerequisite for all other Juniper courses like CCNA in Cisco courses. In this course we will learn how to work with Junos, i.e. OS of juniper devices, especially through the CLI interface.
Juniper Associate JNCIA-Junos Fundamental
In the official version of JNCIA-Junos course, we first need to learn the network fundamental concepts, which mainly focus on network OSI and TCP/IP model and layers concept. However, in this course I will assume that students have already passed the Cisco CCNA course and I do not need to repeat these concepts.

I have decided this, because I believe JNCIA-Junos is a prerequisite for Juniper courses and not network courses. For networking courses and specialties, I believe, it is a better idea, to start with Cisco CCNA course.
Target of this Lesson
In this lesson, I’ll prepare the course lab by downloading and installing vSRX. SRX is a Juniper firewall and IPS solution. I chose this device for this course since I will follow this course with juniper security courses.
After preparing the course lab, we will perform some basic configurations to access the Juniper device through Telnet and SSH, and also web interface.
We perform the configuration without knowledge of the Juniper CLI commands. But don’t worry because we’ll start learning Junos CLI configuration from the next video. This lesson is only to give you some feeling of Junos commands.
download vSRX from Juniper website and Install
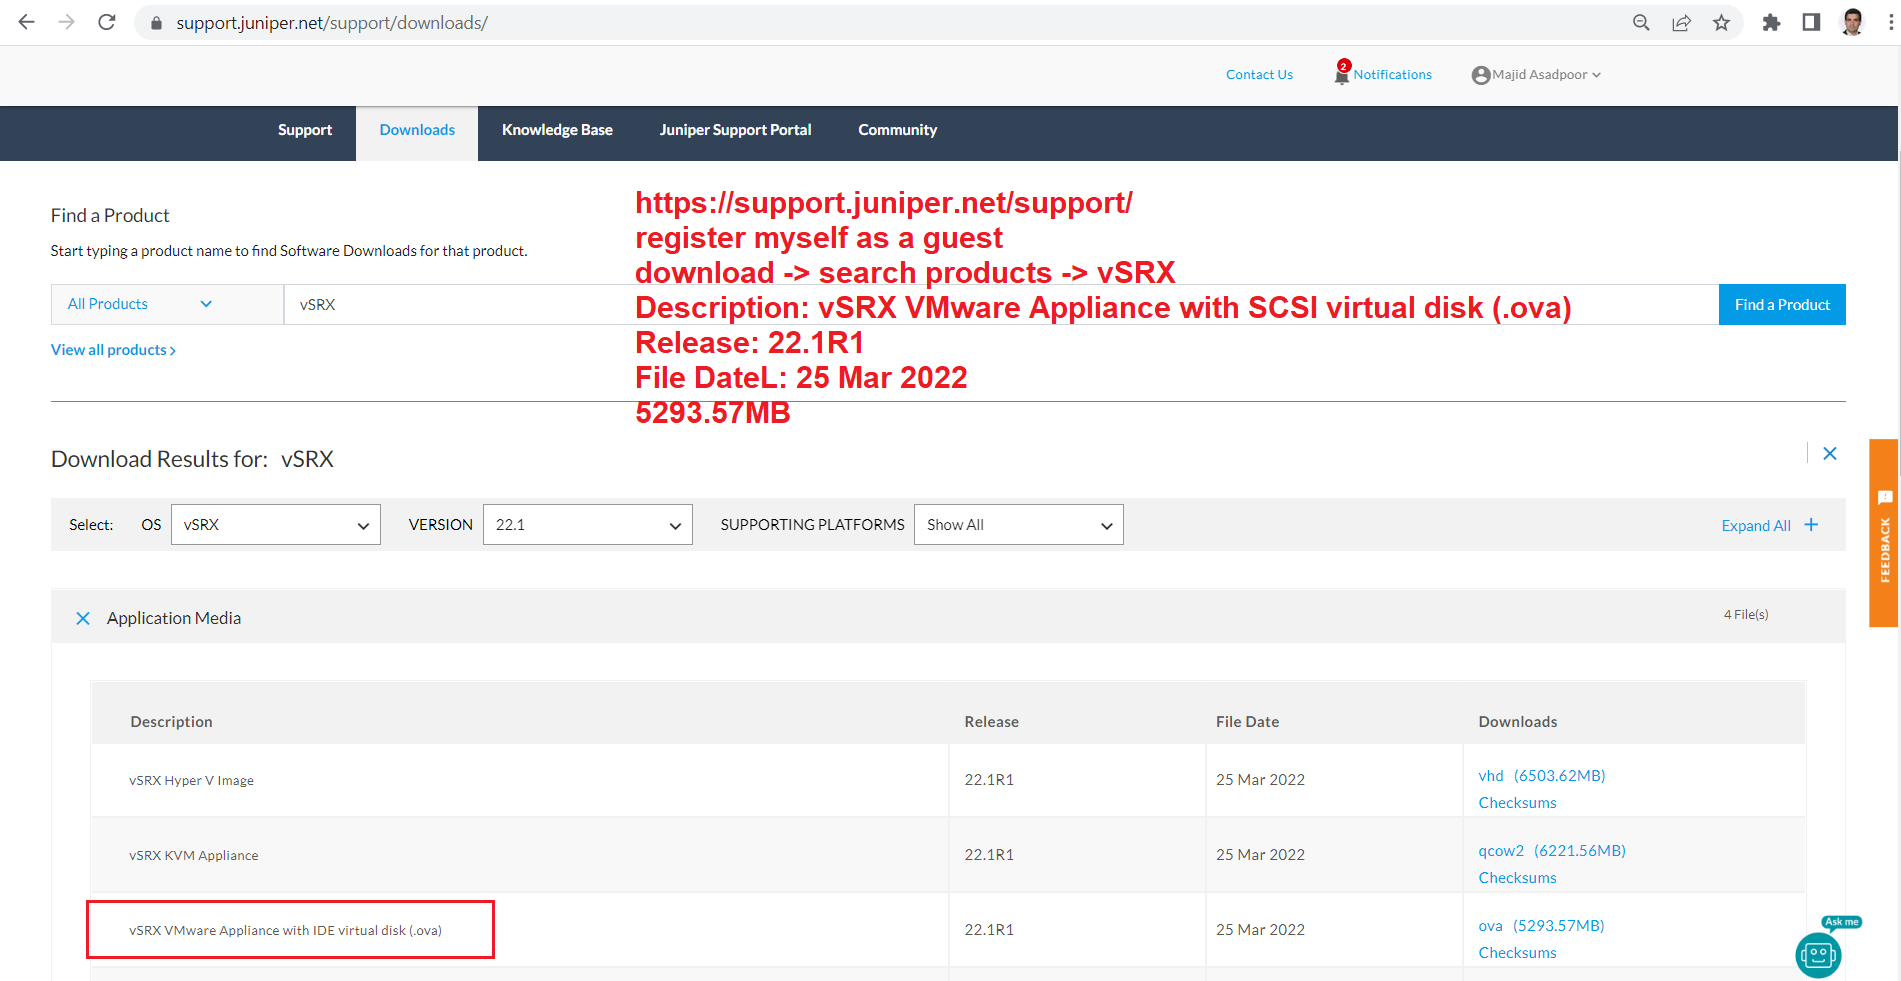
To download juniper vSRX firewall, I have registered myself as a guest in juniper support website. In download section, I have searched for vSRX and downloaded the latest version of SRX VMware ova file.
Juniper Software Download Link
download -> search products -> vSRX
Description: vSRX VMware Appliance with SCSI virtual disk (.ova)
Release: 22.1R1
File Date: 25 Mar 2022
File Size: 5293.57MB
After downloading, we can easily import ovf into vMware management console.
vSRX basic remote access configuration
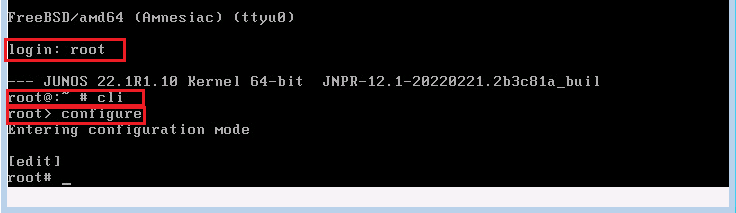
When we load vSRX ovf file, we see a login prompt. By default the username is root and without any password.
With entering username , it shows you Junos version and release time and takes you to the FreeBSD shell environment. In this mode we have access to FreeBSD commands which is normally used in low level troubleshooting and maintenance tasks. We will talk more about it in the next sections.
With entering the command “cli”, you will enter Junos Operation mode. This mode is mostly used for monitoring, troubleshooting and maintenance. We will talk more about it in the next sections.
With entering “configure” command, you will enter Junos Configuration mode. This is the mode that you can configure the device or change the configuration. We will talk more about throughout the course.
vSRC basic access configuration
Just to have a feeling of Junos CLI environment and also be able to access vSRX through Telnet/SSH, we will implement basic Telnet/SSH/WEB access configuration.
It is necessary to set a password for root user. We will give an IP address to management interface and enable ssh, telnet and web services for remote access. We will also add a username with root privilege for remote access.
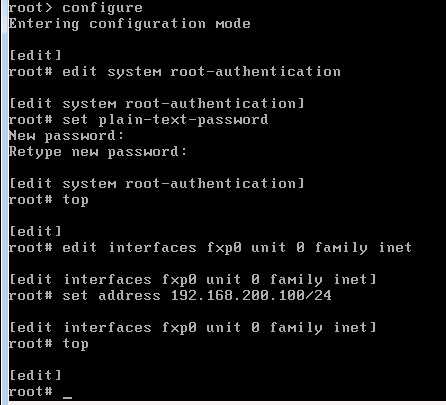
!!! it is necessary to set root password
edit system root-authentication
 set plain-text-password
!!! go to top configuration mode
 top

!!! set managemnt ip address
edit interfaces fxp0 unit 0 family inet
 set address 192.168.200.100/24
 top

!!! enable telnet/ssh/web access. by default root is not allowed for telnet/ssh access even ssh/telnet is enabled. with allow command, we allow the root user to access through telnet/ssh.
edit system services
 set ssh root-login allow
 set telnet
 set web-management http
 top

!!! configure a new rayka user with root priviledge
edit system login
 set user rayka class super-user autehntication plain-text-password
 top
Before applying the configuration we can check the new configuration with “show | compare” command which shows the difference of current configuration and the configuration after applying the new changes.
!!! show changed configuration which is not still applied
show | compare


!!! result of uncomitted configuration
show | compare
[edit system]
+   root-authentication {
+       encrypted-password "$6$Q6YZBe7Z$tabiD68Ex2c0.RC2oaMP2HY1DXdKH47YCoX7tJNvTM/EsMWv11iJ18mOm6xb7T6Jlcd9gS5iEGQGU2hJzBE18."; ## SECRET-DATA
+   }
+   login {
+       user rayka {
+           uid 2000;
+           class super-user;
+           authentication {
+               encrypted-password "$6$twikR5sC$XfDTp1ghxMf7FCeRX/O1Ib0b6PcCUauoXF8397pNCbC6vnPkjewTWhR.ALT0M0DnO1v1E9jlVKOR.wBfWtPpr1"; ## SECRET-DATA
+           }
+       }
+   }
-   autoinstallation {
-       delete-upon-commit;
-       traceoptions {
-           level verbose;
-           flag {
-               all;
-           }
-       }
-       interfaces {
-           fxp0 {
-               bootp;
-           }
-           ge-0/0/0 {
-               bootp;
-           }
-       }
-   }
[edit system services ssh]
+    root-login allow;
[edit system services]
+    telnet;
[edit interfaces fxp0 unit 0]
+     family inet {
+         address 192.168.200.100/24;
+     }
Then we have to apply the configuration with “commit” command.
!!! apply new configuration
commit
As you have seen, in order to perform a configuration, we first entered that specific section and then configured it using the “set” command.
But it is also to configure directly with “set” command without entering different sections.
set system  root-authentication plain-text-password
set system login user rayka class super-user
set system login user rayka authentication plain-text-password
set system services ssh root-login allow
set system services telnet
set system services web-management http interface fxp0.0
set interfaces fxp0 unit 0 family inet address 192.168.200.100/24
You can always check set version of the configuration with “show configuration | display set” command.
rayka> show configuration | display set
set version 22.1R1.10
set system root-authentication encrypted-password "$6$Q6YZBe7Z$tabiD68Ex2c0.RC2oaMP2HY1DXdKH47YCoX7tJNvTM/EsMWv
set system login user rayka uid 2000
set system login user rayka class super-user
set system login user rayka authentication encrypted-password "$6$twikR5sC$XfDTp1ghxMf7FCeRX/O1Ib0b6PcCUauoXF83
set system services ssh root-login allow
set system services telnet
set system services web-management http interface fxp0.0
set system syslog file interactive-commands interactive-commands any
set system syslog file messages any any
set system syslog file messages authorization info
set system license autoupdate url https://ae1.juniper.net/junos/key_retrieval
set security log mode stream
set security screen ids-option untrust-screen icmp ping-death
set security screen ids-option untrust-screen ip source-route-option
set security screen ids-option untrust-screen ip tear-drop
set security screen ids-option untrust-screen tcp syn-flood alarm-threshold 1024
set security screen ids-option untrust-screen tcp syn-flood attack-threshold 200
set security screen ids-option untrust-screen tcp syn-flood source-threshold 1024
set security screen ids-option untrust-screen tcp syn-flood destination-threshold 2048
set security screen ids-option untrust-screen tcp syn-flood queue-size 2000
set security screen ids-option untrust-screen tcp syn-flood timeout 20
set security screen ids-option untrust-screen tcp land
set security policies from-zone trust to-zone trust policy default-permit match source-address any
set security policies from-zone trust to-zone trust policy default-permit match destination-address any
set security policies from-zone trust to-zone trust policy default-permit match application any
set security policies from-zone trust to-zone trust policy default-permit then permit
set security policies from-zone trust to-zone untrust policy default-permit match source-address any
set security policies from-zone trust to-zone untrust policy default-permit match destination-address any
set security policies from-zone trust to-zone untrust policy default-permit match application any
set security policies from-zone trust to-zone untrust policy default-permit then permit
set security policies pre-id-default-policy then log session-close
set security zones security-zone trust tcp-rst
set security zones security-zone untrust screen untrust-screen
set interfaces fxp0 unit 0 family inet address 192.168.200.100/24
To test the result, we connect to the device through ACLI and also web.
