In this section, we will write python scripts that use the restconf protocol to connect to Cisco NSO and manage network devices.
Cisco NSO restconf Examples with Python
From the beginning of the course we used CLI, GUI and Python maagic library to connect to Cisco NSO and manage network devices.
In the previous section, we started using the latest method, the restocnf protocol, to connect to Cisco NSO using the software “postman” and Cisco NSO postman collection.
In this section, we continue to use the restconf protocol as the northbound connection method, but via python scripts.
get NSO restconf python code from postman
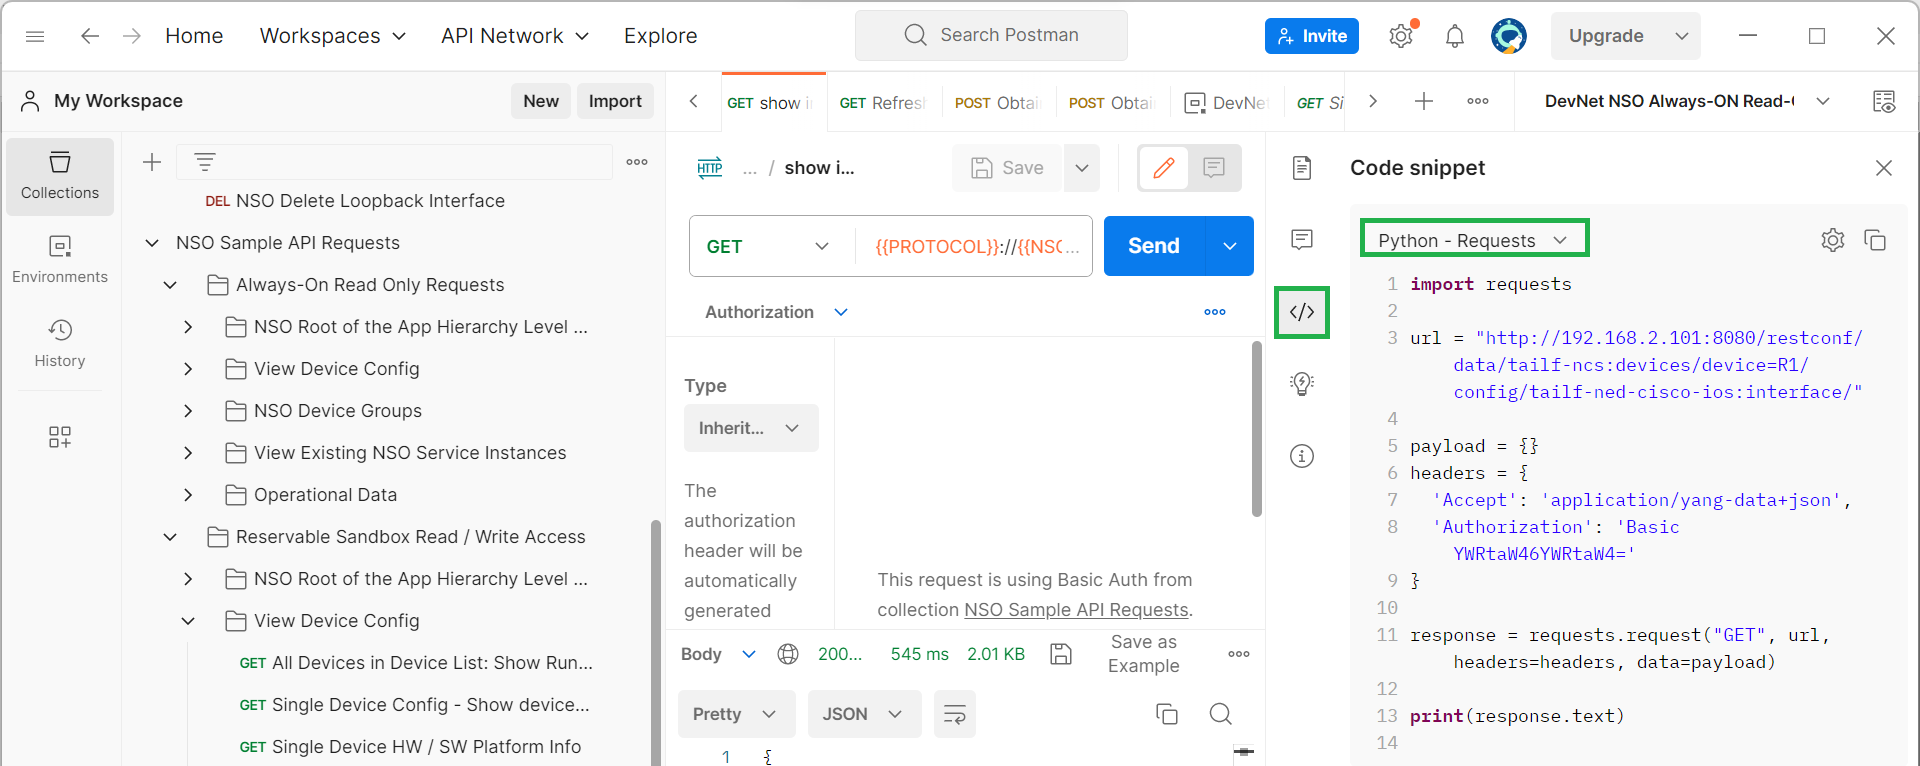
The easiest way to prepare the first release of restconf python scripts is to use the postman software to extract the equivalent python code for each existing restconf API samples.
In the last section, we discussed how to extract python code or code with any other programming language from postman software.
get list of interfaces via Cisco NSO restconf
For our first example, we get the list of interfaces from router R1 in Cisco NSO. However, we will use the exact python script generated in the postman software without any modifications.
import requests

url = "http://192.168.2.101:8080/restconf/data/tailf-ncs:devices/device=R1/config/tailf-ned-cisco-ios:interface/"

payload = {}
headers = {
  'Accept': 'application/yang-data+json',
  'Authorization': 'Basic YWRtaW46YWRtaW4='
}

response = requests.request("GET", url, headers=headers, data=payload)

print(response.text)
It uses python library “requests” to connect to cisco nso through http protocol.
It uses IP address “192.168.2.101” and port “8080” to connect to Cisco NSO. Then “/restconf/data/“ is always fixed.
How do I extract the remaining part of the configuration? We’ve discussed many times how to get it via the “display xpath” option in cisco nso.
We use the “requests.request” method to send the HTTP “GET” command to the specified URL to Cisco NSO.
The parameter “payload” is empty, since we get information and do not send any payload.
The data encoding format accepted by the script and the authentication information are specified in the header field.
Let’s run the script and see the result.
{
  "tailf-ned-cisco-ios:interface": {
    "Loopback": [
      {
        "name": "100",
        "ip": {
          "address": {
            "primary": {
              "address": "4.5.6.7",
              "mask": "255.255.255.0"
            }
          }
        }
      },
...
    ],
    "GigabitEthernet": [
      {
        "name": "1",
        "negotiation": {
          "auto": true
        },
        "mop": {
          "xenabled": false,
          "sysid": false
        },
        "ip": {
          "address": {
            "primary": {
              "address": "192.168.2.91",
              "mask": "255.255.255.0"
            }
          }
        }
      },
...
    ]
  }
}
As we expect, the list of interfaces and their IP address will be displayed in the output.
But now we modify the first script in order to parameterize the script, which makes it easier to read, debug, and reuse.
import requests

HOST = "192.168.2.101"
PORT = "8080"
USER = "admin"
PASSWORD = "admin"

url = f"http://{HOST}:{PORT}/restconf/data/tailf-ncs:devices/device=R1/config/tailf-ned-cisco-ios:interface/"

payload = {}
headers = {
  'Accept': 'application/yang-data+json',
}

response = requests.request("GET", url, headers=headers, auth=(USER, PASSWORD), data=payload)

print(response.text)
Then I use four variables: “HOST”, “PORT”, “USER” and “PASSWORD” which can easily be changed depending on the environment in which you want to run the script.
It is also possible to keep and secure these variable out of the script, which is out of scope of this course but is already discussed in the course CLI-based network automation.
In the URL, HOST and PORT variable are used in the middle of string with the help of “F-String”.
F-strings in python provide a way to embed expressions inside string values.
The other change is that authentication information, including username and password, is added in the HTTP request command using the “auth” header field.
If you run the script, you will receive the same result as the previous script that we have extracted from postman software.
All of the other scripts discussing in this section are also taken from the postman software and I’ve only parameterized them to make it easier for you to understand and reuse it.
Cisco NSO restconf Example2: add a new loopback interface
The second script is used to add a new loopback interface in the router R1.
Compared to the previous script, the first difference is using “POST” command instead of “GET” command since we are adding a configuration to the router.
import requests
import json

HOST = "192.168.2.101"
PORT = "8080"
USER = "admin"
PASSWORD = "admin"

url = f"http://{HOST}:{PORT}/restconf/data/tailf-ncs:devices/device=R1/config/tailf-ned-cisco-ios:interface/"

payload = json.dumps({
  "Loopback": [
    {
      "name": "300",
      "ip": {
        "address": {
          "primary": {
            "address": "4.5.16.17",
            "mask": "255.255.255.255"
          }
        }
      }
    }
  ]
})
headers = {
  'Accept': 'application/yang-data+json',
  'Content-Type': 'application/yang-data+json'
}

response = requests.request("POST", url, headers=headers, auth=(USER, PASSWORD), data=payload)

print(response.text)
The payload is no longer empty because we need to send the new configuration to the router.
It is in JSON format. Therefore, a new header field, “Content-Type“, specifies the format of the payload sent via the POST command.
How do we prepare the payload? It is easy. In the previous script, we got the list of interfaces in JSON format. I just copied an loopback interface JSON output and changed the name and IP address.
The payload is converted to a correct JSON file using “json.dumps” method. This method is used to convert Python objects such as a dictionary, list, string, integer, float, boolean, and None to JSON string objects.
Now we run the script to make sure that new loopback interface is added in router R1.
Before that you can check router R1 to delete interface loopback 300 if already exist.
majid@majid-ubuntu:~/devnet/cisco_nso/13.restconf$ python3 13.2.restconf_add_loopback_interface.py
R1#show ip int brief
Interface              IP-Address      OK? Method Status                Protocol
GigabitEthernet1       192.168.2.91    YES NVRAM  up                    up
GigabitEthernet2       unassigned      YES NVRAM  administratively down down
GigabitEthernet3       unassigned      YES NVRAM  administratively down down
Loopback100            4.5.6.7         YES NVRAM  up                    up
Loopback150            1.1.1.1         YES NVRAM  up                    up
Loopback300            4.5.16.17       YES manual up                    up
R1#
Cisco NSO restconf Example 3: delete loopback interface
In the third script, we delete the new loopback interface created in the previous script.
import requests
import json

HOST = "192.168.2.101"
PORT = "8080"
USER = "admin"
PASSWORD = "admin"

url = f"http://{HOST}:{PORT}/restconf/data/tailf-ncs:devices/device=R1/config/tailf-ned-cisco-ios:interface/Loopback=300"

payload={}
headers = {
  'Content-Type': 'application/yang-data+json',
  'Accept': 'application/yang-data+json',
}

response = requests.request("DELETE", url, headers=headers, auth=(USER, PASSWORD), data=payload)

print(response.text)
The URL is as the previous script. Just we add “Loopback=300”, in order to delete interface loopback 300.
The only other difference is using HTTP “DELETE” command instead of “GET” or “POST” commands.
Payload is also empty, since we do not send any content to the network device.
Now let’s run the script to make sure that interface loopback 300 is deleted from the router.
majid@majid-ubuntu:~/devnet/cisco_nso/13.restconf$ python3 13.3.restconf_delete_loopback_interface.py
R1#show ip int brief
Interface              IP-Address      OK? Method Status                Protocol
GigabitEthernet1       192.168.2.91    YES NVRAM  up                    up
GigabitEthernet2       unassigned      YES NVRAM  administratively down down
GigabitEthernet3       unassigned      YES NVRAM  administratively down down
Loopback100            4.5.6.7         YES NVRAM  up                    up
Loopback150            1.1.1.1         YES NVRAM  up                    up
get live-status output from network devices
In the next three script we receive operational output fro network devices using cisco nso “live-status” feature.
import requests
import json

HOST = "192.168.2.101"
PORT = "8080"
USER = "admin"
PASSWORD = "admin"

url = f"http://{HOST}:{PORT}/restconf/data/tailf-ncs:devices/device=R1/live-status"

payload={}
headers = {
  'Content-Type': 'application/yang-data+json',
  'Accept': 'application/yang-data+json',
}

response = requests.request("GET", url, headers=headers, auth=(USER, PASSWORD), data=payload)

print(response.text)
I got the URL from postman software. But it is easy. Just adding “live-status” keyword at the end of URL after choosing interesting device.
HTTP “GET” command is used to get the operational output.
If we run the script, In the output you see the operational status and statistics including interfaces counters, ARP information, interface names, IP addresses and MAC addresses and device and software model, version and licensing information.
{
  "tailf-ncs:live-status": {
    "ietf-interfaces:interfaces-state": {
... // interface counters
    },
    "tailf-ned-cisco-ios-stats:arp": {
... // arp information
    },
    "tailf-ned-cisco-ios-stats:interfaces":
...	 // interface name, IP address and MAC address
    "tailf-ned-cisco-ios-stats:inventory":
...
    "tailf-ned-cisco-ios-stats:running-config": {
      "license": {
        "udi": {
          "pid": "CSR1000V",
          "sn": "97G01N142F8"
        }
      }
    },
    "tailf-ned-cisco-ios-stats:version": {
      "name": "ios",
      "version": "17.01.01",
      "model": "CSR1000V",
      "serial-number": "97G01N142F8",
      "license": {
        "level": "ax",
        "type": "N/A(Smart"
      }
    },
...
  }
}
get arp information from live-status feature
The next script is exactly the same as “live-status” script, but the output is limited to only arp information from live status feature. This is done with adding “tailf-ned-cisco-ios-stats:arp” at the end of URL after “live-status” keyword.
import requests
import json

HOST = "192.168.2.101"
PORT = "8080"
USER = "admin"
PASSWORD = "admin"

url = f"http://{HOST}:{PORT}/restconf/data/tailf-ncs:devices/device=R1/live-status/tailf-ned-cisco-ios-stats:arp"

payload={}
headers = {
  'Content-Type': 'application/yang-data+json',
  'Accept': 'application/yang-data+json',
}

response = requests.request("GET", url, headers=headers, auth=(USER, PASSWORD), data=payload)

print(response.text)
Let’s run the script and see the ARP information stored in router R1.
{
  "tailf-ned-cisco-ios-stats:arp": {
    "address": [
      {
        "ip": "192.168.2.1",
        "protocol": "Internet",
        "age-mins": 0,
        "hardware-addr": "f086.2099.a458",
        "type": "ARPA",
        "interface": "GigabitEthernet1"
      },
...
      {
        "ip": "192.168.2.91",
        "protocol": "Internet",
        "hardware-addr": "000c.29e8.3ce3",
        "type": "ARPA",
        "interface": "GigabitEthernet1"
      }
    ]
  }
}
send an exec command through live-status
In the last script, we send an exec command to network device to be executed.
import requests
import json

HOST = "192.168.2.101"
PORT = "8080"
USER = "admin"
PASSWORD = "admin"

url = f"http://{HOST}:{PORT}/restconf/data/tailf-ncs:devices/device=R1/live-status/tailf-ned-cisco-ios-stats:exec/any"

payload = json.dumps({
  "input": {
    "args": "show ip interface brief"
  }
})
headers = {
  'Accept': 'application/yang-data+json',
  'Content-Type': 'application/yang-data+json',
}

response = requests.request("POST", url, headers=headers, auth=(USER, PASSWORD), data=payload)

print(response.text)
The result is not JSON structured and you will get the result exactly when you enter the command directly from the CLI.
To send an exec command in iOS devices, we specify the keyword “tailf-ned-cisco-ios-stats:exec/any” at the end of the URL and after “live-status” keyword and the command itself must be passed as a payload and via an argument to the input variable.
For sending exec command we also need to use POST command in HTTP request.
Let’s run command and see the result.
majid@majid-ubuntu:~/devnet/cisco_nso/13.restconf$ python3 13.6.restconf_live_status_send_any_exec_command.py
{
  "tailf-ned-cisco-ios-stats:output": {
    "result": "\r\nInterface              IP-Address      OK? Method Status                Protocol\r\nGigabitEthernet1       192.168.2.91    YES NVRAM  up                    up      \r\nGigabitEthernet2       unassigned      YES NVRAM  administratively down down    \r\nGigabitEthernet3       unassigned      YES NVRAM  administratively down down    \r\nLoopback100            4.5.6.7         YES NVRAM  up                    up      \r\nLoopback150            1.1.1.1         YES NVRAM  up                    up      \r\nR1#"
  }
}