Juniper SRX Antispam feature blocks or tags incoming and outgoing spam emails or unwanted emails.
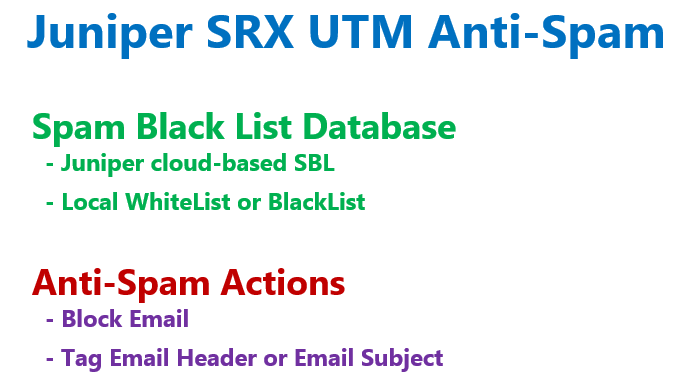
It detects spam emails based on a cloud-based Juniper spam block list (SBL) or a locally configured blacklist and whitelist.
Juniper SRX Antispam Fundamental
As you know, Juniper SRX UTM has four features. In the previous section, we discussed the antivirus feature. This section discusses the antispam feature. Content filtering and web filtering are discussed in the next sections.
Juniper SRX antispam feature is to detect and block or tag spam emails.
It checks the source IP address of the sending SMTP server and also the e-mail address of the sender of incoming and outgoing e-mails.
If the IP addresses or email addresses have a bad reputation in the spam blacklist database, they will be detected as spam emails.
Spam blacklist database can be a cloud-based Juniper SBL or a local and manually created blacklist.
Detected spam emails can be blocked or we can just tag the email header or email subject with a custom string.
Juniper SRX Antispam Configuration Steps
The Configuration of SRX Antispam feature is very similar to antivirus that we have discussed in the previous section.
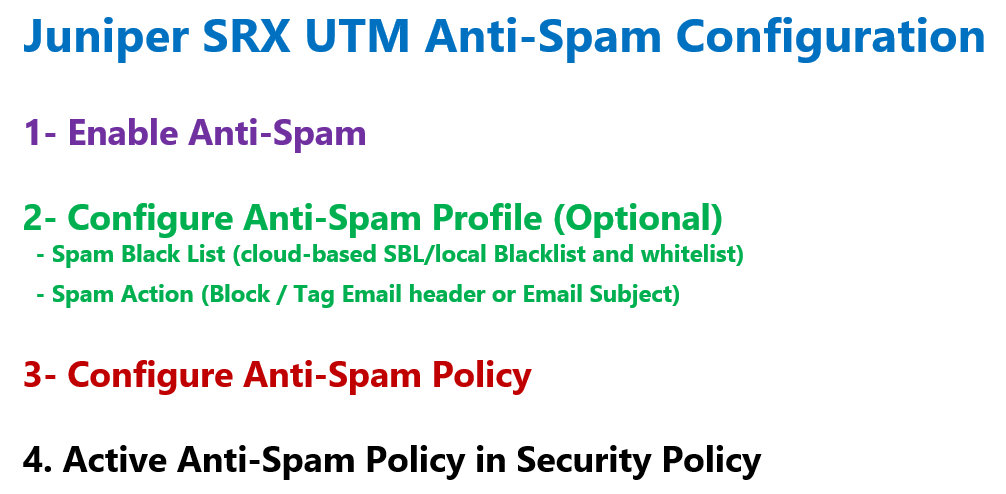
In the first step we have to enable the antispam feature.
In the second step, which is optional, we configure an antispam profile. This is optional, because by default there is a pre-configured profile in juniper SRX device.
In the profile we add any local or cloud-based spam blacklist database. We also configure the action to be taken for detected spam emails. As we have talked, the action can be to block spam emails or tag the emails.
Then we configure the antispam policy. In the antispam policy, we only call the desired anti-spam profile.
In the last step, antispam policy must be called in any desired security policy.
1- Enable Antispam in Juniper SRX Device
To configure juniper SRX antispam feature, we start we enabling the anti-spam feature in the device.
This feature require a license. I use 30 days trial license just to show you how to configure it.
With the command “show system license”, you can make sure that the antispam license is already activated in the device.
rayka@vSRX1# run show system license
License usage:
                                 Licenses     Licenses    Licenses    Expiry
  Feature name                       used    installed      needed
  anti_spam_key_sbl                     0            1           0    30 days
  idp-sig                               0            1           0    30 days
  ...
Then with the command “set security utm default-configuration anti-spam type ?” we have the option to enable cloud-based Sophos antispam feature or to disable the feature.
rayka@vSRX1# set security utm default-configuration anti-spam type ?
Possible completions:
  sbl                  Anti-spam sophos sbl
  anti-spam-none
[edit]
rayka@vSRX1# set security utm default-configuration anti-spam type sbl

[edit]
rayka@vSRX1#
2- Enable Juniper SRX Antispam Profile
Then we can optionally configure an antispam profile. In the profile, we can enable multiple spam detection database, which can be Sophos server in the cloud or the local whitelist and blacklist, which can be created locally.
With the command “set security utm feature-profile anti-spam sbl profile ?”, first we choose a name for profile. Here I choose the name ANTISPAMPROFILE.
Then with the option “sbl-default-server”, we enable cloud based blacklist database as the first option.
[edit]
rayka@vSRX1# set security utm feature-profile anti-spam sbl profile ANTISPAMPROFILE ?
Possible completions:
  <[Enter]>            Execute this command
  address-blacklist    Anti-spam blacklist
  address-whitelist    Anti-spam whitelist
+ apply-groups         Groups from which to inherit configuration data
+ apply-groups-except  Don't inherit configuration data from these groups
  custom-tag-string    Custom tag string
  no-sbl-default-server  Don't default SBL server
  sbl-default-server   Default SBL server
  spam-action          Anti-spam actions
  |                    Pipe through a command
[edit]
rayka@vSRX1# set security utm feature-profile anti-spam sbl profile ANTISPAMPROFILE sbl-default-server
If you want to add also local database, first, you have to create local blacklist or whitelist database based on IP address, domain name and URL patterns which also support wildcards.
Here I have created a blacklist and a white database, based on different options, just to show you the possibilities.
Then we add these databases to the profile. These databases are added to the cloud based Sophos database that we have already configured.
set security utm custom-objects url-pattern BLACKLIST value 1.2.3.4
set security utm custom-objects url-pattern BLACKLIST value example.net
set security utm custom-objects url-pattern BLACKLIST value "[email protected]"
set security utm custom-objects url-pattern BLACKLIST value http://*.example.com

set security utm custom-objects url-pattern WHITELIST value 5.6.7.8

set security utm feature-profile anti-spam sbl profile ANTISPAMPROFILE address-whitelist WHITELIST
set security utm feature-profile anti-spam sbl profile ANTISPAMPROFILE address-blacklist BLACKLIST
In the antispam profile we can also configure the actions to be taken against spam emails.
With choosing the parameter “spam-action” in the command “set security utm feature-profile anti-spam sbl profile ANTISPAMPROFILE”, we have the options to block spam emails or tag the email with a custom string.
Here I have shown two examples just to show the both options.
[edit]
rayka@vSRX1# set security utm feature-profile anti-spam sbl profile ANTISPAMPROFILE spam-action ?
Possible completions:
  block                Block e-mail
  tag-header           Tag header of e-mail
  tag-subject          Tag subject of e-mail
[edit]

set security utm feature-profile anti-spam sbl profile ANTISPAMPROFILE spam-action block
set security utm feature-profile anti-spam sbl profile ANTISPAMPROFILE  custom-tag-string ***SPAM***>
3- Configure Juniper SRX Antispam Policy
In the third step, we configure antispam policy.
There are not a lot to configure in the policy. We just configure the default or one of the manually configured antispam profile which must be used in antispam processing.
[edit]
rayka@vSRX1# set security utm utm-policy ANTISPAM_POLICY1 anti-spam smtp-profile ?
Possible completions:
  <smtp-profile>       Anti-spam profile
  ANTISPAMPROFILE      [security utm feature-profile anti-spam sbl profile]
  junos-as-defaults    [security utm feature-profile anti-spam sbl profile]
[edit]
rayka@vSRX1# set security utm utm-policy ANTISPAM_POLICY1 anti-spam smtp-profile ANTISPAMPROFILE
Here I create a policy with the name of ANTISPAM_POLICY1. There are two options for the profile.
Junos antispam default profile, “junos-as-defaults” or what we have just configured, “ANTISPAMPROFILE”.
In our example, I choose the configured “ANTISPAMPROFILE” profile.
4- Enable Juniper SRX Antispam Policy in Security Policy
In the last step, we enable the configured antispam policy in existing security policy.
set security policies from-zone untrust to-zone trust policy default-permit match source-address any
set security policies from-zone untrust to-zone trust policy default-permit match destination-address any
set security policies from-zone untrust to-zone trust policy default-permit match application any
set security policies from-zone untrust to-zone trust policy default-permit then permit

[edit]
rayka@vSRX1# set security policies from-zone untrust to-zone trust policy default-permit then permit application-services utm-policy ANTISPAM_POLICY1
From untrust zone to trust zone, there is a default default-permit rule that we configured in the previous sections.
At the end of “then” command, we add ANTISPAM_POLICY1 in default-permit security policy.
After committing, we can check it with the command, “show configuration security policies from-zone untrust to-zone trust policy default-permit | display set”
[edit]
rayka@vSRX1# run show configuration security policies from-zone untrust to-zone trust policy default-permit | display set
set security policies from-zone untrust to-zone trust policy default-permit match source-address any
set security policies from-zone untrust to-zone trust policy default-permit match destination-address any
set security policies from-zone untrust to-zone trust policy default-permit match application any
set security policies from-zone untrust to-zone trust policy default-permit then permit application-services utm-policy ANTISPAM_POLICY1
These are all the configuration that we need to configure to start using antispam feature in juniper SRX device.
Monitoring and Troubleshooting Antispam Configuration
To make sure that antispam feature is correctly configured and it is inspecting incoming and outgoing emails, there are two main monitoring commands.
With the command “show security utm anti-spam status”, you can make sure that antispam feature is activated and which spam black database is used.
rayka@vSRX1# run show security utm anti-spam status
 UTM anti-spam status:

    SBL Whitelist Server:
    SBL Blacklist Server:
        msgsecurity.juniper.net

    DNS Server:
        Primary  :          8.8.8.8
        Secondary:          0.0.0.0
        Ternary  :          0.0.0.0
And with the command “show security utm anti-spam statistics”, you can follow how many connection are inspected and how many spams are detected.
[edit]
rayka@vSRX1# run show security utm anti-spam statistics
 UTM Anti Spam statistics:

Total connections:     0
Denied connections:    0
Total greetings:       0
Denied greetings:      0
Total e-mail scanned:  0
White list hit:        0
Black list hit:        0
Spam total:            0
Spam tagged:           0
Spam dropped:          0
DNS errors:            0
Timeout errors:        0
Return errors:         0
Invalid parameter errors: 0

[edit]
rayka@vSRX1#