


Cisco NSO web GUI is another method for accessing and managing NSO.
In this section, we introduce Cisco NSO GUI components, especially those that we have discussed beforehand. we manage network devices through NSO GUI, we show and change the configuration, and finally we learn how to commit and roll back the configuration changes through NSO Web GUI.
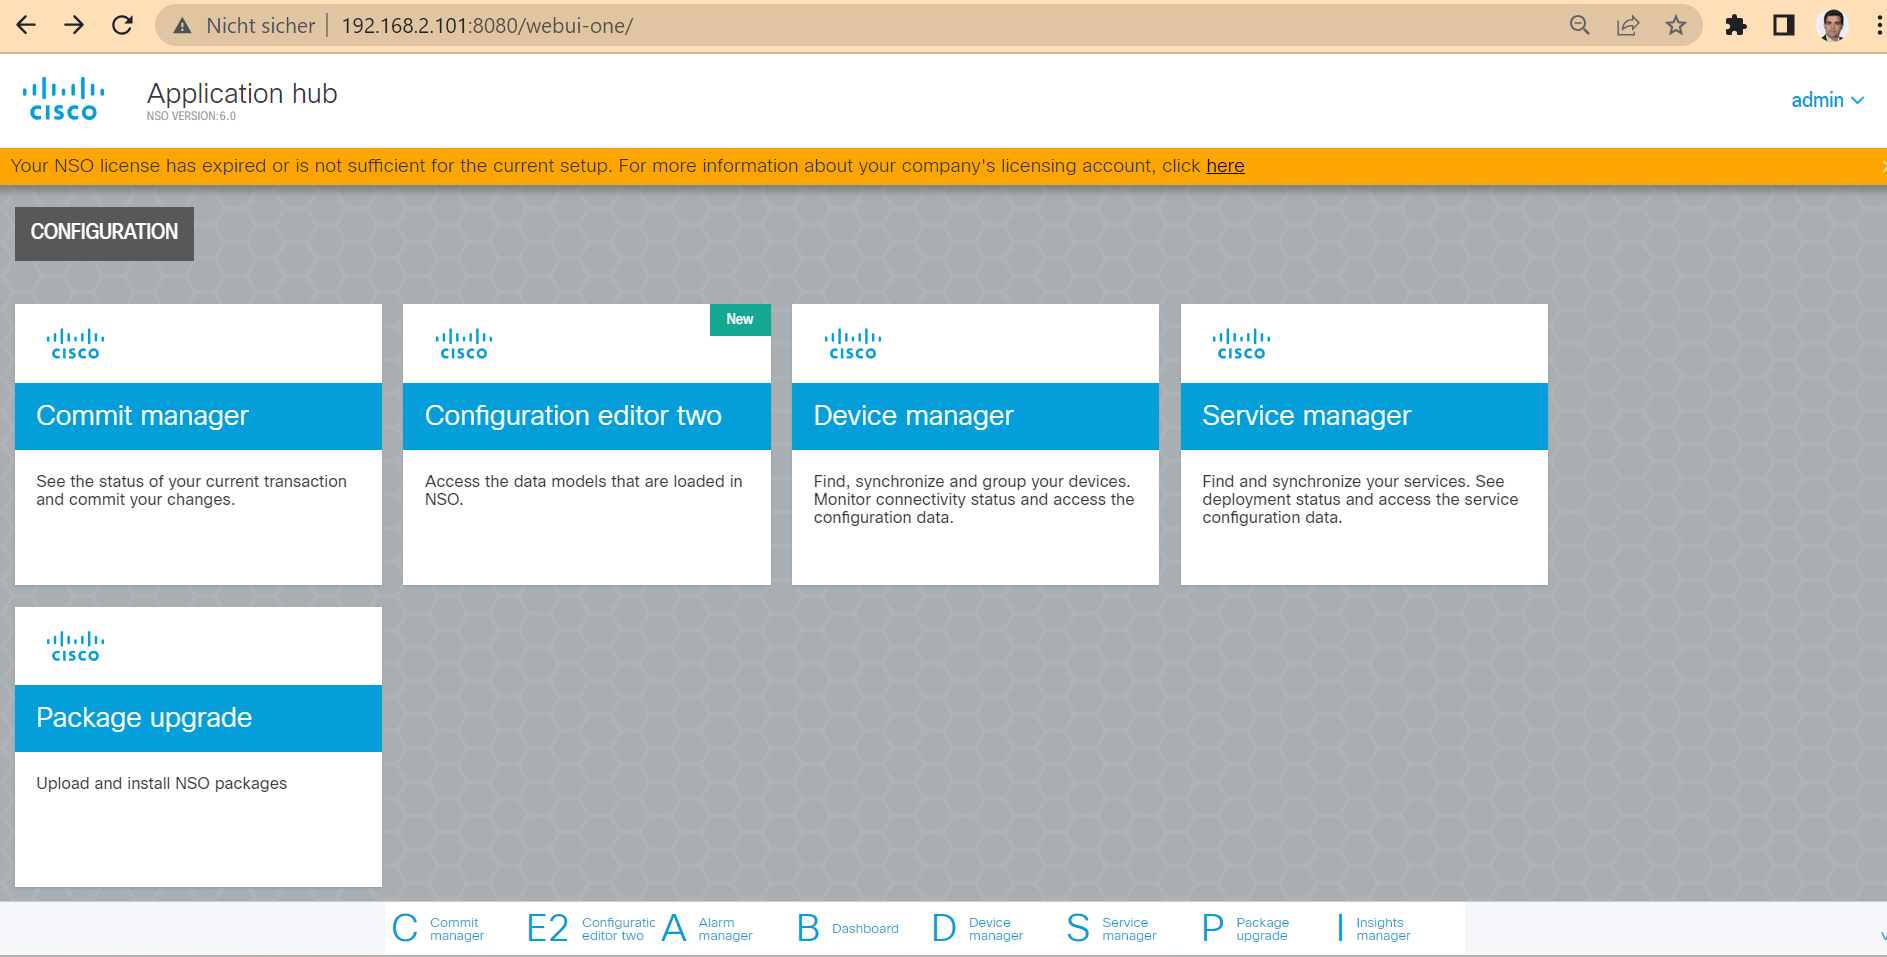
When you install cisco NSO, you can connect to the software also through Web GUI with default port 8080 and the username and password both admin.
There are a few important components on the home page, which you can return to at any time by clicking the Cisco icon.
All these components are also available in the bottom section of the web GUI on all other pages.
We won’t discuss all of the components existing in this section, but we’ll review some of them that we’ve already discussed through the CLI interface.
In the beginning, just as a review:
Device manager:
Through the Device Manager section, we can manage network devices, including checking connectivity, connecting NSO to network devices and finally comparing and synchronizing the configuration between NSO and network devices.
Commit Manager:
Through commit manager, you can apply and also rollback the configuration changes.
Alarm Manager:
With the alarm manager, you can see the details of any probable errors and alarms.
Configuration Editor / Configuration Editor 2:
Through the configuration editor we can display and also change the configuration of network devices. There are two versions of configuration editor. The old one and the new one which is known as “configuration editor 2”.
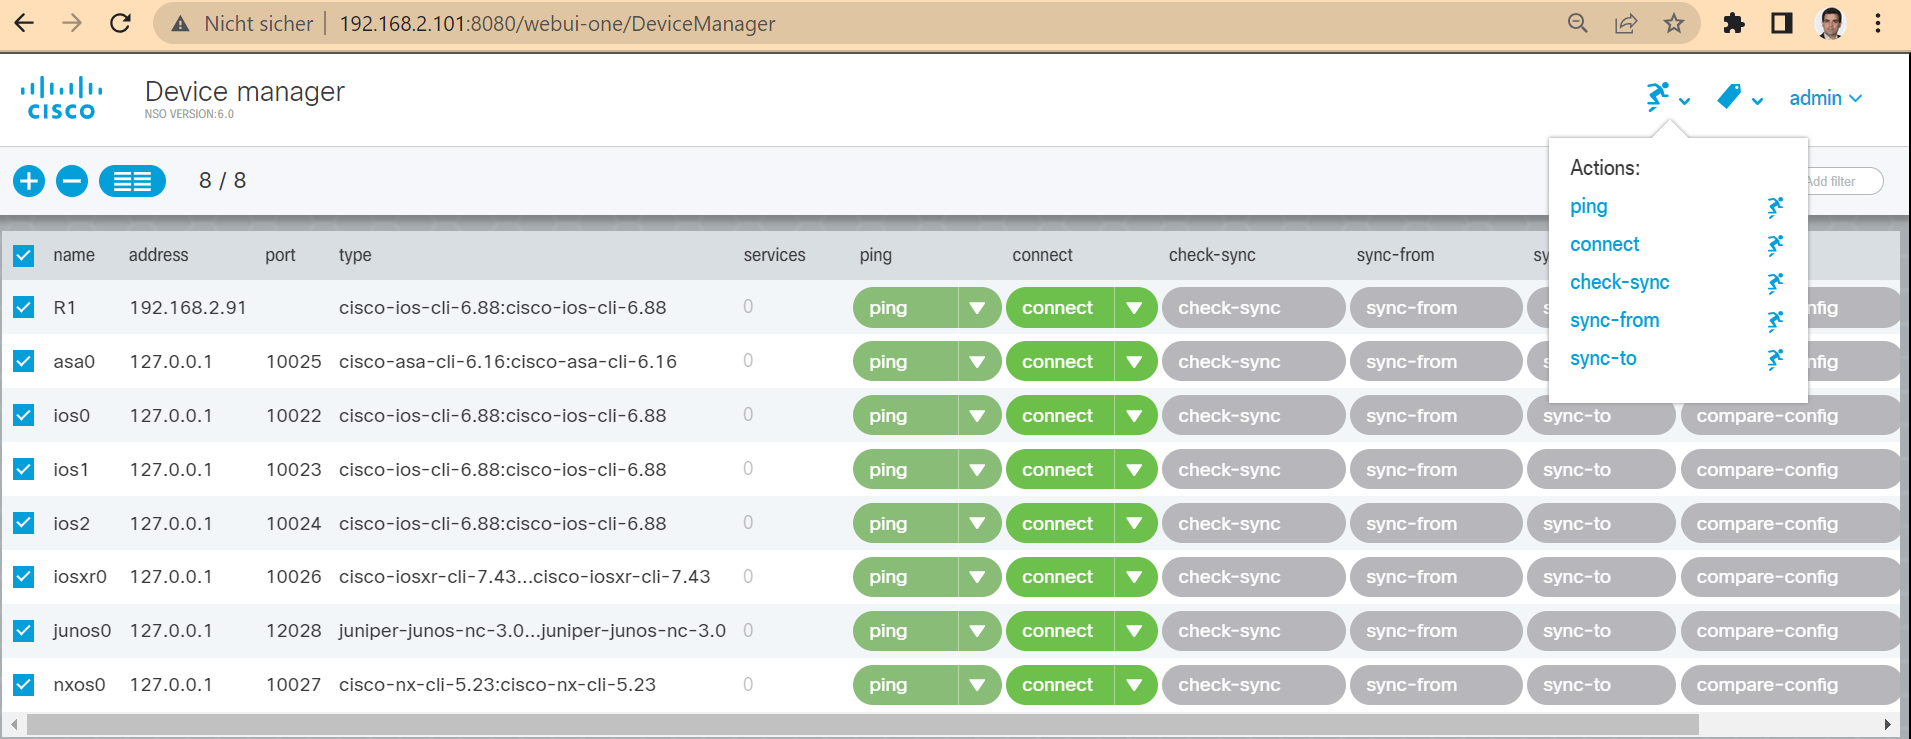
To better understand how it works, let’s start with Device Manager.
In device manager section, we see list of all devices. With “ping” we can make sure that devices are available. With “connect”, we verify the connectivity from NSO to devices.
To take action against more than one device at a time, you can select them and then select the desired action from the action menu.
With “check-sync” we check the configuration sync status between NSO and network devices.
Let’s configure a network device directly and then check the sync status again. It is expected to go out of the sync.
R1(config)#int loopback 102
R1(config-if)#ip address 102.102.102.102 255.255.255.255
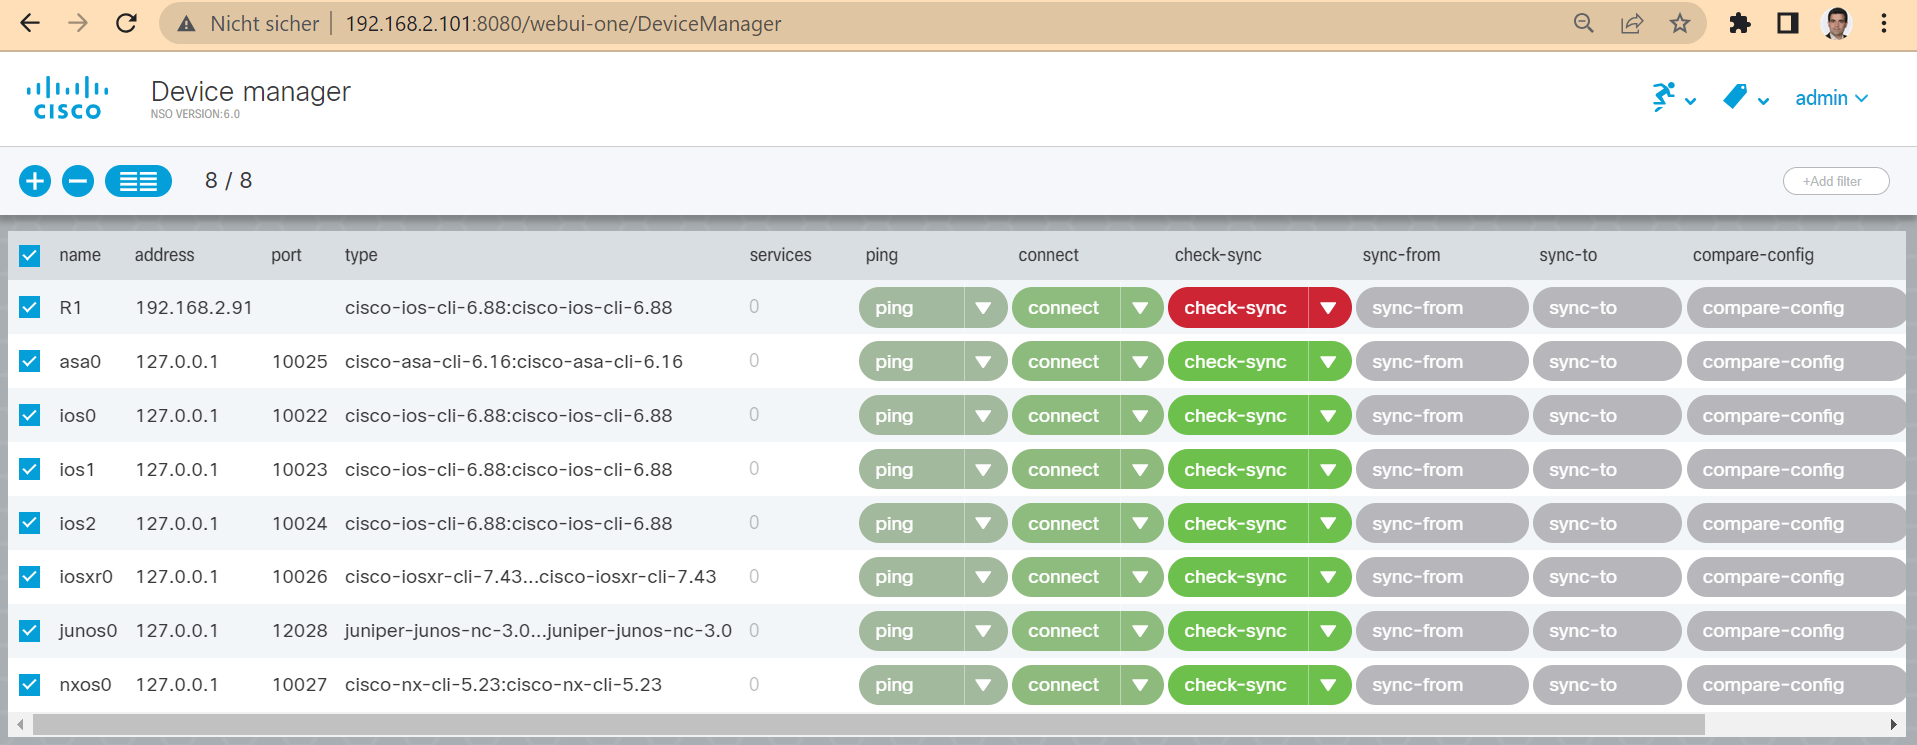
A new alarm related to sync error should be added in the Alarm Manager section.
In the tab, “operdata”, you can check the details of the alarm.
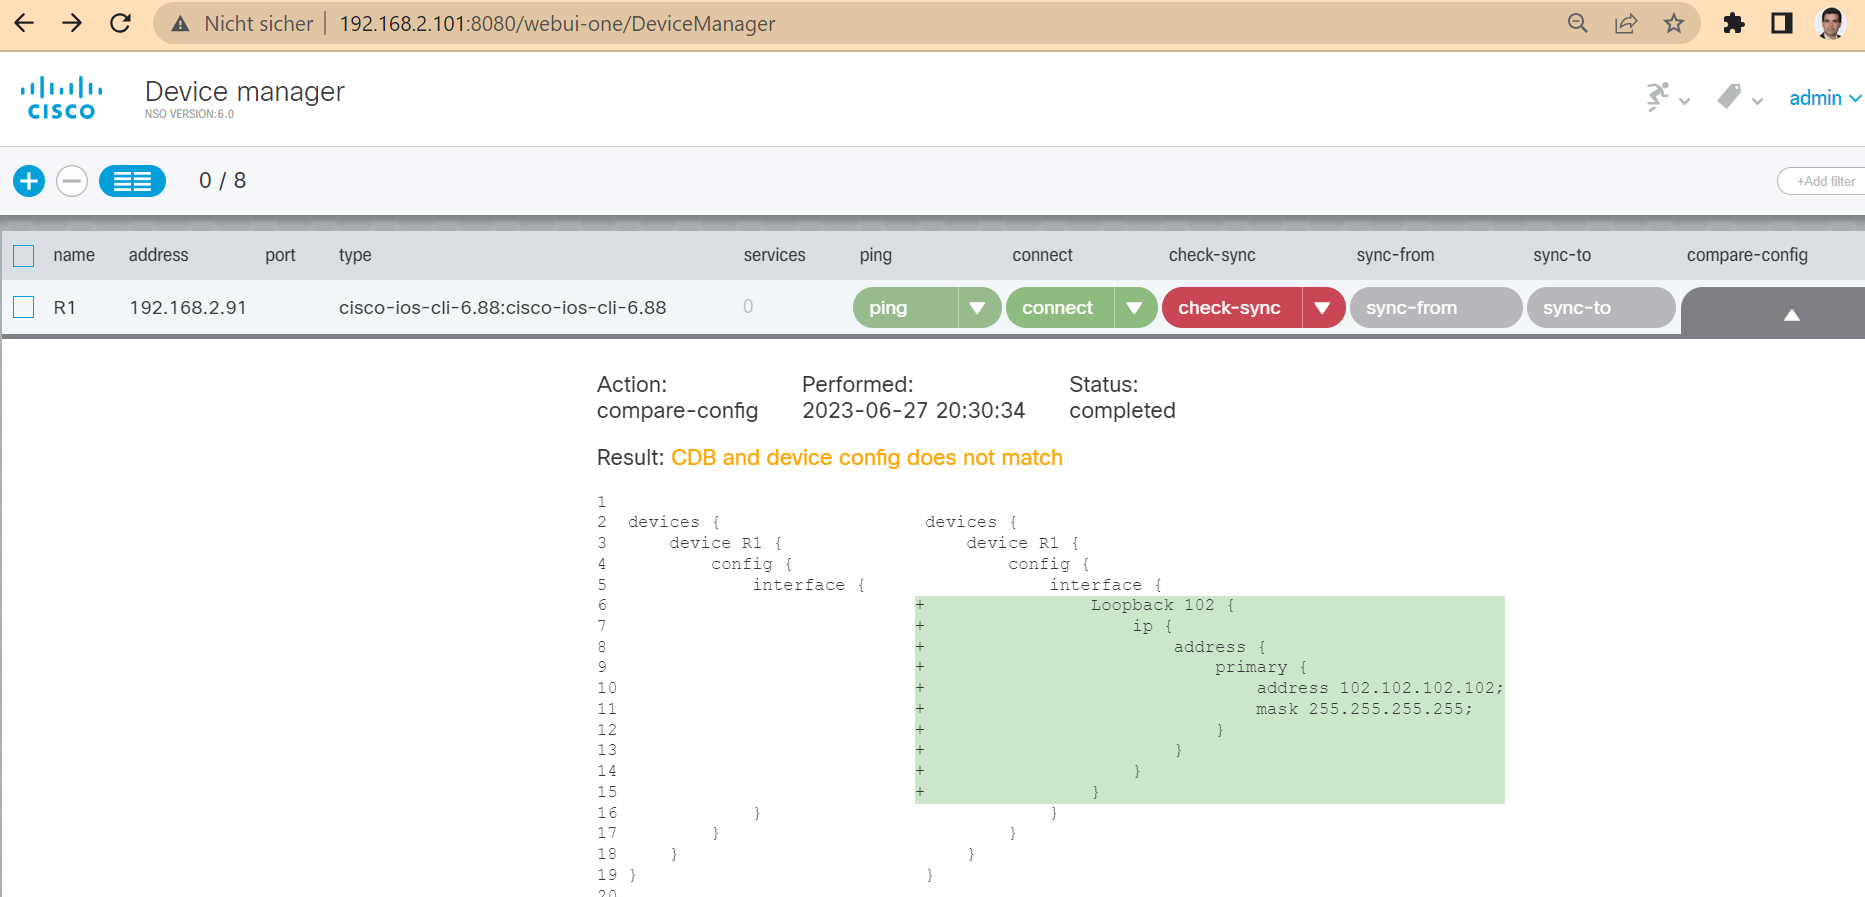
Then we can use “compare-config” feature in device manager to see what is exactly the difference between network device and NSO configuration.
Here, we see that interface loopback 102 configuration exist in the network device and it must be added in cisco NSO.
Now there are two options. “sync-from” to copy the configuration from network device to cisco NSO and “sync-to” to copy the configuration from cisco NSO to network devices.
The “sync-to” is used when you change the configuration temporarily for troubleshooting but the you want to revert the configuration of network devices to the state od cisco NSO.
For example, I use “sync-to” option, so that interface loopback 102 is deleted from the network device. Then we check again the sync status.
R1#show ip int brief
Interface              IP-Address      OK? Method Status                Protocol
GigabitEthernet1       192.168.2.91    YES NVRAM  up                    up
GigabitEthernet2       unassigned      YES NVRAM  administratively down down
GigabitEthernet3       unassigned      YES NVRAM  administratively down down
Loopback100            4.5.6.7         YES NVRAM  up                    up
R1#
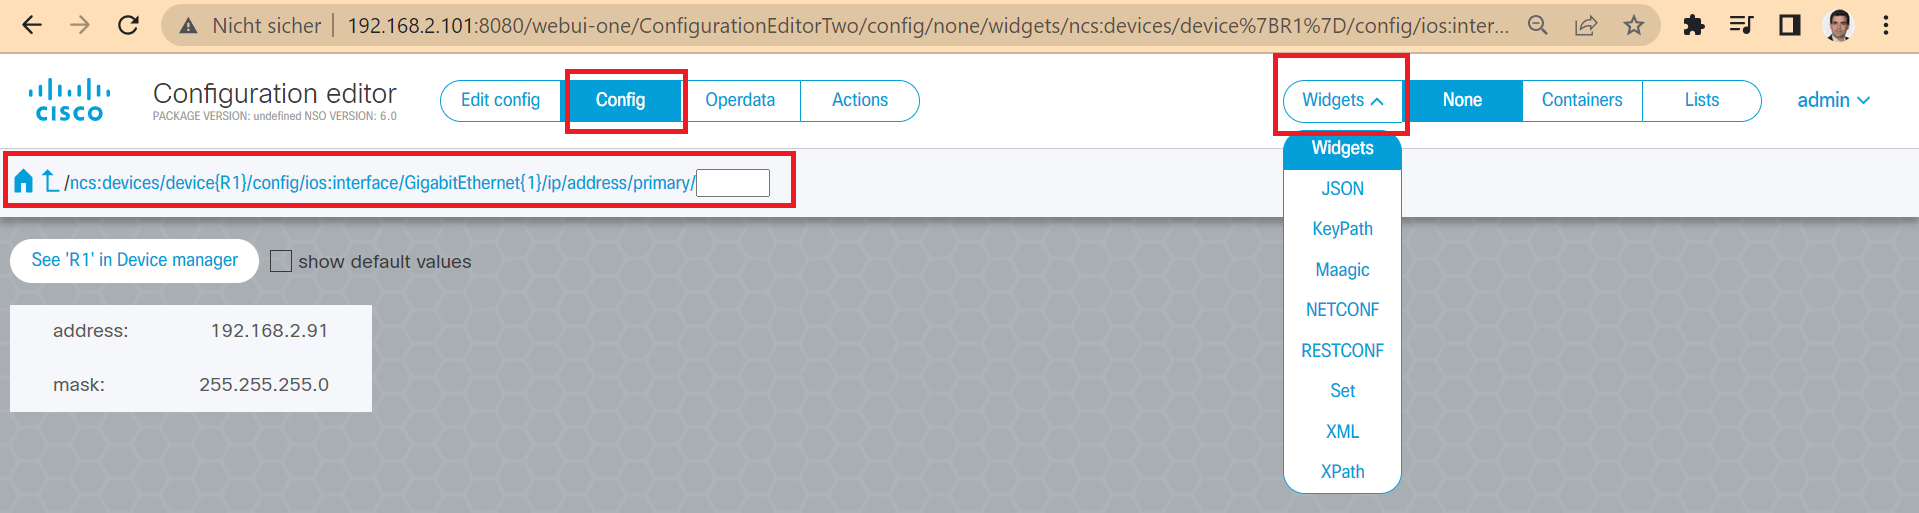
In the section “configuration editor” or the new version “configuration editor 2”, we can display or change the configuration.
Here choose the option “ncs:devices”, then desired device, R1 as example, then the option “config” and the interesting part of the configuration, like “ios:interface” and then go to find the IP address of the device.
The top left also shows the path to get to each part of the configuration.
ncs:devices/device{R1}/config/ios:interface/GigabitEthernet{1}/ip/address/primary/
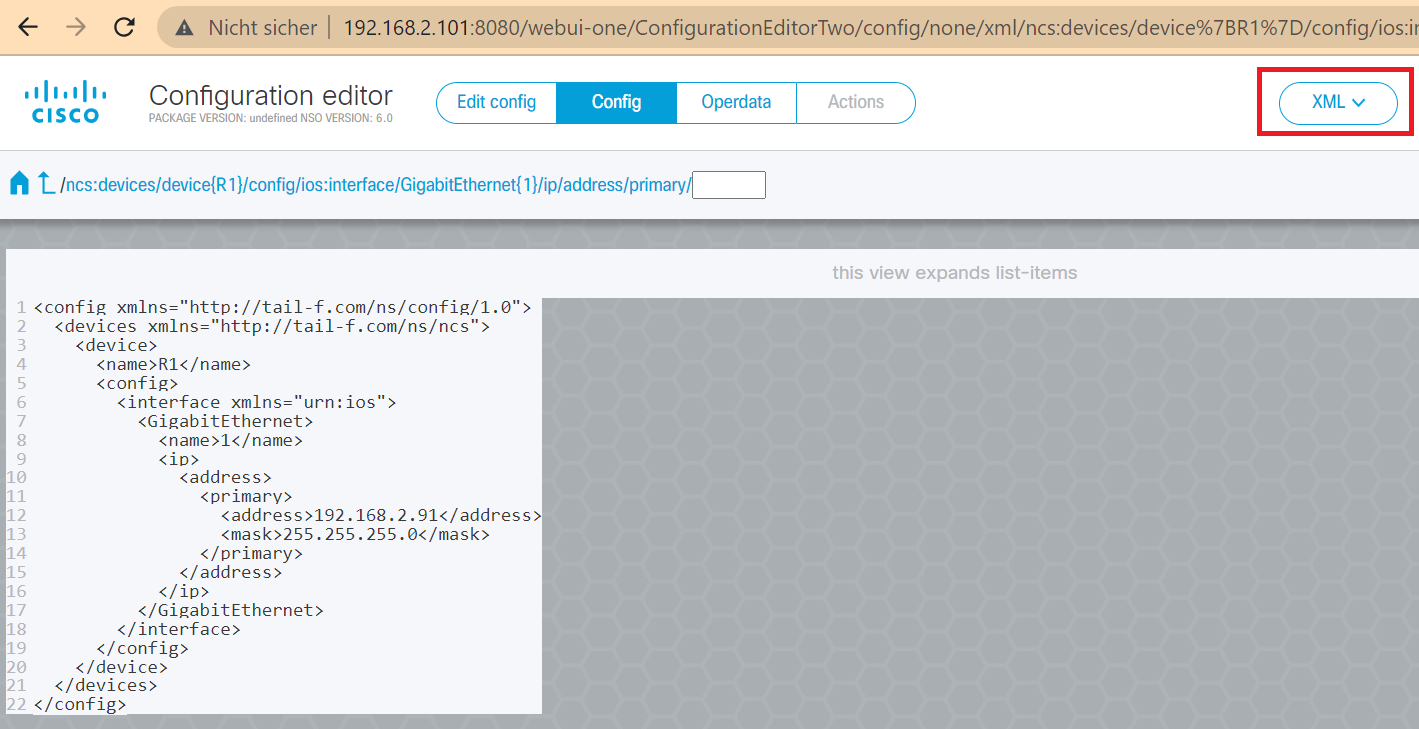
Select “Widgest” on the top right to view the configuration in various output formats such as XML, JSON, NETCONF and RESTCONF.
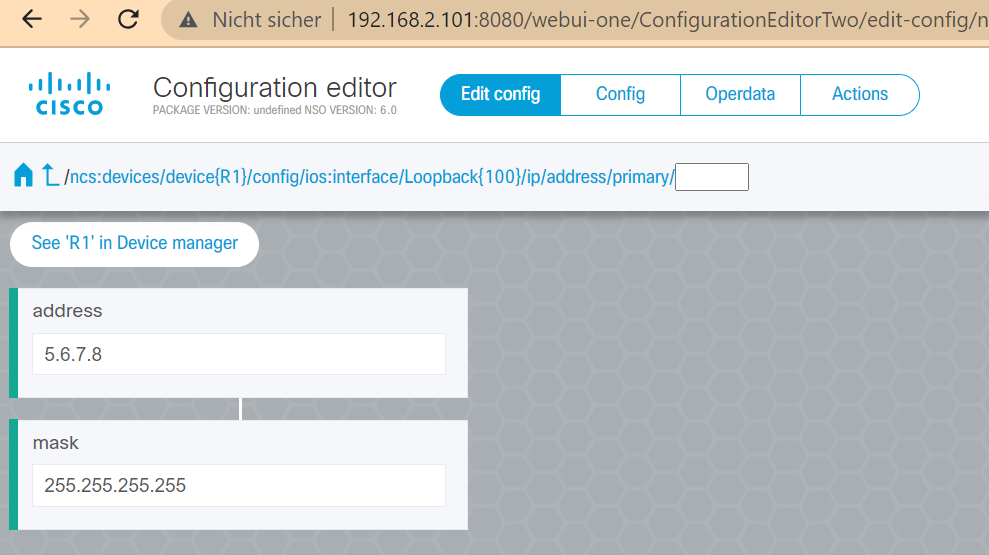
To change the configuration, we choose the “Edit Config” option in “Configuration Editor”. Then we are allowed to change the configuration.
As an example, we change the IP address of loopback interface.
when we change the configuration, that section will change color to green, which means the configuration has changed but needs to be committed.
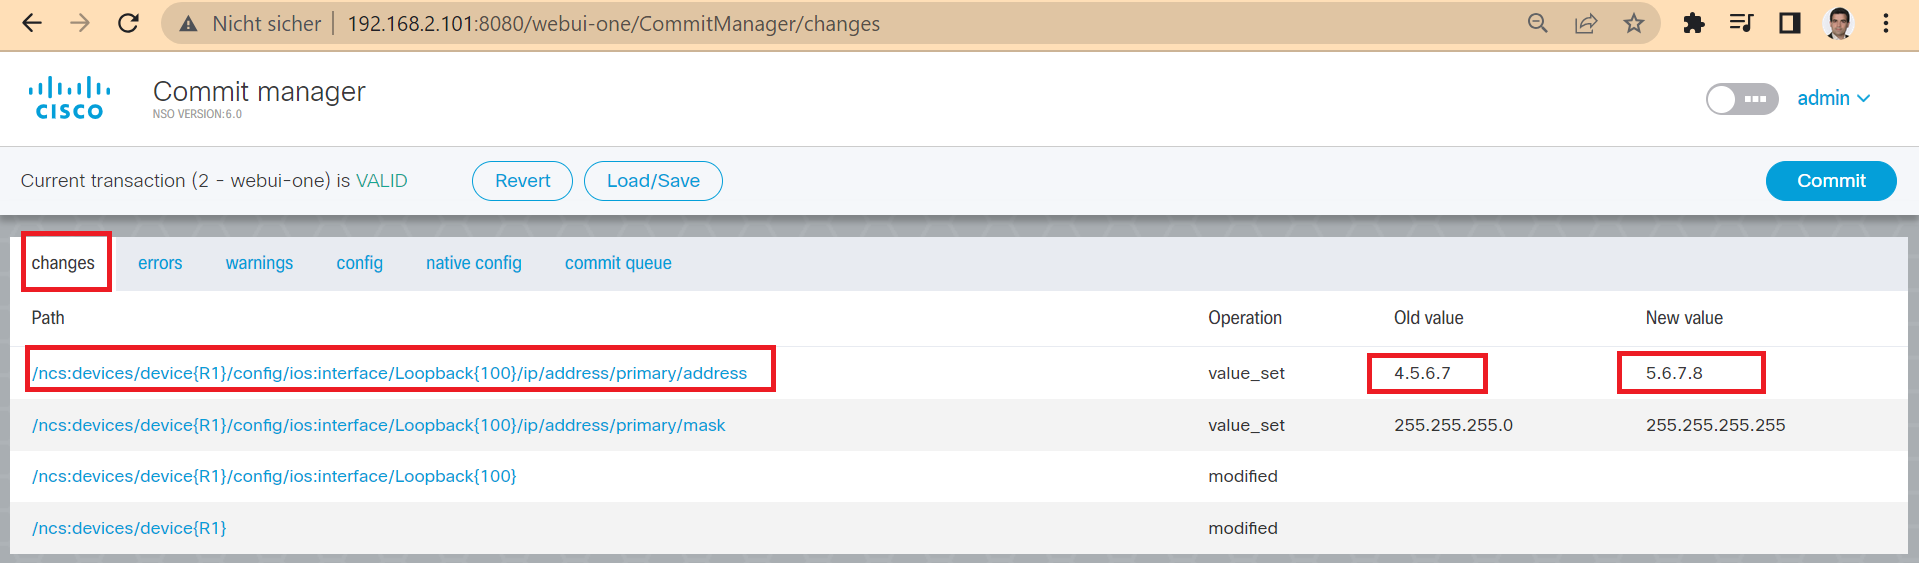
To apply the configuration, we go to the “commit manager” section. In the tab, “path”, you see the path in yang data model in which the configuration has changed. You see also the old value and the new value.
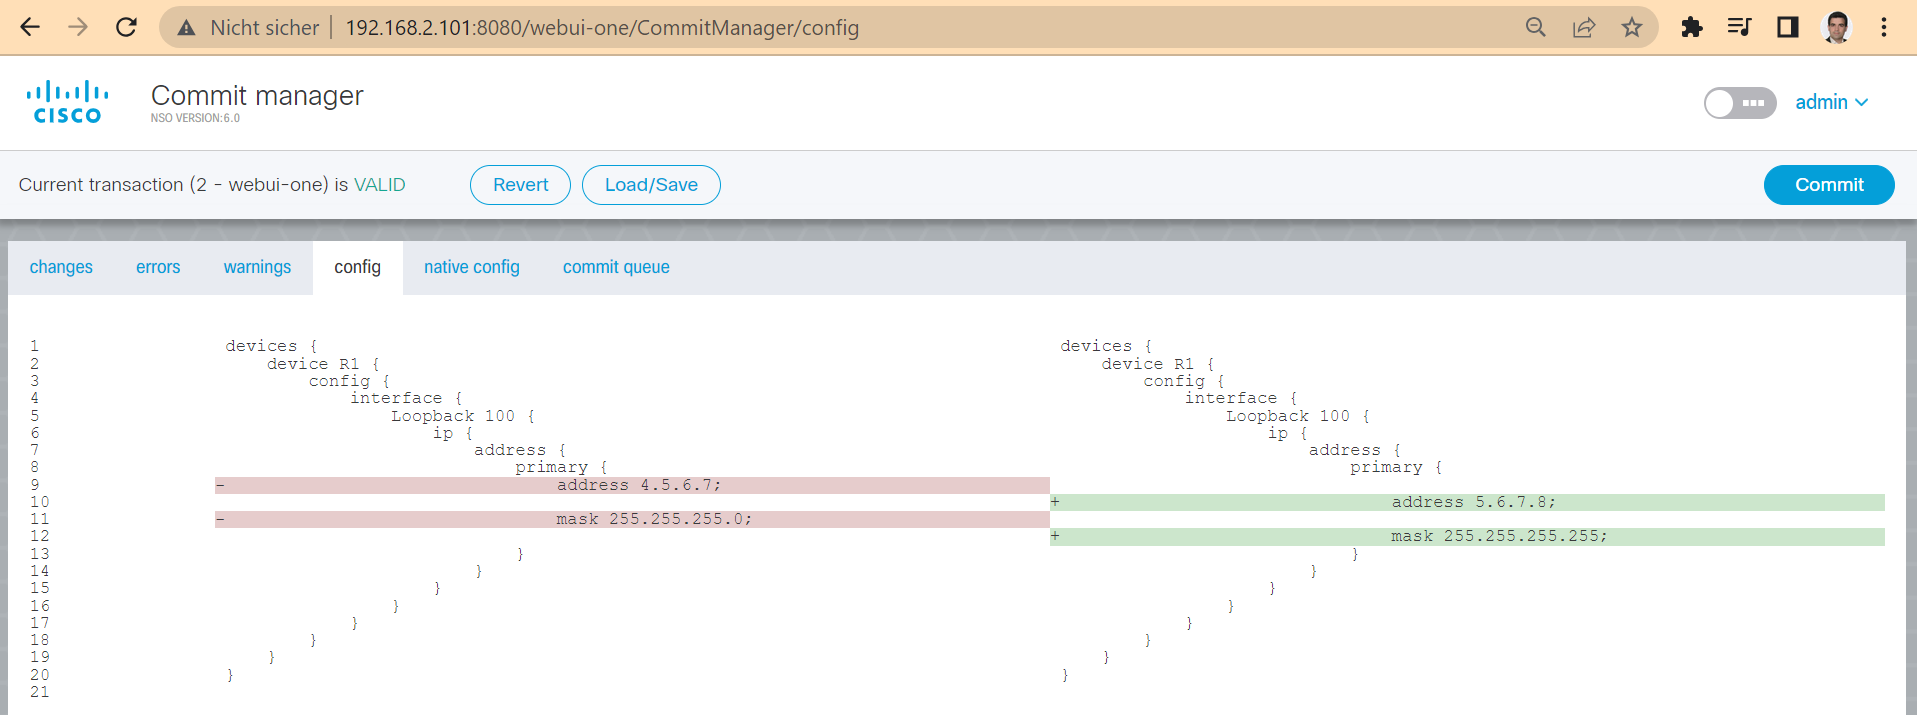
In the “config” tab you can see the removing configuration in red color and the new configuration in green color.
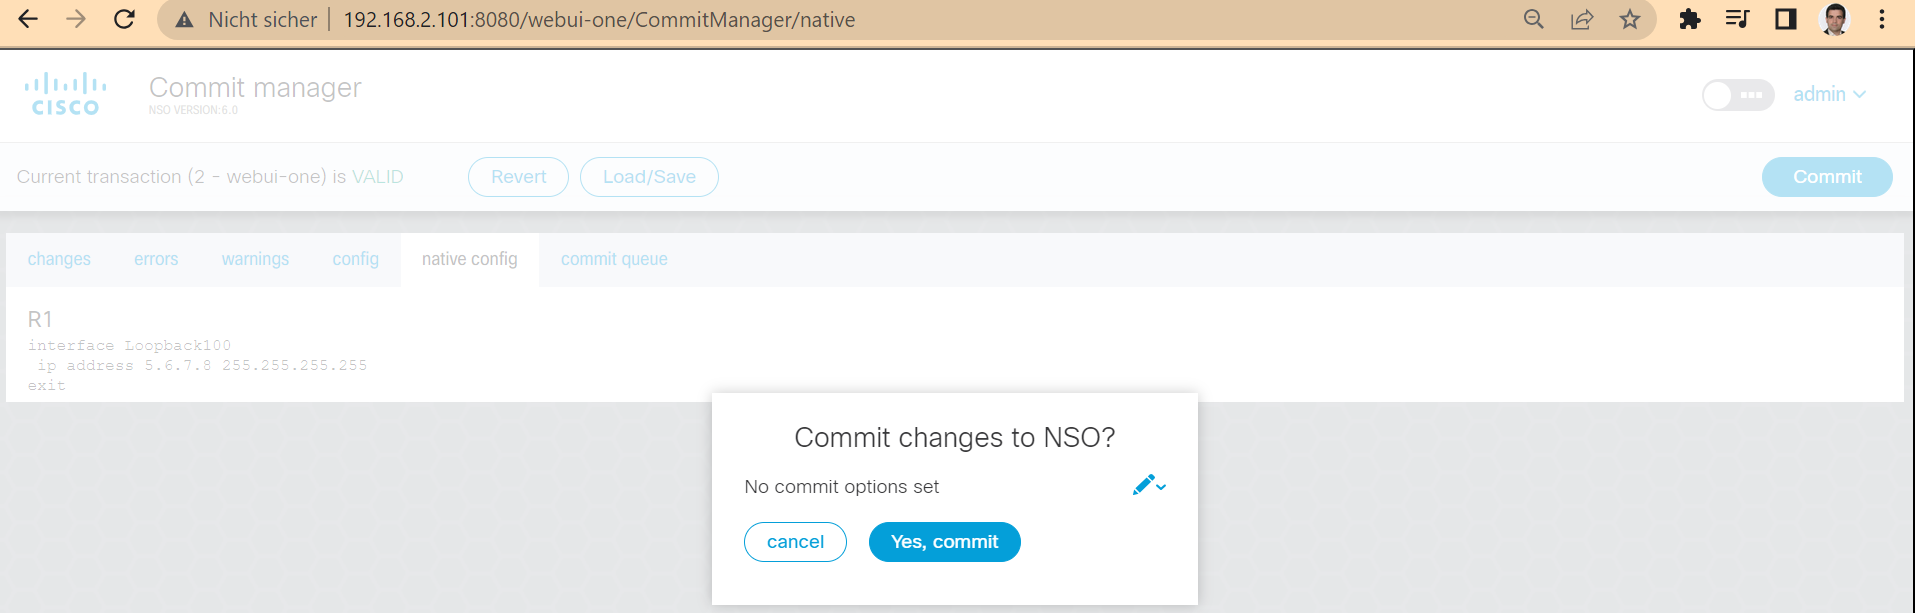
And in the “native config” tab, you can see the actual configuration changes in CLI format.
Then with pressing the “commit” button, you will apply the new changes.
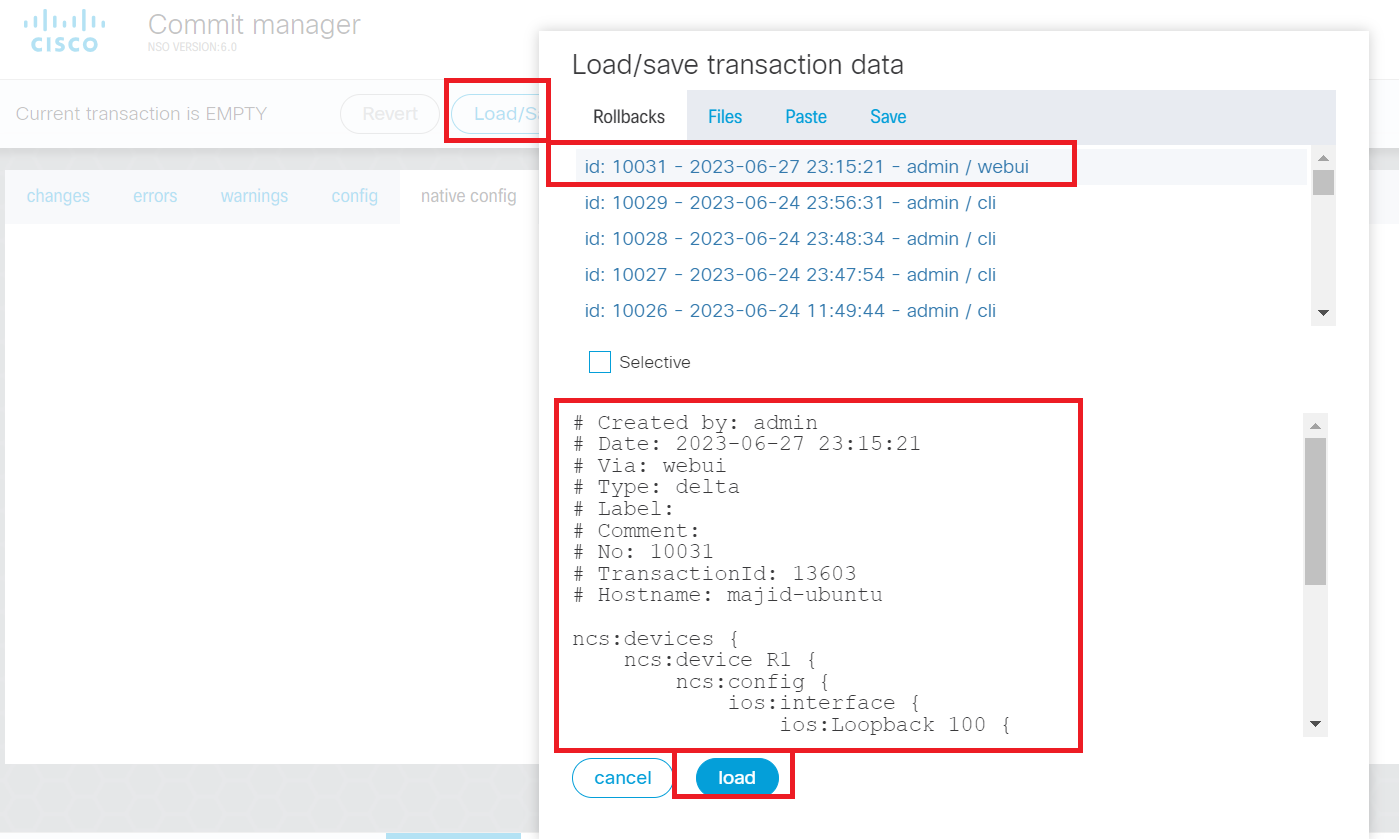
In “commit manager” section, you have also the capability to rollback the configuration.
Click auf “Load/Save” button. Then you can choose the rollback number to see the changes. There is also the option “Selective” that we talked about in the previous section.
With pressing the “load” button, you can rollback the configuration.
The new changes must also be applied using the commit command to complete the rollback process.
What we learned in this section are some of the important sections of the NSO web GUI.
But how to apply a configuration template to multiple devices or how to manage service orchestration using Cisco NSO are the concepts we will learn in the following sections.