Cisco SD-WAN Route Policy is a tool for route manipulation. route filtering, changing metrics or metric type, adding community, and changing AS-Path are some of the manipulations that we can apply while receiving or advertising routes.
Cisco SD-WAN Policy Concept
We use policies to do many tasks in SD-WAN infrastructure. there are two types of policies, localized policy that are applied directly to WAN routers and centralized policy that are applied to vSmart controller.
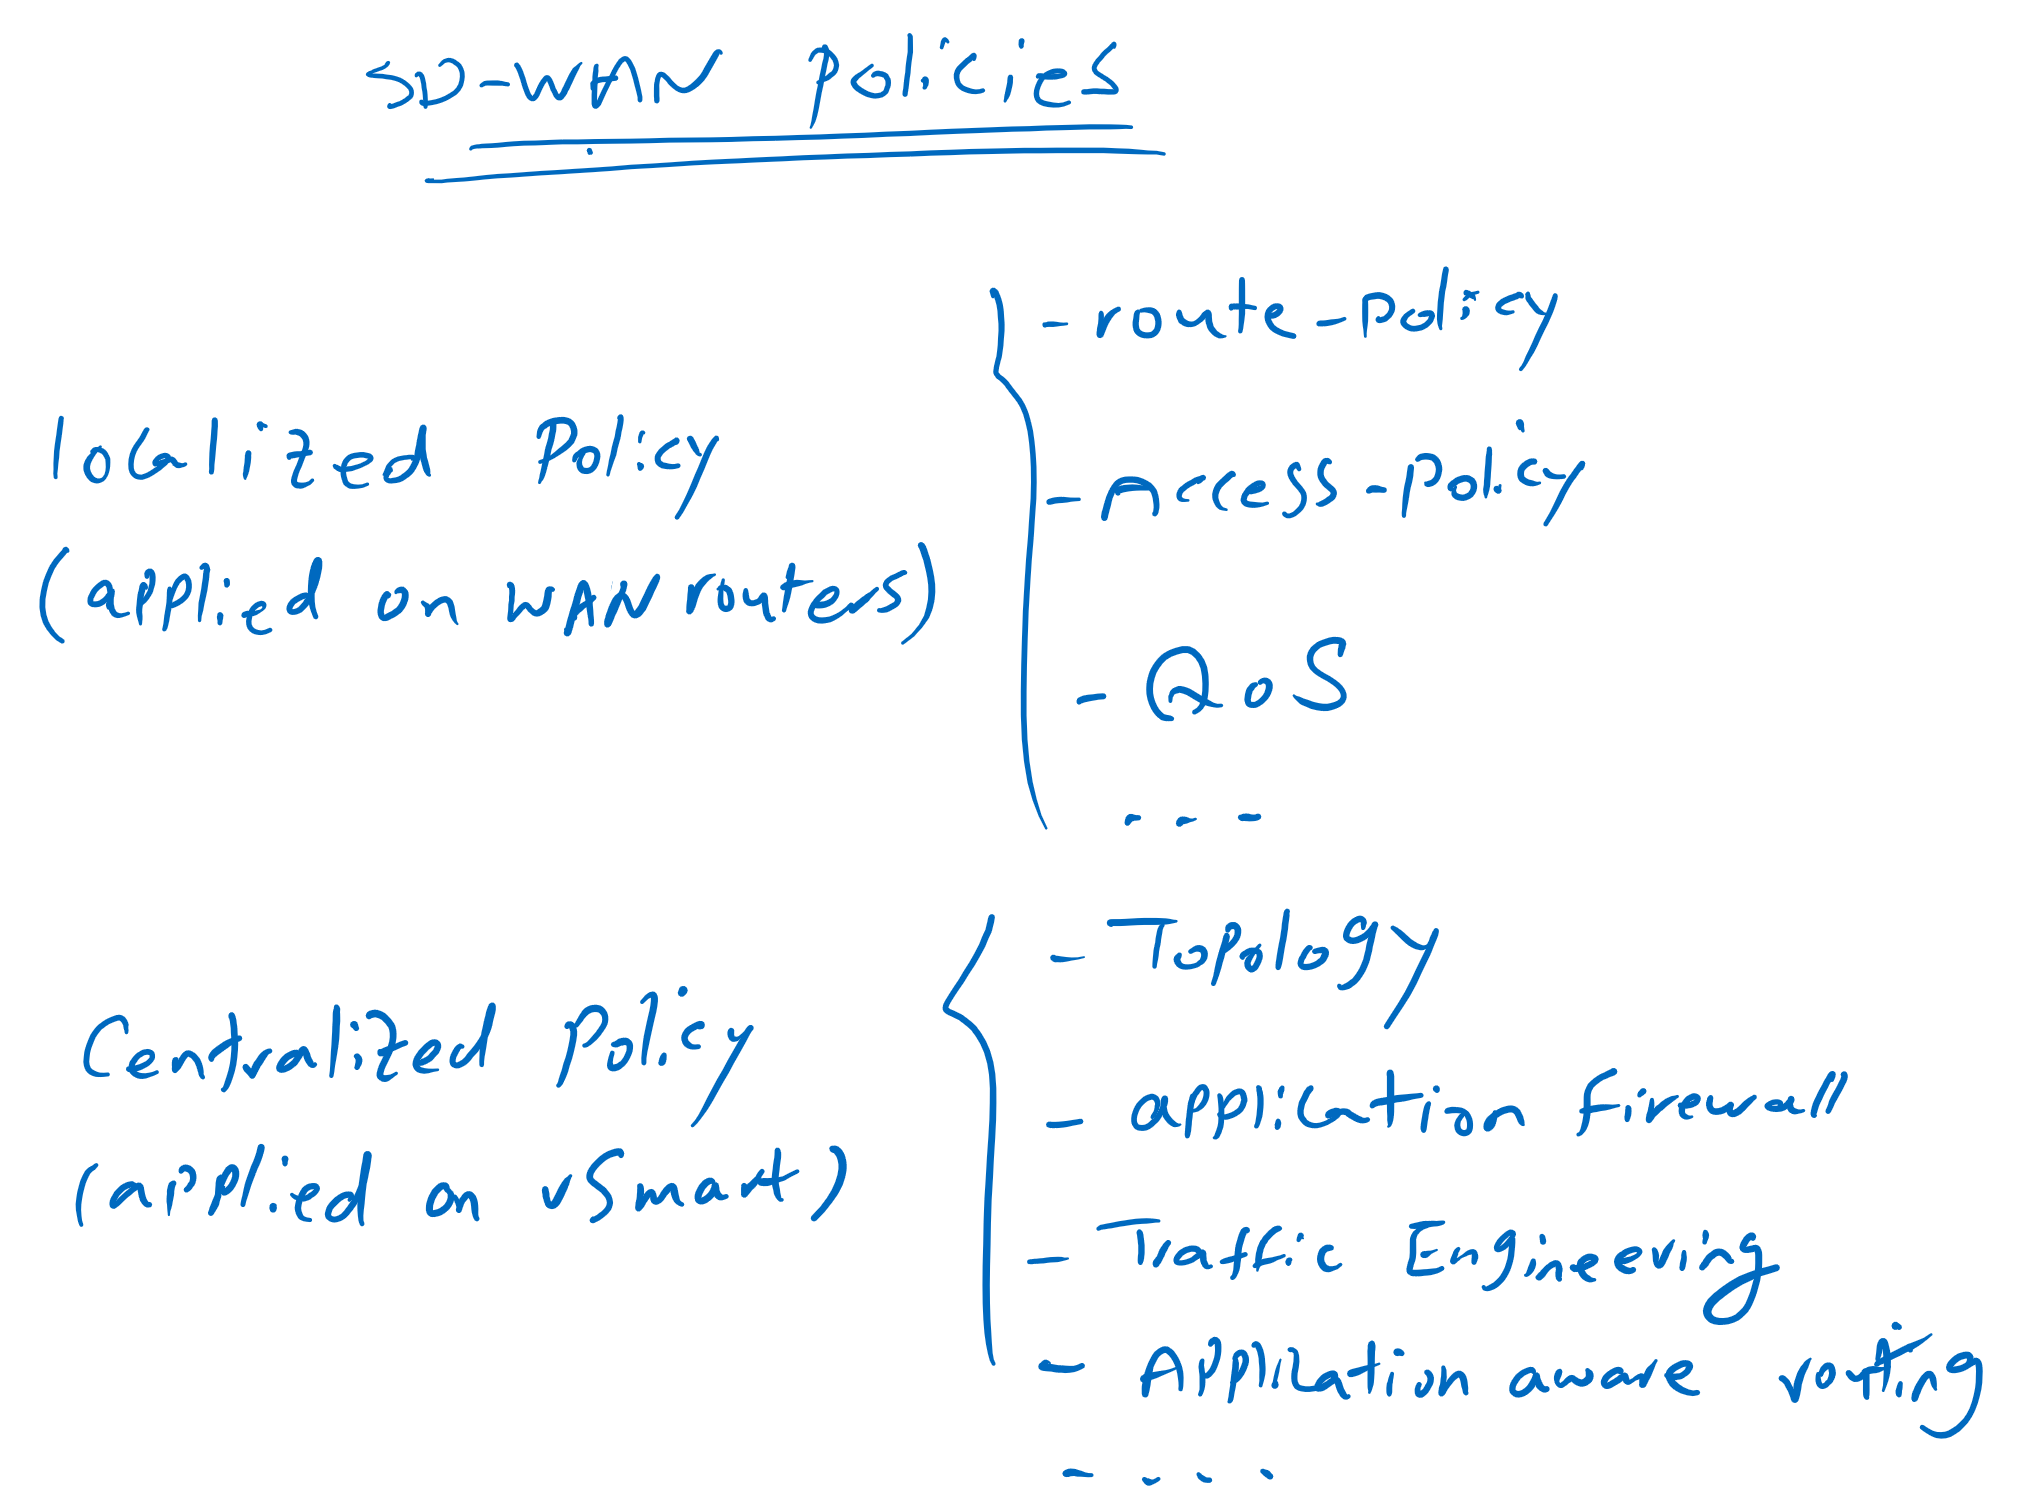
With localized policy, we can do many tasks. Configuring route policy to manipulate or filter routes, configure access list to filter data traffic, and QoS policies to guarantee bandwidth and priority for some data traffics are some of the most important policies that we can configure through localized policy.
With centralized policy, we can also configure many important tasks. How are branches and headquarter connected to each another? Full mesh, hub and spoke, or custom topology. this is implemented through a centralized policy. Traffic filtering at application layer, traffic engineering to route traffic through a specific path, and application-base routing are some of the policies that can be configured through centralized policy.
This section is dedicated to the implementation of route policy. With route policy we can filter routes, we can change metric or metric type of the routes, we can change AS-path and community of BGP routes and many other manipulations either when we receive or advertise routes. Matching of the routes can be configured based on many parameters like prefixes, as-path and community.

route policy can be applied to a specific neighbor or a specific Interface or even in route redistribution between routing protocols.
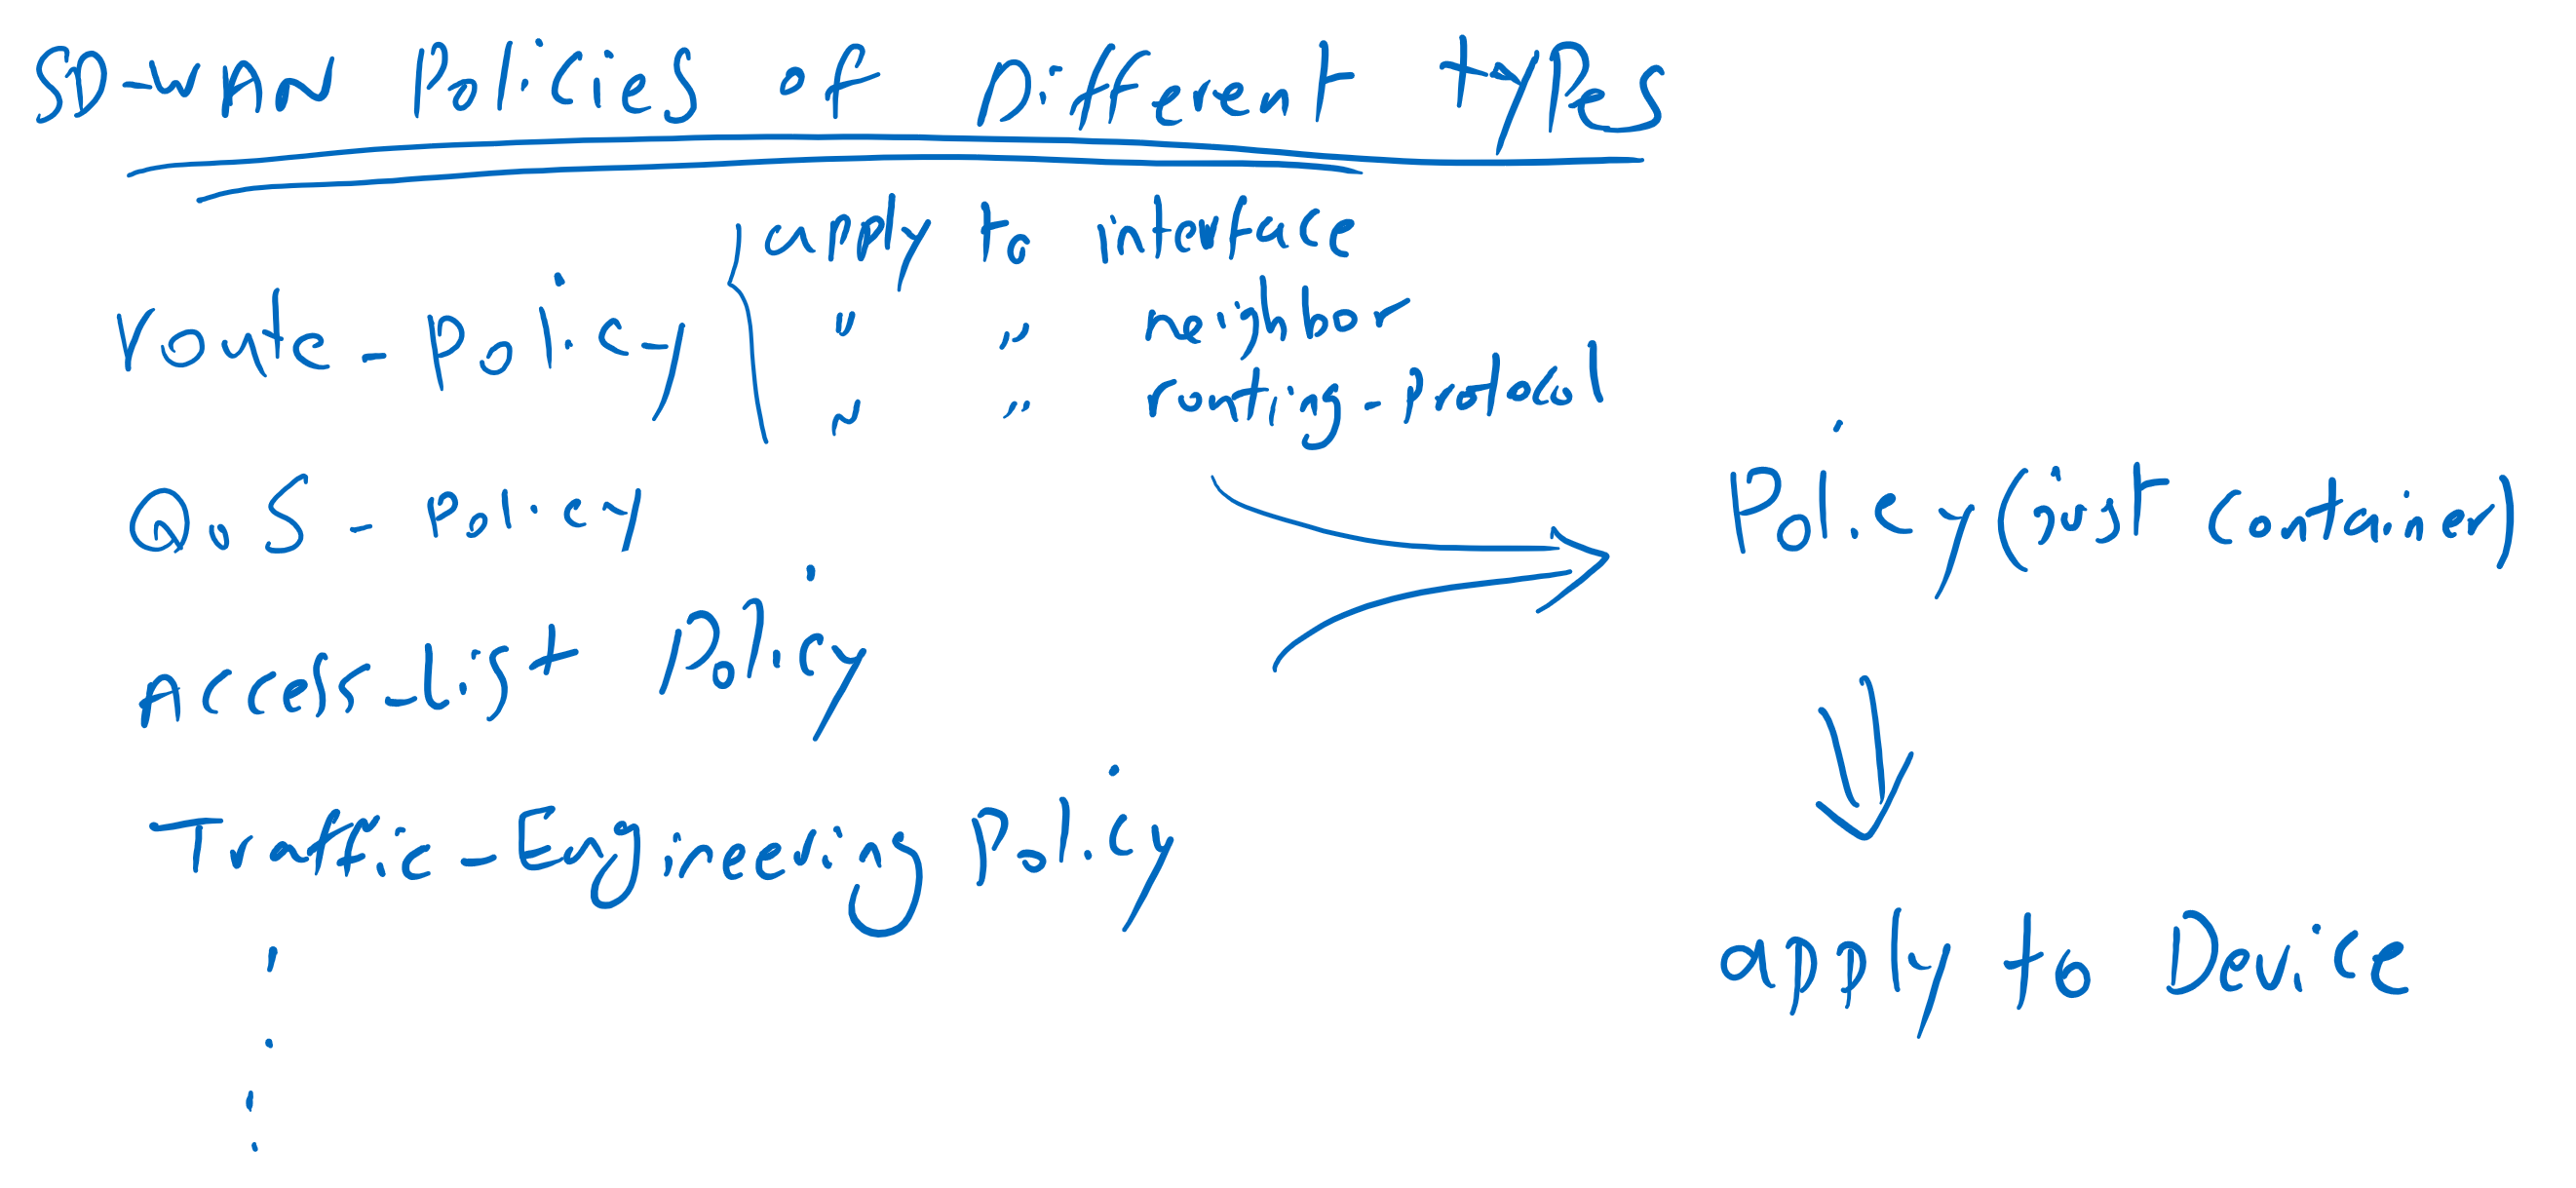
Route policy is not the only policy that can be applied to a device. we have many other types of policies. many policies of the same or different types can be applied to a particular device. All the policies that must be applied to a specific or group of devices are hold inside a new policy that is just a container to hold other real policies. I myself prefer to call it “container policy”. container policy itself does not contain any commands. Container policy is the only policy that can applied to a device itself through device template.
Route policy is the topic of this section and as examples, we will configure three route policies, one for OSPF and the other two for BGP.
In OSPF policy, we will change metric, metric type and also add a tag when redistributing OMP routes into OSPF, but only for a specific subnet 172.16.4.0/24 which is behind cEdge4.

Let’s start to configure our first route policy.
OSPF Route Policy
add “if section” or “match section” of route policy
We will configure route policy through localized policy.
In localized policy, first, “if section” of the route-policy must be configured.
CONFIGURATION -> POLICIES -> Localized Policy -> custom options -> Lists -> Prefix -> New prefix List
Prefix List Name: net_172_16_4
Add Prefix: 172.16.4.0/24 le 32
add route policy (route-map in cisco)
Then, “then section” of route policy must be configured which is equivalent to writing route-map in cisco routers.
CONFIGURATION -> POLICIES -> Localized Policy -> custom options -> Route Policy -> Add Route Policy -> Create New
Name: OMP_OSPF
Description: OMP_OSPF
Sequence 1:
 match : address = net_172_16_4
 actions: Accept, Metric: 164, Metric Type: type1, OSPF Tag: 164
Sequence 2:
 actions: Accept
Sequence 3:
 Default Action: Reject (by default)
add container policy
Since multiple polices of the same or different types can be applied to a single device, In the next step we configure a policy, which I call it “container policy”, and it can be applied to devices through device template. Container policy must hold all policies that must be applied to a device or devices. container policy is just a container and there is no command behind it.
This OSPF route policy inside container policy must be applied to cEdge1 router, so the name can be cEdge1_Policy which will hold, in the future, all other policies related to cEdge1 router.
As I have said, policies of different types can be imported into container policy. Like QoS, Access-List and also route-policies.
CONFIGURATION -> POLICIES -> Localized Policy -> Add Policy -> section: Configure Route Policy -> Add Route Policy
  Policy Name: cEdge1_Policy
  Policy Description : cEdge1_Policy
  Import : OMP_OSPF
We can preview the commands before applying it to a device or devices. with preview, Viptella commands will be shown. these Viptela commands will be translated to cisco commands when we apply it to cisco CSR router.
policy
 route-policy OMP_OSPF
    sequence 1
     match
      address net_172_16_4
     !
     action accept
      set
       metric 164
       ospf-tag 164
       metric-type type1
      !
     !
    !
    sequence 11
     action accept
     !
    !
  default-action reject
 !
 lists
  prefix-list net_172_16_4
   ip-prefix 172.16.4.0/24 le 32
  !
 !
!
apply container policy to device
Now it is the time to apply “container policy” to cEdge1 device through device template.
setting -> CONFIGURATION -> TEMPLATES -> Device
Template Name: CSR1000v_Device_Template_cEdge1
Section: Additional Templates
Policy: cEdge1_Policy
When applying “container policy” to cEdge1 router, we can preview commands once again. Here you can see that Viptela commands are translated to cisco route-map commands.
ip prefix-list net_172_16_4 seq 5 permit 172.16.4.0/24 le 32
!
route-map OMP_OSPF permit 1
 match ip address prefix-list net_172_16_4
 set metric 164
 set metric-type type-1
 set tag 163
route-map OMP_OSPF deny 65535
apply route policy in redistribution
Notice that with applying “container policy” to cEdge1 router, route-maps are configured in router but not applied to any interface, neighbor or protocol. In this scenario, route-map must be applied to routes redistributed from OMP to OSPF protocol
So now, route policy or route-map must be applied when routes are redistributed from OMP to OSPF. We will configure it through OSPF feature template which is configured in previous sections.
settings -> CONFIGURATION -> TEMPLATES -> Feature
Template Name: CSR1000v_VPN10_OSPF
Section: REDISTRIBUTE
Protocol: omp
Route Policy: OMP_OSPF
cisco CSR1000v equivalent command is as follows:
router ospf 10 vrf 10
 timers throttle spf 200 1000 10000
 redistribute omp route-map OMP_OSPF
After applying, we can check the result of our configuration with “show ip ospf database external” command in Datacenter router.
Datacenter#show ip ospf database external
....
  LS age: 395
  Options: (No TOS-capability, DC, Downward)
  LS Type: AS External Link
  Link State ID: 172.16.4.0 (External Network Number )
  Advertising Router: 172.16.1.1
  LS Seq Number: 8000012C
  Checksum: 0x5967
  Length: 36
  Network Mask: /24
        Metric Type: 1 (Comparable directly to link state metric)
        MTID: 0
        Metric: 164
        Forward Address: 0.0.0.0
        External Route Tag: 164
....
BGP Route Policy
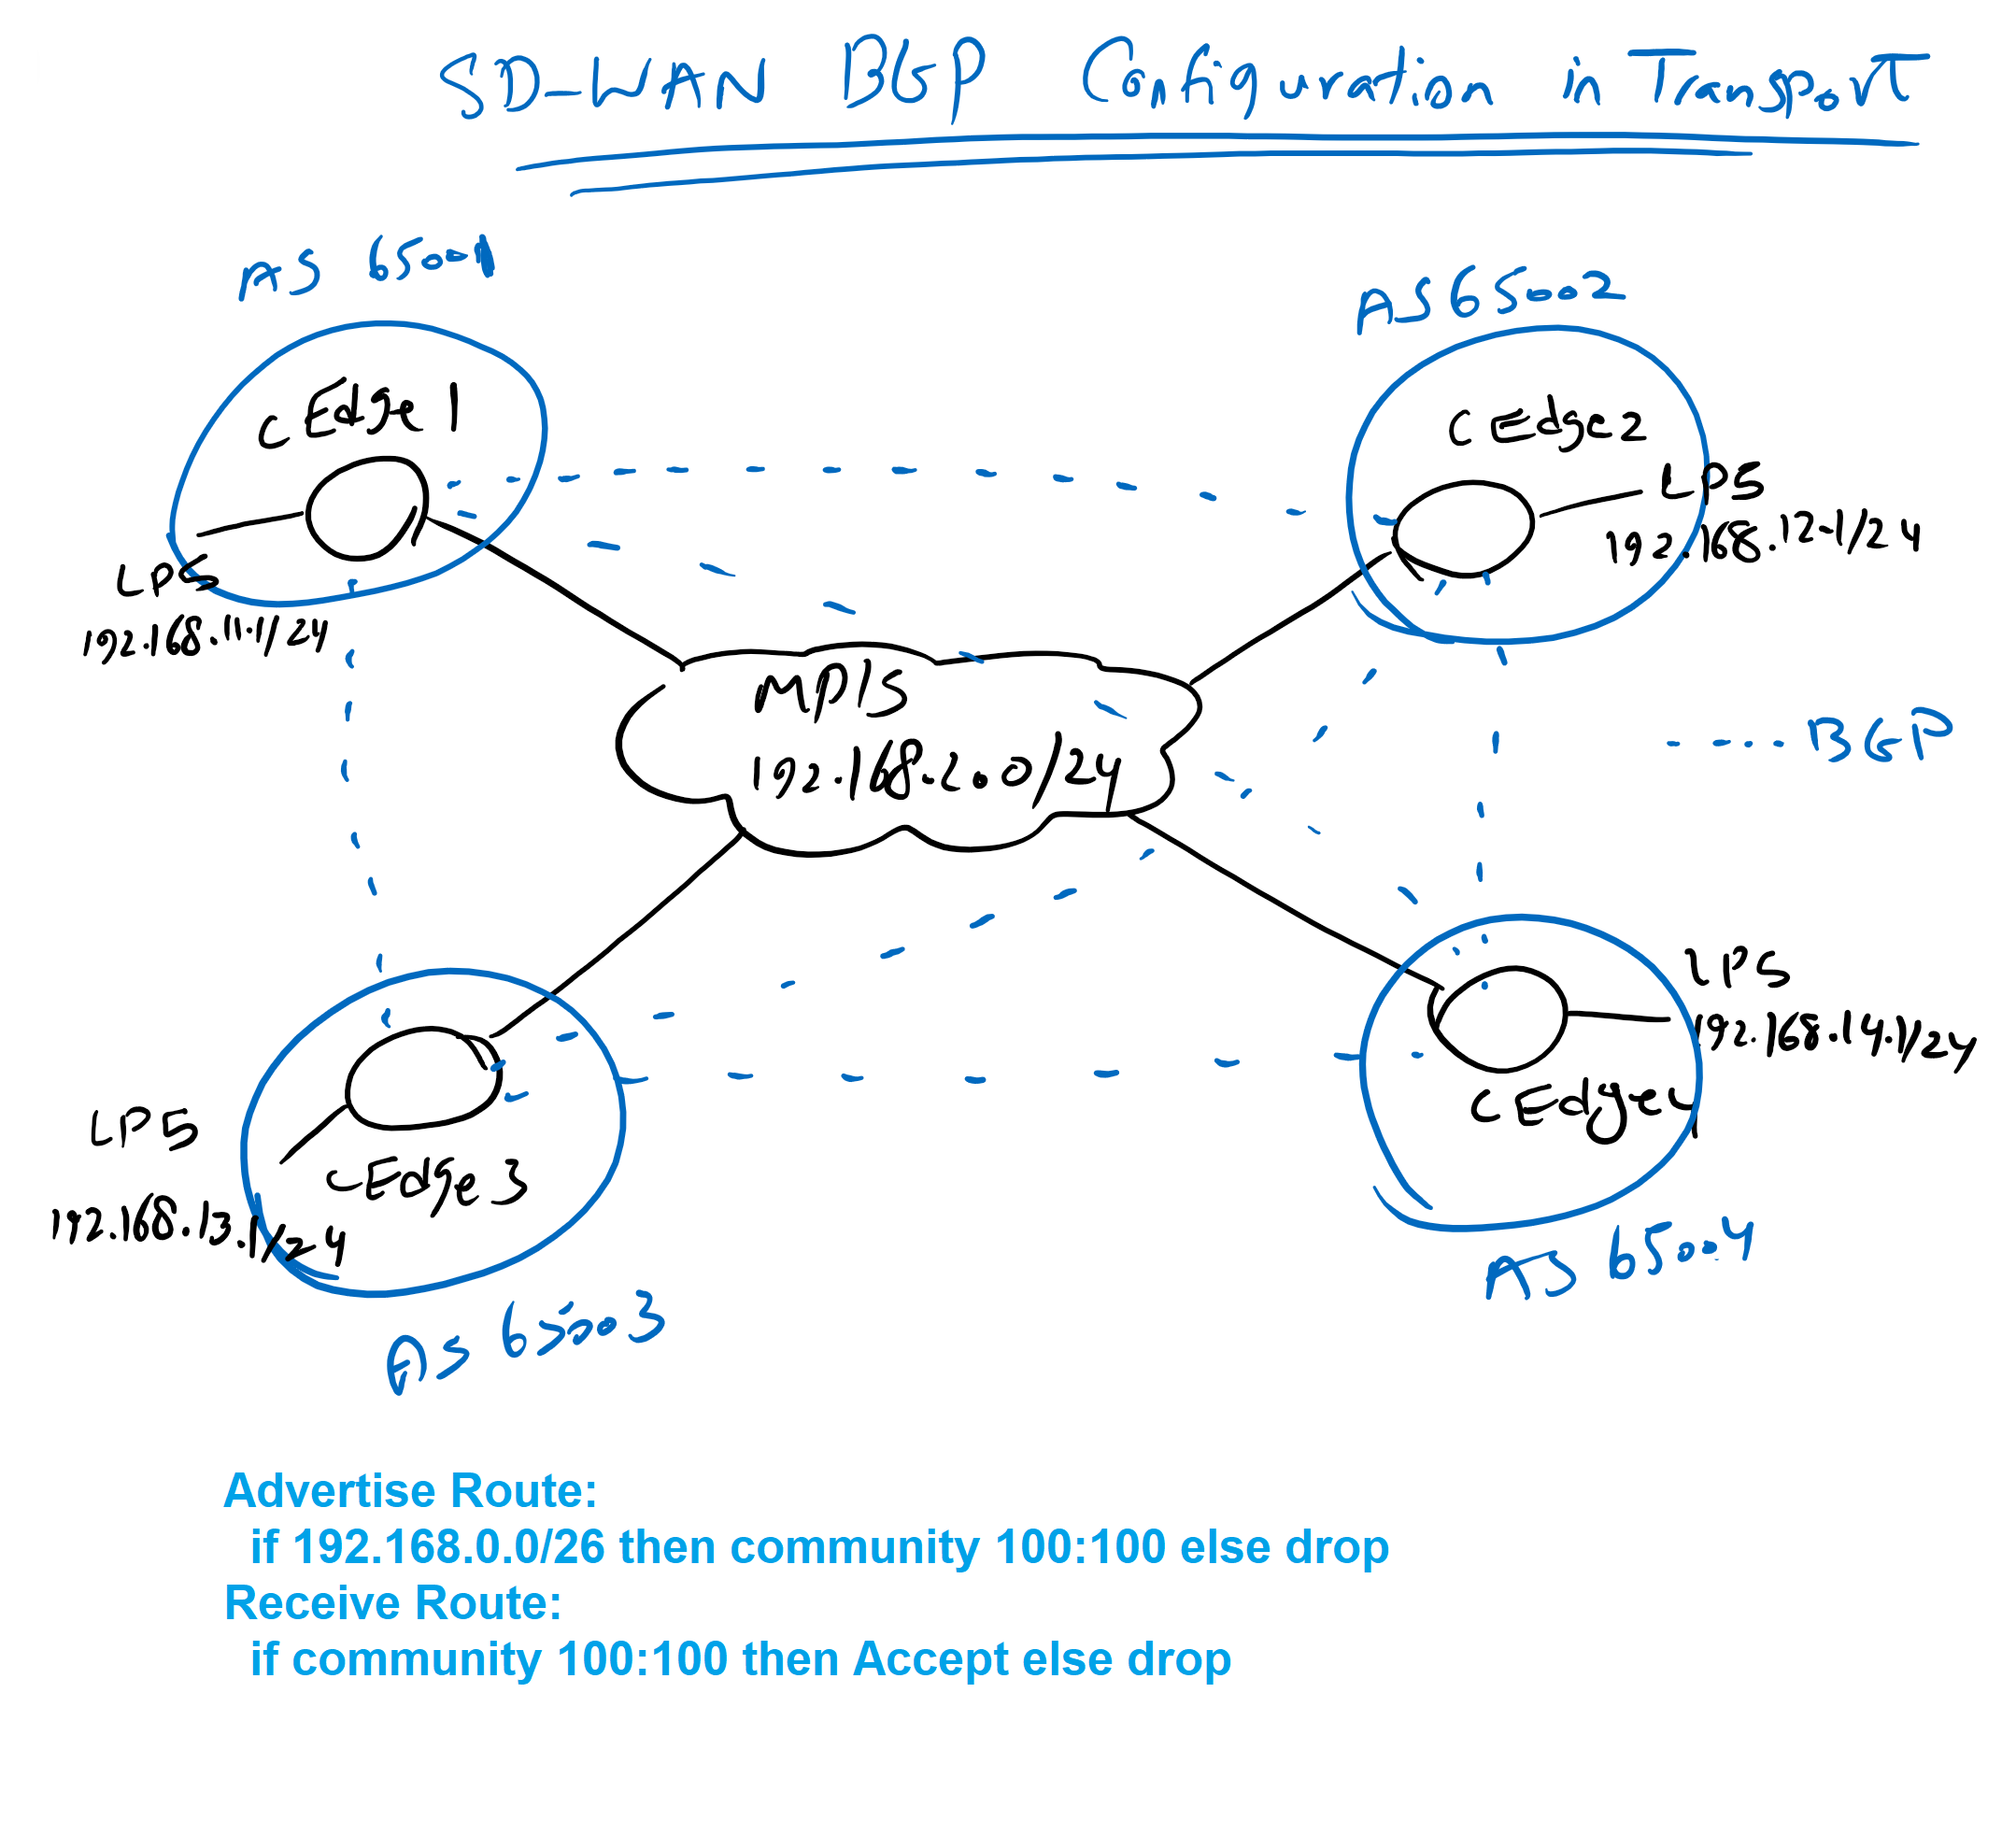
The next two policies are related to BGP policies. As you know we have already a full mesh BGP neighborship between WAN routers. IP addresses configured in interface loopback5, 192.168.11.0/24 to 192.168.14.0/24 are already advertised through BGP protocol.
In this policy, BGP routes will be tagged with a specific community 100:100 when they are advertised. BGP routes are received only if they contain that specific community.
add “if section” or “match section” of route policy
First, “if section” of the route-policy must be configured.
We need two matching rules. First match prefixes to set the community 100:100 in advertising. Second routes with community 100:100 to be accepted in receiving.
CONFIGURATION -> POLICIES -> Localized Policy -> Lists -> Prefix -> New prefix List
Prefix List Name: net_192_168
Add Prefix: 192.168.0.0/16 le 32
CONFIGURATION -> POLICIES -> Localized Policy -> Lists -> community -> New Community List
Community List Name: comm100_100
Community: 100:100add route policy (route-map in cisco)
Then, “then section” of route policy must be configured which is equivalent to writing route-map in cisco routers.
We need two policies, one, we receive routes through BGP and the other, when we advertise BGP routers. in advertising, community 100:100 will be added to BGP routes. In receiving, only routes with community 100:100 will be accepted.
CONFIGURATION -> POLICIES -> Localized Policy -> custom options -> Route Policy -> Add Route Policy -> Create New
Name: BGP_OUT
Description: BGP_OUT
Sequence 1:
 match : address = net_172_16_4
 actions: Accept, community = 100:100
Sequence 2:
 Default Action: Reject (by default)
CONFIGURATION -> POLICIES -> Localized Policy -> custom options -> Route Policy -> Add Route Policy -> Create New
Name: BGP_IN
Description: BGP_IN
Sequence 1:
match: community list = comm100_100
actions: Accept
Sequence 2:
Default Action: Reject (by default)container policy
Then these two policies must be imported into existing “container policy”, cEdge1_Policy.
Since these two policies must be also applied to other edge routes. We will also add a new “container policy” with the name, cEdge_Policy to be applied to other edge routers.
CONFIGURATION -> POLICIES -> Localized Policy -> cEdge1_Policy -> Edit -> Route Policy -> Add Route Policy -> Import Existing
  Import : BGP_IN, BGP_OUT
CONFIGURATION -> POLICIES -> Localized Policy -> Add Policy -> section: Configure Route Policy -> Add Route Policy
Policy Name: cEdge_Policy
Policy Description : cEdge_Policy
Import : BGP_IN, BGP_OUTWe can preview the commands before applying it to a device or devices. these Viptela commands will be translated to cisco commands when we apply it to cisco CSR router.
policy
 route-policy bgp_out
    sequence 1
     match
      address net_192_168
     !
     action accept
      set
       community 100:100
      !
     !
    !
  default-action reject
 !
 route-policy bgp_in
    sequence 1
     match
      community comm100_100
     !
     action accept
     !
    !
  default-action reject
 !
 lists
  community-list comm100_100
   community 100:100
  !
  prefix-list net_192_168
   ip-prefix 192.168.0.0/16 le 32
  !
 !
!
apply container policy to all Edger outers
Now it is the time to apply new “container policy” to other cEdge devices through device template.
setting -> CONFIGURATION -> TEMPLATES -> Device
Template Name: CSR1000v_Device_Template
Section: Additional Templates
Policy: cEdge_Policy
When applying “container policy” to Edge routers, we can preview commands once again. Here you can see that Viptela commands are translated to cisco route-map commands.
ip community-list standard comm100_100 permit 6553700
!
ip prefix-list net_192_168 seq 5 permit 192.168.0.0/16 le 32
!
route-map BGP_IN permit 1
 match community comm100_100
route-map BGP_IN deny 65535
!
route-map BGP_OUT permit 1
 match ip address prefix-list net_192_168
 set community 6553700
route-map BGP_OUT deny 65535
apply route policy to neighbors
Notice that with applying “container policy” to cEdge routers, route-maps are configured in router but not applied to any neighbors.
so we have to apply route policy or route-map to every three neighbors in BGP configurations. We will configure it through BGP feature template which is configured in previous sections.
settings -> CONFIGURATION -> TEMPLATES -> Feature
Template Name: CSR1000v_BGP
Section: Neighbor
Do the followings for all three neighbors
Address Family: Global: On
Address Family: Global: ipv4-unicast
Route Policy In : Global: On
Policy Name: Global: BGP_IN
Route Policy Out : Global: On
Policy Name: Global: BGP_OUT
cisco CSR1000v equivalent command is as follows:
router bgp 65001
 bgp log-neighbor-changes
 neighbor 192.168.2.102 remote-as 65002
 neighbor 192.168.2.103 remote-as 65003
 neighbor 192.168.2.104 remote-as 65004
 !
 address-family ipv4
  network 192.168.11.0
  neighbor 192.168.2.102 activate
  neighbor 192.168.2.102 send-community both
  neighbor 192.168.2.102 route-map bgp_in in
  neighbor 192.168.2.102 route-map bgp_out out
  neighbor 192.168.2.103 activate
  neighbor 192.168.2.103 send-community both
  neighbor 192.168.2.103 route-map bgp_in in
  neighbor 192.168.2.103 route-map bgp_out out
  neighbor 192.168.2.104 activate
  neighbor 192.168.2.104 send-community both
  neighbor 192.168.2.104 route-map bgp_in in
  neighbor 192.168.2.104 route-map bgp_out out
  distance bgp 20 200 20
 exit-address-family
The final result can be check with “show ip bgp” command. you have to see all routes still in BGP but including community.
cEdge2#show ip bgp 192.168.11.0
BGP routing table entry for 192.168.11.0/24, version 7
Paths: (3 available, best #3, table default)
  Advertised to update-groups:
     2
  Refresh Epoch 4
  65004 65001
    192.168.2.101 from 192.168.2.104 (192.168.14.1)
      Origin IGP, localpref 100, valid, external
      Community: 6553700
      rx pathid: 0, tx pathid: 0
      Updated on Oct 29 2021 00:27:35 IRDT
  Refresh Epoch 1
  65003 65001
    192.168.2.101 from 192.168.2.103 (192.168.13.1)
      Origin IGP, localpref 100, valid, external
      Community: 6553700
      rx pathid: 0, tx pathid: 0
      Updated on Oct 29 2021 00:28:05 IRDT
  Refresh Epoch 4
  65001
    192.168.2.101 from 192.168.2.101 (192.168.11.1)
      Origin IGP, metric 0, localpref 100, valid, external, best
      Community: 6553700
      rx pathid: 0, tx pathid: 0x0
      Updated on Oct 29 2021 00:27:35 IRDT