The first part of this lesson is to explore the F5 AWAF Lab topology, which we will focus on throughout the course. We then set up the first part of the lab topology, which is setting up DVWA (Damn Vulnerable Web Application), an intentionally vulnerable web application that we secure using the F5 AWAF module.
F5 AWAF Lab Topology
This is the lab topology we will use in the course. An F5 device with LTM and AWAF modules sits between the Internet and the corporate data center.
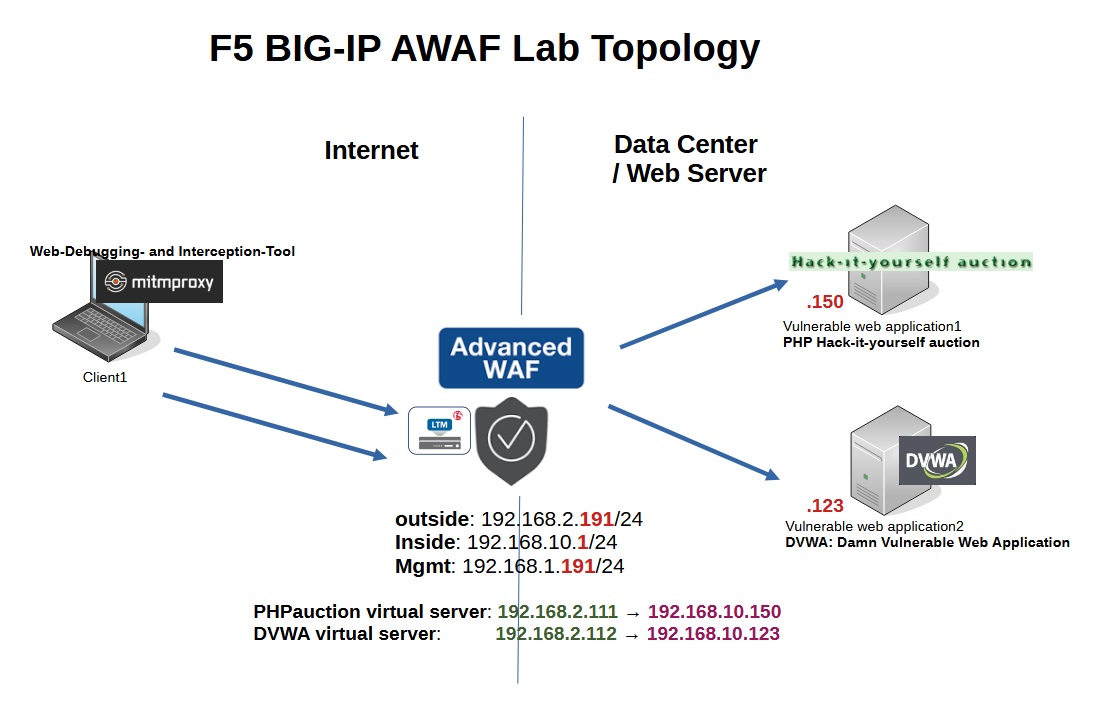
There are two vulnerable web application servers, “PHP Hack-it-yourself Auction” and “DVWA (Damn Vulnerable Web Application)”, which we publish with the F5 LTM module and secure with the F5 AWAF security module.
There is also a client that tries to attack different parts of the web applications, which provides a motivation to secure that part of the web applications.
In the client we use “mitmproxy” as a web debugging and interception tool that we use to analyze and manipulate web traffic.
More specifically, f5 has three interfaces in “management”, “outside” and “inside” zones with IP addresses 192.168.1.191/24, 192.168.2.191/24 and 192.168.10.1/24.
We create two virtual servers with IP addresses 192.168.2.111 and 192.168.2.112 and names “phpauction” and “DVWA” to publish web applications. These virtual servers act as a proxy for 192.168.10.150 and 192.168.10.123 vulnerable web applications in the data center.
The configuration of the laboratory topology is divided into four sections. In this and the next lesson we will configure and prepare vulnerable web applications, DVWA and Hack-It-Yourself PHPauction.
Then we will prepare the F5 AWAF module with the initial configuration and finally learn how to analyze and intercept web traffic using Mitmproxy.
Lesson 2: F5 AWAF Lab Preparation Part 1: Setting Up DVWA for Security Testing
Lesson 3: F5 AWAF Lab Preparation Part 2: Configuring PHPauction for Vulnerability Exploration
Lesson 4: F5 AWAF Lab Preparation Part 3: F5 AWAF Initial Setup
Lesson 5: F5 AWAF Lab Preparation Part 4: Integrating Mitmproxy for Traffic Analysis
Setting Up DVWA
DVWA (Damn Vulnerable Web Application), is a PHP/MySQL web application that is intentionally designed to be vulnerable. It serves as a training tool for security professionals, allowing them to practice and improve their skills in identifying and exploiting common web vulnerabilities in a controlled environment.
We will use F5 AWAF to secure various application vulnerabilities throughout the course.
There are different methods to install DVWA, using XAMPP on Windows, using Docker, On Kali Linux, Using VirtualBox and prepared installation script.
We will use the prepared installation script on Kali Linux to set up DVWA.
install Kali Linux
To install Kali Linux, I downloaded the ISO version of Kali Linux from Kali official website.
I didn’t use a prepared virtual machine because there was no OVF file for the VMware ESXi server. But there virtual machines for VMware workstation, VirtualBox, Hyper-V and QEMU.
I am not going to show how to install Kali Linux, just FYI I used a short YouTube video training to install Kali Linux on VMware ESXi.
Then I installed SSH server on Kali Linux so that I can connect via SSH to copy and paste commands more easily.
## enable ssh-server on kali linux
Sudo apt-Update
sudo apt install openssh-server
sudo systemctl start ssh
sudo systemctl enable ssh
sudo systemctl restart ssh
sudo systemctl status ssh
Install DVWA
There are different methods to install DVWA. Some of these can be time-consuming and complex. Therefore, I decided to use a prepared installation script to install DVWA.
In this method, according to DVWA official Gituub website, all you need to do is download the script using the “wget” command, make it executable using the “chmod” command, and finally run the script.
wget https://raw.githubusercontent.com/IamCarron/DVWA-Script/main/Install-DVWA.sh
chmod +x Install-DVWA.sh
sudo ./Install-DVWA.sh
Now let’s install it and see the result.
During installation we will be asked to provide an username and password for MySQL. I choose root as the username and no password.
┌──(majid㉿kali)-[~]
└─$ pwd
/home/majid

┌──(majid㉿kali)-[~]
└─$ wget https://raw.githubusercontent.com/IamCarron/DVWA-Script/main/Install-DVWA.sh
--2024-04-09 12:29:26--  https://raw.githubusercontent.com/IamCarron/DVWA-Script/main/Install-DVWA.sh
Resolving raw.githubusercontent.com (raw.githubusercontent.com)... 2606:50c0:8003::154, 2606:50c0:8000::154, 2606:50c0:8002::14, ...
Connecting to raw.githubusercontent.com (raw.githubusercontent.com)|2606:50c0:8003::154|:443... connected.
HTTP request sent, awaiting response... 200 OK
Length: 16688 (16K) [text/plain]
Saving to: 'Install-DVWA.sh'

Install-DVWA.sh                 100%[======================================================>]  16.30K  --.-KB/s    in 0.002s

2024-04-09 12:29:26 (7.04 MB/s) - 'Install-DVWA.sh' saved [16688/16688]


┌──(majid㉿kali)-[~]
└─$ chmod +x Install-DVWA.sh

┌──(majid㉿kali)-[~]
└─$ sudo ./Install-DVWA.sh
[sudo] password for majid:

╓────────────────────────────────────────────────────────────╖
║                 Welcome to the DVWA setup!                 ║
║               Script Name: Install-DVWA.sh                 ║
║                     Author: IamCarron                      ║
║   Github Repo: https://github.com/IamCarron/DVWA-Script    ║
║                 Installer Version: 1.0.4                   ║
╙────────────────────────────────────────────────────────────╜

Updating repositories...
Hit:1 http://http.kali.org/kali kali-rolling InRelease
Reading package lists... Done
Building dependency tree... Done
Reading state information... Done
551 packages can be upgraded. Run 'apt list --upgradable' to see them.
Verifying and installing necessary dependencies...
apache2 is installed!
mariadb-server is installed!
mariadb-client is installed!
php is installed!
php-mysql is installed!
php-gd is not installed. Installing it now...
Reading package lists... Done
Building dependency tree... Done
Reading state information... Done
The following additional packages will be installed:
  php8.2-gd
The following NEW packages will be installed:
  php-gd php8.2-gd
0 upgraded, 2 newly installed, 0 to remove and 551 not upgraded.
Need to get 32.3 kB of archives.
After this operation, 150 kB of additional disk space will be used.
Get:1 http://http.kali.org/kali kali-rolling/main amd64 php8.2-gd amd64 8.2.12-1+b1 [28.6 kB]
Get:2 http://http.kali.org/kali kali-rolling/main amd64 php-gd all 2:8.2+93 [3648 B]
Fetched 32.3 kB in 1s (53.4 kB/s)
Selecting previously unselected package php8.2-gd.
(Reading database ... 404025 files and directories currently installed.)
Preparing to unpack .../php8.2-gd_8.2.12-1+b1_amd64.deb ...
Unpacking php8.2-gd (8.2.12-1+b1) ...
Selecting previously unselected package php-gd.
Preparing to unpack .../php-gd_2%3a8.2+93_all.deb ...
Unpacking php-gd (2:8.2+93) ...
Setting up php8.2-gd (8.2.12-1+b1) ...

Creating config file /etc/php/8.2/mods-available/gd.ini with new version
Setting up php-gd (2:8.2+93) ...
Processing triggers for libapache2-mod-php8.2 (8.2.12-1+b1) ...
Processing triggers for php8.2-cli (8.2.12-1+b1) ...
libapache2-mod-php is installed!
git is installed!
Downloading DVWA from GitHub...
Cloning into '/var/www/html/DVWA'...
remote: Enumerating objects: 4500, done.
remote: Counting objects: 100% (50/50), done.
remote: Compressing objects: 100% (41/41), done.
remote: Total 4500 (delta 17), reused 34 (delta 8), pack-reused 4450
Receiving objects: 100% (4500/4500), 2.30 MiB | 11.54 MiB/s, done.
Resolving deltas: 100% (2112/2112), done.
Enabling MariaDB...
Starting MariaDB...

Default credentials:
Username: root

Password: [No password just hit Enter]
Enter SQL user: root
Enter SQL password (press Enter for no password):
Enter password:
SQL commands executed successfully.
Configuring DVWA...
Configuring permissions...
Configuring PHP...
Enabling Apache...
Restarting Apache...
DVWA has been installed successfully. Access http://localhost/DVWA to get started.
Credentials:
Username: admin
Password: password

With ♡ by IamCarron

┌──(majid㉿kali)-[~]
└─$
After installation, you can connect to the web server using „http://Kali-Linux-IP-Address/DVWA“, with default username „admin“ and the password „password“.
When you first connect, you will see possible errors with DVWA web application installation.
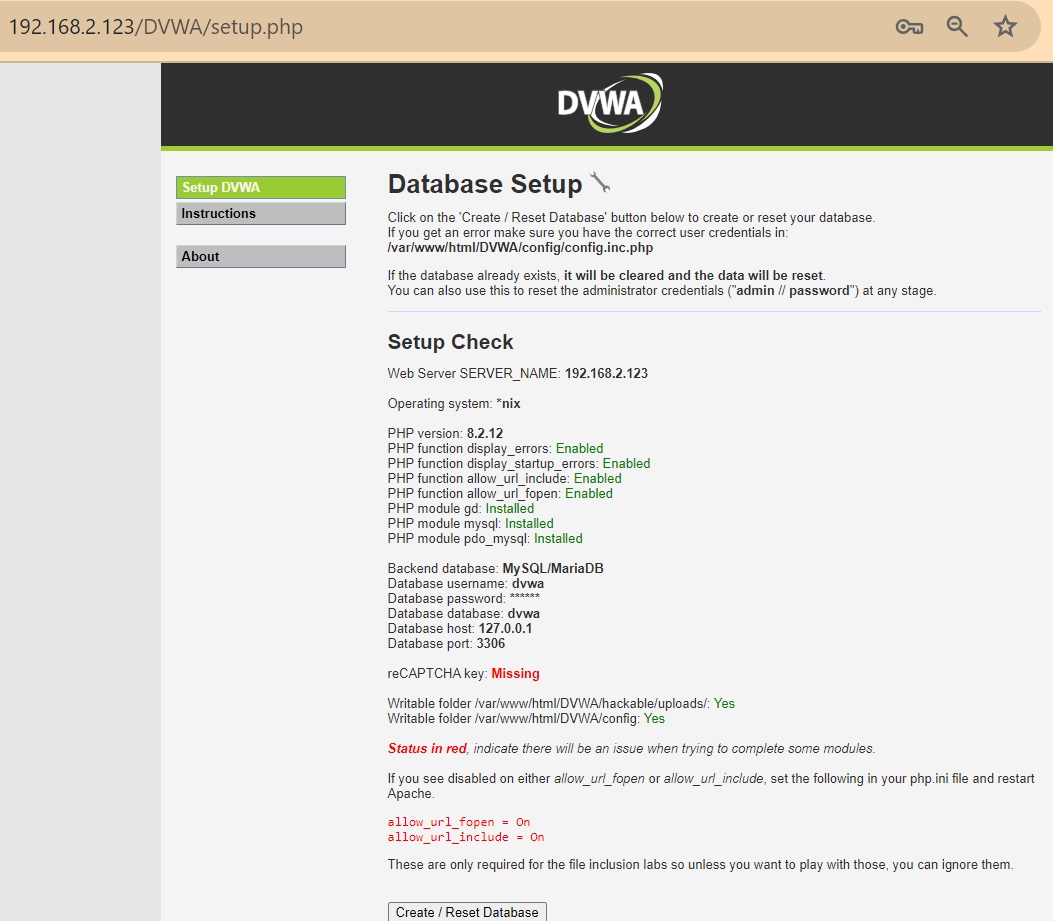
To me it says to make sure “allow_url_fopen” and “allow_url_include” are enabled in the “php.ini” configuration file. For me they are already enabled.

There is a “Create/Reset Database” button at the end of the page.
We use this button after we have installed DVWA or if we want to start with a fresh database or if you want to restart the exercises and clear all previous progress.
We click on this button because we have just installed the application.
After the database is created, the appearance of the web application changes and new menu options appear.
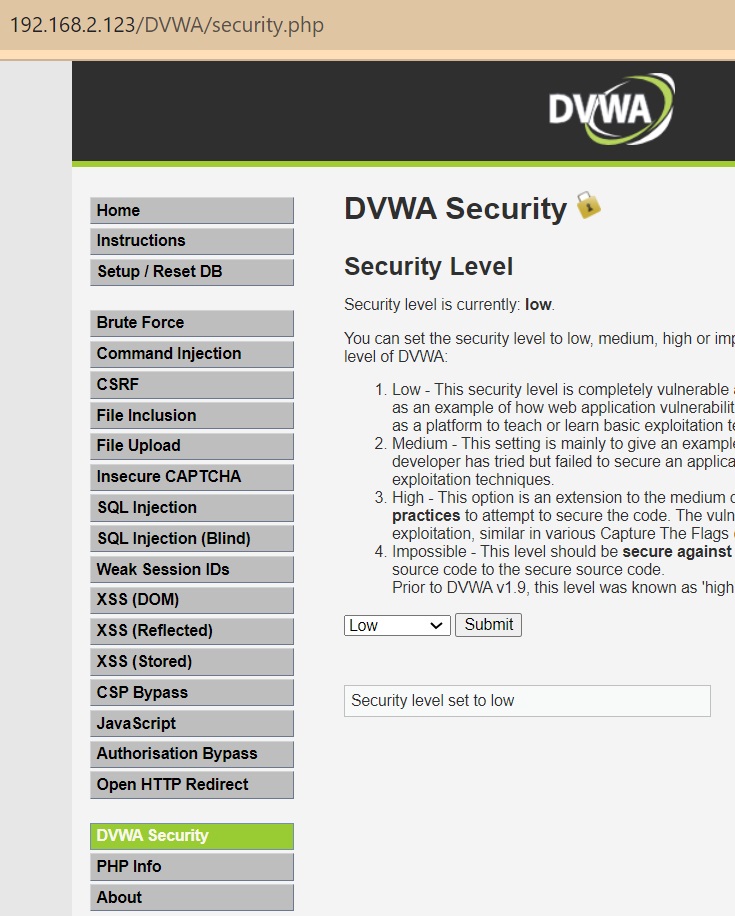
In the menu „DVWA Security”, you can change the security level of the web application from Low to Impossible, which determines the difficulty of exploiting vulnerabilities:
For our purposes, we mostly use the “low” security level option so that we can protect every web application vulnerabilities through the F5 AWAf module.