Juniper SRX web filtering is the last URM feature that allows you to filter based on URLs and URL categories.
We will discuss Local and Websense web filtering in this section and enhanced web filtering in the next section.
Juniper SRX Web Filtering Fundamental
With juniper SRX web filtering feature you are able to filter web traffic based on URL and URL category.
Three versions of URL filtering exist to implement.
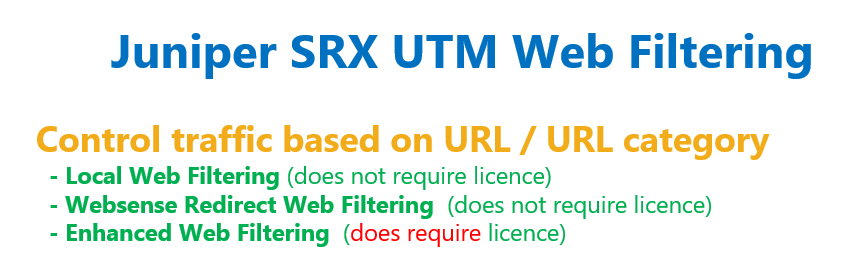
In the local web filtering, you configure URL and URL categories locally in the device itself. This type of implementation does not require any license.
With Websense Redirect Web Filtering, we redirect URLs to the Websense appliance where the administrator has previously configured which URLs are allowed. This type of implementation also does not require any license.
Enhanced web filtering is another type of web filtering which is based on cloud information, including URL category and URL reputation. This type of implementation does require license and we will discuss it in the next section.
Juniper SRX Web Filtering Configuration Steps
Configuring web filtering feature is like all other UTM features.
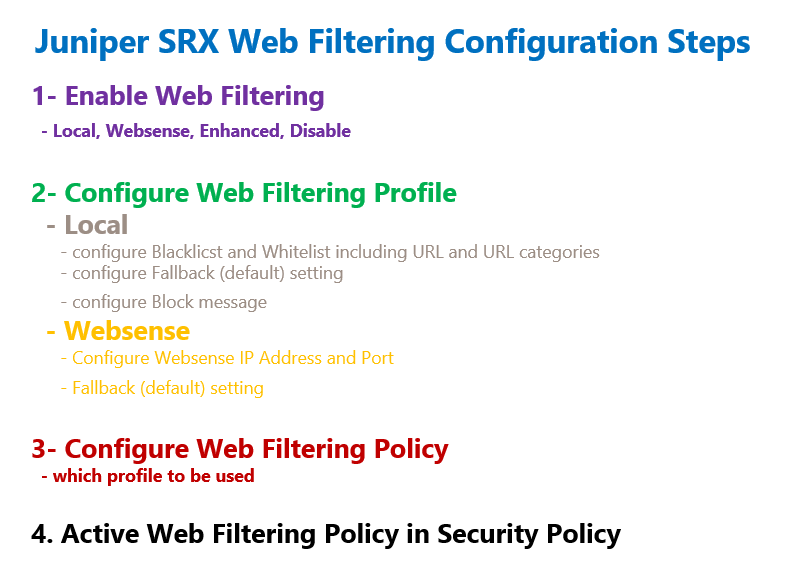
In the first step we have to enable web filtering feature and the type of it.
We have four options, local web filtering, Websense appliance redirect based web filtering, enhanced web filtering or to disable the web filtering.
In the second step, we configure web filtering profile.
When we use local web filters, we need to configure at least one blacklist or one whitelist containing URL and URL categories to be blocked or permitted.
We also configure the fallback setting for the URLs neither in the whitelist nor in the blacklist.
We also have the option to configure a custom message that will be shown to the users facing with a blocked URL.
If we use Websense web filtering, then we only need to configure the IP address and the port to connect to the Websense appliance. This is because permitted or denied URLs are configured in the Websense appliance and not in the juniper device itself.
In the third step we configure a web filtering policy. The only configuration in web filtering policy is to use one of the configured web filtering profile.
In the last step, web filtering policy will be applied to a security policy exact like other UTM features.
Juniper SRX Web Filtering Configuration
Now we can start configuring local and Websense-redirect web filtering in the juniper SRX device.
Configure the Type of Web Filtering
In the first step, we have to enable web filtering and the type of web filtering to be used.
With the command “set security utm default-configuration web-filtering type ?”, you see that there are four options to be configured as we have discussed earlier. “juniper-local”, “websense-redirect”, “juniper-enhanced” or to disable web filtering with “web-filtering-none” option.
Here I enable local web filtering.
[edit]
rayka@vSRX1# set security utm default-configuration web-filtering type ?
Possible completions:
  juniper-enhanced
  juniper-local
  web-filtering-none
  websense-redirect
[edit]
rayka@vSRX1# set security utm default-configuration web-filtering type juniper-local

[edit]
rayka@vSRX1#
Configure Local Web Filtering Profile
To configure a local web filtering profile, first we have to configure URL pattern custom-objects including as many URLs that we wish. Custom-objects also support wildcard.
Then we have to create as many categories we wish that include URL patterns configured earlier.
Then we configure an action for each URL category to be permitted or blocked.
set security utm custom-objects url-pattern URLBLACKLIST value http://*.juniper.net
set security utm custom-objects url-pattern URLBLACKLIST value 192.168.1.100

set security utm custom-objects url-pattern URLWHITELIST value http://*.msn.net


set security utm custom-objects custom-url-category WHITELISTCAT value URLWHITELIST
set security utm custom-objects custom-url-category BLACKLISTCAT value URLBLACKLIST


set security utm feature-profile web-filtering juniper-local profile WEB_FILTER_LOCAL_PROFILE category BLACKLISTCAT action block
set security utm feature-profile web-filtering juniper-local profile WEB_FILTER_LOCAL_PROFILE category WHITELISTCAT action permit
set security utm feature-profile web-filtering juniper-local profile WEB_FILTER_LOCAL_PROFILE default log-and-permit
set security utm feature-profile web-filtering juniper-local profile WEB_FILTER_LOCAL_PROFILE custom-block-message "ACCESS DENIED"
Here we create a URL pattern custom-object naming “URLBLACKLIST”, including two URLs, “http://*.juniper.net” and “192.168.1.100”.
Another URL pattern custom-object with the name of “URLWHITELIST”, including only one URL, “http://*.msn.net”.
Then we create two categories with the name of “WHITELISTCAT” and “BLACKLISTCAT” including “URLWHITELIST” and “URLBLACKLIST”, which is already configured in custom-objects.
Then we configure the action “block” for the URLs inside “BLACKLISTCAT” category and the action “permit” for the URLs inside “WHITELISTCAT” category.
We also configure the “log-and-permit” action as fallback action for the URLs that are not configured in any category.
In the last line of local web filtering, we configure a custom message “ACCESS DENIED” to be displayed to the users when a URL is blocked.
Configure Websense-Redirect Web Filtering Profile
If you have selected to use websense-redirect web filtering, then we do not need to configure any URL patterns locally and they will be configured in Websense appliance.
set security utm feature-profile web-filtering websense-redirect profile WEB_FILTER_REDIRECT_PROFILE server host 192.168.1.100

rayka@vSRX1# set security utm feature-profile web-filtering websense-redirect profile WEB_FILTER_REDIRECT_PROFILE fallback-settings ?
Possible completions:
  <[Enter]>            Execute this command
+ apply-groups         Groups from which to inherit configuration data
+ apply-groups-except  Don't inherit configuration data from these groups
  default              Fallback default settings
  server-connectivity  Fallback action when device cannot connect to server
  timeout              Fallback action when connection to server timeout
  too-many-requests    Fallback action when requests exceed the limit of engine

set security utm feature-profile web-filtering websense-redirect profile WEB_FILTER_REDIRECT_PROFILE fallback-settings default log-and-permit
What we configure in this case in juniper SRX is to configure the IP address and optionally the Port to connect to Websense appliance.
We can also configure fallback option, to configure the action when juniper SRX cannot connect to the Websense appliance, or the connection to the Websense appliance is timed out or the URL is not configure in the Websense appliance.
Configure Web Filtering Policy
In the next step we configure web filtering policy.
There is not a lot to configure in web filtering policy. We only configure and enable one of the configured web filtering profile in web filtering policy.
set security utm utm-policy WEB_FILTER_LOCAL_POLICY web-filtering http-profile WEB_FILTER_LOCAL_PROFILEEnable Web Filtering Policy in Security Policy
In the last step, we have to apply the web filtering policy in a security policy.
From untrust zone to trust zone, there is a default default-permit rule that permit everything in which we configured in the previous sections.
At the end of “then” command, we add web filter policy WEB_FILTER_LOCAL_POLICY in default-permit security policy.
set security policies from-zone untrust to-zone trust policy default-permit match source-address any
set security policies from-zone untrust to-zone trust policy default-permit match destination-address any
set security policies from-zone untrust to-zone trust policy default-permit match application any
set security policies from-zone untrust to-zone trust policy default-permit then permit

set security policies from-zone untrust to-zone trust policy default-permit then permit application-services utm-policy WEB_FILTER_LOCAL_POLICY
Monitor Web Filtering Policy
To make sure that web filtering policy is configured and activated, we have two main monitoring commands.
With the command “show security utm web-filtering status”, you can make sure that web filtering is activated. It also shows the type of web filtering policy.
[edit]
rayka@vSRX1# run show security utm web-filtering status
 UTM web-filtering status:
    Server status: Juniper local URL filtering
With the command “show security utm web-filtering statistics”, you can follow and monitor statistics related to web filtering policy. The number of hits based on URLs and URL categories.
[edit]
rayka@vSRX1# run show security utm web-filtering statistics
 UTM web-filtering statistics:
    Total requests:                     0
    White list hit:                     0
    Black list hit:                     0
    Default action hit:                 0
    Custom category permit:             0
    Custom category block:              0
    Custom category quarantine:         0
    Custom category qurantine block:    0
    Custom category quarantine permit:  0
    Safe-search redirect:               0
    Safe-search rewrite:                0
    Web-filtering sessions in total:    128000
    Web-filtering sessions in use:      0
    Fallback:                       log-and-permit           block
          Default                                 0               0
          Timeout                                 0               0
     Connectivity                                 0               0
Too-many-requests                                 0               0

[edit]
rayka@vSRX1#
I can’t run the command: “set security utm default-configuration web-filtering type juniper-local”. Firewall said syntax error – can’t find “default-configuration” options in command.