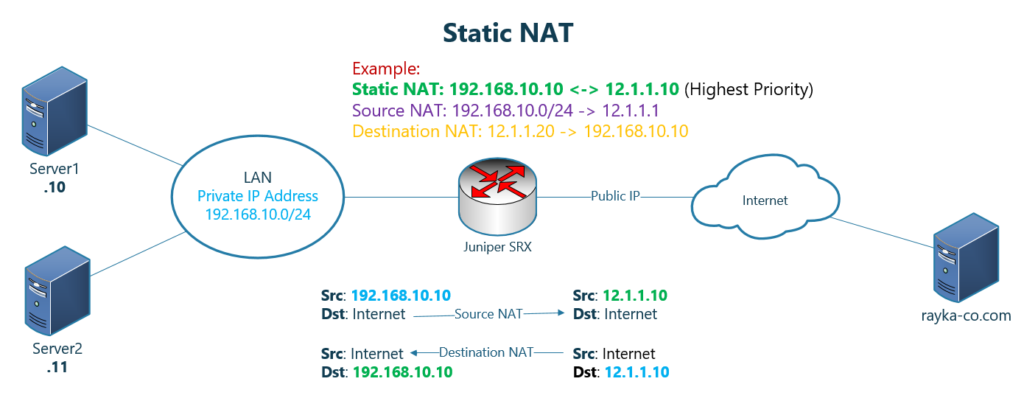
Juniper SRX Static NAT is a one-to-one mapping between two IP addresses. It has the highest priority in NAT policies.
It is bi-directional, meaning it translates the IP address in both directions. In other words, in acts as both destination NAT and source NAT.
Juniper SRX Static NAT Fundamental
As I said in the introduction, Static NAT is a one-to-one mapping between two specific IP addresses or between two subnets with equal number of IP addresses.
If you remember, in the Juniper SRX traffic flow, static NAT has the highest priority among all other NAT policies including source NAT and destination NAT and even before routing decision and security policy.
In other words, if an IP address in the packet is matched with both destination NAT and static NAT or both source NAT and static NAT, static NAT translation will be applied to the IP address.
As an example, in this topology, a one-to-one mapping is created between two IP addresses, 192.168.10.10 and 12.1.1.10. It has the highest priority even though 192.168.10.10 matches both destination NAT and source NAT.
Static NAT is bidirectional. It means when traffic with the source IP address, 192.168.10.10 is coming from inside zone and is forwarded through juniper SRX, the IP address will be translated to 12.1.1.10.
It also applies to the traffic with destination IP address, 12.1.1.10, coming from outside zone, which will be translated to the IP address 192.168.10.10.
Juniper SRX Static NAT topology and Configuration
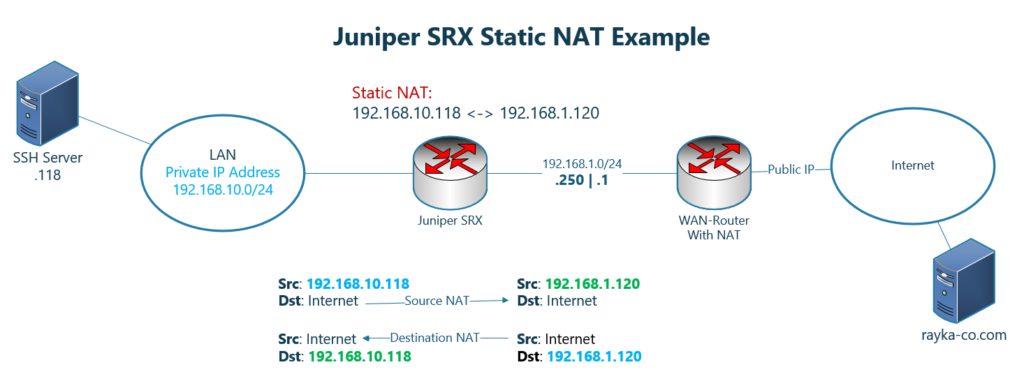
This is the topology that we will be configuring static NAT for in this section, and this is exactly the topology that we used in the previous sections.
Users inside the network with IP address subnet 192.168.10.0/24 are connected to the internet through two intervening devices.
We have a server with IP address 192.168.10.118 and an SSH server enabled in the inside zone.
Although source NAT and destination NAT are already configured in Juniper SRX, we can configure static NAT without paying attention to the current configuration of source NAT and destination NAT since static NAT has the highest priority.
What we will configure is to create a static one-to-one mapping between the IP address 192.168.10.118 in inside zone and the IP address 192.168.1.120 in outside zone.
As you can see in the figure, static NAT applies in both direction. It translates the source IP address of 192.168.10.118 to 192.168.1.120, for the traffic forwarding from inside zone to the outside zone.
It also translates destination IP address from 192.168.1.120 to 192.168.10.118 for traffic forwarding from outside zone to the inside zone
Juniper SRX Static NAT Configuration
This is the configuration that I have prepared for the static NAT.
set security nat static rule-set STATIC-NAT from zone outside
set security nat static rule-set STATIC-NAT rule 10_118_to_1_120 match destination-address 192.168.1.120/32
set security nat static rule-set STATIC-NAT rule 10_118_to_1_120 then static-nat prefix 192.168.10.118/32

set security nat proxy-arp interface ge-0/0/0.0 address 192.168.1.120/32
For the configuration of static NAT, first we have to enter inside the context of “security nat static”. Then we configure a rule-set with as many rules as we need.
Here I have a rule-set with the name of “STATIC-NAT” and only one rule with the name of “10_118_to_1_120”.
The rule-set is applied to traffic coming from outside zone. Outgoing zone or interface cannot be configured since static NAT processing is done before routing decision, and at the time of NAT processing, the outgoing interface or zone is not clear.
In the second line, the traffic with destination IP address 192.168.1.120 is matched.
It is also possible to match traffic for a specific port number but here I will match all traffic with 192.168.1.120 as destination IP address.
In the last line, the equivalent IP address in the inside zone, 192.168.10.118 is configured.
Now you know that proxy-arp also needs to be configured because 192.168.1.120 is not physically configured in the Juniper SRX and by default Juniper SRX doesn’t reply to the ARP request for that IP address.
In the last line, we configure proxy-arp for the IP address 192.168.1.120.
Now we can copy and commit the configuration
Juniper SRX Static NAT Monitoring and Troubleshooting
To enable live monitoring of the log file, we enable it using the “monitor start” command.
Then we create a traffic from outside zone to the destination IP address 192.168.1.120 and destination port SSH.
rayka# run monitor start FIREWALL | grep /22

[edit]
rayka#
*** FIREWALL ***
Sep  4 09:10:33   RT_FLOW: RT_FLOW_SESSION_CREATE: session created 192.168.1.88/26048->192.168.1.120/22 0x0 junos-ssh 192.168.1.88/26048->192.168.10.118/22 0x0 N/A N/A static rule 10_118_to_1_120 6 PERMIT-ALL outside inside 17180130274 N/A(N/A) ge-0/0/0.0 UNKNOWN UNKNOWN UNKNOWN N/A N/A -1 N/A N/A N/A Off root N/A N/A


[edit]
rayka# run show security flow session | grep /22
  In: 192.168.1.88/26048 --> 192.168.1.120/22;tcp, Conn Tag: 0x0, If: ge-0/0/0.0, Pkts: 9, Bytes: 1656,
  Out: 192.168.10.118/22 --> 192.168.1.88/26048;tcp, Conn Tag: 0x0, If: ge-0/0/1.0, Pkts: 9, Bytes: 2037,
The output of log file shows that the destination IP address 192.168.1.120 is translated to 192.168.10.118.
It also shows that the traffic match with static NAT rule with the name of “10_118_to_1_120” and security rule with the name of “PERMIT-ALL”.
This can also be confirmed with monitoring session table with the command “show security flow session | grep /22”.
Destination IP address of incoming traffic is 192.168.1.120 and source IP address of return traffic is 192.168.10.118.
We can also check the configuration and also static Nat translation hit with the command “show security nat static rule all”.
rayka# run show security nat static rule all
Total static-nat rules: 1
Total referenced IPv4/IPv6 ip-prefixes: 2/0
Static NAT rule: 10_118_to_1_120
  Rule set                   : STATIC-NAT
  Rule Id                    : 1
  Rule position              : 1
  From zone                  : outside
  Destination addresses      : 192.168.1.120
  Host addresses             : 192.168.10.118
  Netmask                    : 32
  Host routing-instance      : N/A
  Translation hits           : 1
    Successful sessions      : 1
  Number of sessions         : 1
Monitor bidirectional capability of Juniper SRX Static NAT
As I have explained earlier, static NAT is bidirectional.
To see bidirectional capability of static NAT, we send a traffic from inside zone with source IP address 192.168.10.181 to the internet. For example to the Google and destination port 80.
We expect that the source IP address will be translated to what is configured in static NAT and not to what is configured in source NAT.
Before sending traffic, we start live monitoring of log file for the destination port 80 with the command “monitor start FIREWALL | grep /80”.
Then we send the traffic.
rayka# run monitor start FIREWALL | grep /80

[edit]
rayka# Sep  4 09:13:20   RT_FLOW: RT_FLOW_SESSION_CREATE: session created 192.168.10.118/34736->216.239.38.120/80 0x0 junos-http 192.168.1.120/34736->216.239.38.120/80 0x0 static rule 10_118_to_1_120 N/A N/A 6 PERMIT-WEB inside outside 17180130516 N/A(N/A) ge-0/0/1.0 UNKNOWN UNKNOWN UNKNOWN N/A N/A -1 N/A N/A N/A Off root N/A N/A

rayka# run show security flow session | grep /80
  In: 192.168.10.118/34736 --> 216.239.38.120/80;tcp, Conn Tag: 0x0, If: ge-0/0/1.0, Pkts: 3, Bytes: 140,
  Out: 216.239.38.120/80 --> 192.168.1.120/34736;tcp, Conn Tag: 0x0, If: ge-0/0/0.0, Pkts: 2, Bytes: 104,
The output shows that the source IP address 192.168.10.118 is translated to 192.168.1.120 and it matches with static NAT rule “10_118_to_1_120” and security policy rule with the name of “PERMIT-WEB”.
We can see the same result in the session table with the command “show security flow session | grep /80”.
The source IP address of incoming connection is 192.168.10.118 but destination IP address of return traffic is 192.168.1.120.


Can you share full config of interface and zones as well?
Tha Lab is not longer available to copy the commands