
Juniper SRX policy based IPsec VPN is one of two methods of IPsec implementation that is configured in this section.
Route based IPsec VPN is another implementation method that will be configured in the next section.
Juniper SRX policy based IPsec VPN Configuration Example
Juniper SRX IPsec VPN configuration methods
Policy-based and route-based are two methods to implement site-to-site IPsec VPN in Juniper SRX devices and also in Cisco devices.

In policy-based IPsec configuration, unlike route-based IPsec configuration, we do not configure a virtual interface for the tunnel.
We send interesting traffic to the IPsec VPN tunnel by configuring a policy.
The advantage of configuring a virtual interface for the IPsec tunnel is that we can configure whatever features that we configure in other interfaces.
For example, if we configure a virtual interface for IPsec VPN, we can configure routing, ACL, QoS and also multicasting within the virtual interface.
With policy based IPsec VPN, we don’t have most of these features. Therefore, what we will learn in this section is an old method that is mainly used only to learn how to configure IPsec VPN.
Most of the concepts discussed in this section are the same also in route-based IPsec VPN configuration.
Juniper SRX IPsec VPN topology
This is the topology that we will use in this section to configure policy based IPsec VPN.
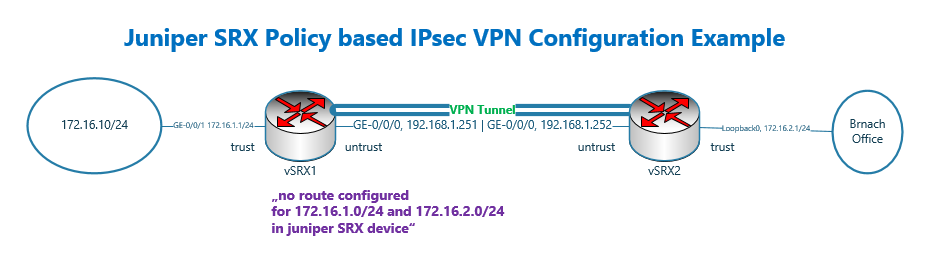
There are two juniper SRX devices with the name of vSRX1 and vSRX2.
These two device are connected to each other directly and through the interface ge-0/0/0, in the subnet 192.168.1.0/24 and in untrust zone. The IP address of vSRX1 is .251 and the other side .252.
vSRX1 is connected to LAN network through interface ge-0/0/1 and in the trust zone. The IP subnet 172.16.1.0/24 is configured for this network.
In vSRX2, the LAN interface in the trust zone is simulated using loopback interface and in the subnet 172.16.2.0/24.
It is important to know that there is no route configured in vSRX devices to reach LAN networks. In other words the subnet 172.16.1.0/24 and 172.16.2.0/24 cannot connect to each other without IPsec VPN Tunnel.
Juniper SRX IPsec VPN basic configuration
Before starting IPsec configuration, it is not bad to review the current basic configuration of vSRX devices.
set system host-name vSRX1
set interfaces ge-0/0/1 unit 0 family inet address 172.16.1.1/24
set interfaces ge-0/0/0 unit 0 family inet address 192.168.1.251/24


set security zones security-zone trust interfaces ge-0/0/1.0 host-inbound-traffic system-services all
set security zones security-zone trust interfaces ge-0/0/1.0 host-inbound-traffic protocols all
set security zones security-zone untrust interfaces ge-0/0/0.0 host-inbound-traffic system-services all
set security zones security-zone untrust interfaces ge-0/0/0.0 host-inbound-traffic system-services ike
set security zones security-zone untrust interfaces ge-0/0/0.0 host-inbound-traffic protocols all

set security policies from-zone trust to-zone untrust policy default-permit match source-address any
set security policies from-zone trust to-zone untrust policy default-permit match destination-address any
set security policies from-zone trust to-zone untrust policy default-permit match application any
set security policies from-zone trust to-zone untrust policy default-permit then permit
set security policies pre-id-default-policy then log session-close

set security policies from-zone untrust to-zone trust policy default-permit match source-address any
set security policies from-zone untrust to-zone trust policy default-permit match destination-address any
set security policies from-zone untrust to-zone trust policy default-permit match application any
set security policies from-zone untrust to-zone trust policy default-permit then permit
set security policies pre-id-default-policy then log session-close
set system host-name vSRX2
set interfaces lo0 unit 0 family inet address 172.16.2.1/24
set interfaces ge-0/0/0 unit 0 family inet address 192.168.1.252/24
set security zones security-zone trust interfaces lo0.0 host-inbound-traffic system-services all
set security zones security-zone trust interfaces lo0.0 host-inbound-traffic protocols all
set security zones security-zone untrust interfaces ge-0/0/0.0 host-inbound-traffic system-services all
set security zones security-zone untrust interfaces ge-0/0/0.0 host-inbound-traffic system-services ike
set security zones security-zone untrust interfaces ge-0/0/0.0 host-inbound-traffic protocols all
set security policies from-zone trust to-zone untrust policy default-permit match source-address any
set security policies from-zone trust to-zone untrust policy default-permit match destination-address any
set security policies from-zone trust to-zone untrust policy default-permit match application any
set security policies from-zone trust to-zone untrust policy default-permit then permit
set security policies pre-id-default-policy then log session-close
set security policies from-zone untrust to-zone trust policy default-permit match source-address any
set security policies from-zone untrust to-zone trust policy default-permit match destination-address any
set security policies from-zone untrust to-zone trust policy default-permit match application any
set security policies from-zone untrust to-zone trust policy default-permit then permit
set security policies pre-id-default-policy then log session-closeIn the first lines, the hostname and IP address of interfaces are configured according to the topology.
Then interfaces are added to the appropriate zones.
All system service and protocol traffic are permitted to vSRX devices with the host-inbound-traffic command.
I’ve allowed everything for the simplicity, but it’s not recommended in the real environment for security reasons.
I allowed “ike” in a separate line in the untrust interface. It wasn’t necessary here since I allowed all protocol and system service traffic.
I wanted only to show that for IPsec connectivity, we need to allow “ike” to the Juniper SRX devices.
Then we have two policies with the name of “default-permit” from untrust to trust zone and also from trust to untrust which permit everything.
Juniper SRX policy based IPsec VPN basic configuration steps
Here I have prepared a diagram which shows configuration steps of policy based IPsec VPN.

There are three steps to be configured to create an IPsec VPN.
- IKE phase 1 (IKE SA) to negotiate IKE security association
- IKE phase 2 (IPsec SA) to negotiate IPsec security association
- Create a policy to send interesting traffic over IPsec VPN tunnel
Juniper SRX IPsec VPN IKE Phase 1 configuration steps
As you see in the figure, in IKE phase 1, we have three sub-steps configurations.
First we configure as many security proposals that we want to accept for the secure connectivity.
This step is not necessary since by default there are some proposals pre-configure in juniper SRX device.
But if you want to configure, there are five main options to configure.
- Which authentication method are going to use? We have two main types. HMAC which use pre-shared-key in which “authentication key” must be configured manually in both sides of IPsec tunnel and digital signature methods. In this course we will use only pre-shared-key method.
- Diffie-Helman group version which negotiates “encryption key” dynamically.
- Authentication algorithm which can be MD5, SHA1 or SHA2 versions.
- The algorithm to use for encryption.
- And finally the lifetime in which encryption key must be re-negotiated.
We will configure a name for the proposals.
In the second step, we configure IKE policy. In IKE policy we decide if we use main mode or aggressive mode. As we have explained in previous section, we use aggressive mode in remote access VPN connection. In site to site VPN connections we use main mode IKE.
If we have chosen pre-shared-key authentication method in any of IKE proposals, then the “authentication key” itself must be configured in IKE policy.
And finally, the configured IKE proposal must be called in IKE policy.
In the third step we configure IKE gateway, the IP address of the other side of the VPN tunnel. In site-to-site VPN tunnel, the IP address of tunnel endpoints must be routable and there must be already connectivity between VPN endpoints.
Then we configure the outgoing interface of VPN tunnel.
Finally the configured IKE policy must be called in IKE gateway configuration to complete the chain of IKE phase 1 configuration.
Juniper SRX IPsec VPN IKE Phase 2 configuration steps
In the second step of policy based IPsec VPN, we configure IKE phase 2 or IPsec security association.
This step similar to IKE phase 1, has also three sub-steps to configure. IPsec proposal, IPsec Policy and IPsec VPN configuration.
In IPsec proposal, we choose which IPsec protocol to be used for secure connectivity. AH or ESP. for AH, only authentication algorithm must be configured. For ESP, both encryption and authentication algorithm must be configured.
In IPsec policy, we choose the configured IPsec proposal.
As you know “encryption key”, negotiated by DH group in IKE phase 1 can also be used for encryption of data traffic. But as an option, you can configure PFS in which encryption key is re-negotiated.
Finally in IPsec VPN, “IKE gateway” and “IPsec policy” will be tied in which connect IKE phase 1 and IKE phase 2 to each other.
In IPsec VPN, there is another option, if IPsec VPN tunnel must be created immediately or whenever a traffic comes.
create Policy to send interesting traffic over IPsec Tunnel
In the final step of policy based IPsec VPN, we configure send and also receive policy to send or receive interesting traffic over IPsec VPN tunnel.
By configuring interesting traffic, you can specify that only a subset of traffic between sites should be sent over the configured IPsec tunnel, especially traffic that are not by self secured.
For example, sending SSH and HTTPS traffic over an IPsec tunnel only increase device utilization.
In a normal cases, send and receive policy are reverse of each other and to make them bidirectional to avoid unidirectional security association, we can use pair-policy keyword between these two policies.
Juniper SRX policy based IPsec VPN basic configuration commands
These are the configuration that I have already prepared for policy based IPsec VPN tunnel.
According to the explanation given in the diagram, the configurations are self-explanatory. So I’ll quickly just review the configuration.
set security ike proposal IKE-PROPOSAL-1 authentication-method pre-shared-keys
set security ike proposal IKE-PROPOSAL-1 dh-group group2
set security ike proposal IKE-PROPOSAL-1 authentication-algorithm sha1
set security ike proposal IKE-PROPOSAL-1 encryption-algorithm aes-128-cbc
set security ike proposal IKE-PROPOSAL-1 lifetime-seconds 86400

set security ike policy IKE-POLICY1 mode main
set security ike policy IKE-POLICY1 proposals IKE-PROPOSAL-1 pre-shared-key ascii-text rayka-co.com

set security ike gateway vSRX2 ike-policy IKE-POLICY1
set security ike gateway vSRX2 address 192.168.1.252
set security ike gateway vSRX2 external-interface ge-0/0/0

set security ipsec proposal IPSEC-PROPOSAL-1 protocol esp
set security ipsec proposal IPSEC-PROPOSAL-1 authentication-algorithm hmac-sha1-96
set security ipsec proposal IPSEC-PROPOSAL-1 encryption-algorithm aes-128-cbc

set security ipsec policy IPSEC-POLICY-1 perfect-forward-secrecy keys group2
set security ipsec policy IPSEC-POLICY-1 proposals IPSEC-PROPOSAL-1

set security ipsec vpn vSRX1-vSRX2 ike gateway vSRX2
set security ipsec vpn vSRX1-vSRX2 ike ipsec-policy IPSEC-POLICY-1
set security ipsec vpn vSRX1-vSRX2 establish-tunnels immediately

set security address-book LOCAL address NET_172_16_1_0__24 172.16.1.0/24
set security address-book LOCAL attach zone trust

set security address-book REMOTE address NET_172_16_2_0__24 172.16.2.0/24
set security address-book REMOTE attach zone untrust

set security policies from-zone trust to-zone untrust policy SEND-VPN-TRAFFIC match source-address NET_172_16_1_0__24
set security policies from-zone trustto-zone untrust policy SEND-VPN-TRAFFIC match destination-address NET_172_16_2_0__24
set security policies from-zone trust to-zone untrust policy SEND-VPN-TRAFFIC match application any
set security policies from-zone trust to-zone untrust policy SEND-VPN-TRAFFIC then permit tunnel ipsec-vpn vSRX1-vSRX2
set security policies from-zone trust to-zone untrust policy SEND-VPN-TRAFFIC then permit tunnel pair-policy RECEIVE-VPN-TRAFFIC
set security policies pre-id-default-policy then log session-close
insert security policies from-zone trust to-zone untrust policy SEND-VPN-TRAFFICTRAFFIC before policy default-permit

set security policies from-zone untrust to-zone trust policy RECEIVE-VPN-TRAFFIC match source-address NET_172_16_2_0__24
set security policies from-zone untrust to-zone trust policy RECEIVE-VPN-TRAFFIC match destination-address NET_172_16_1_0__24
set security policies from-zone untrust to-zone trust policy RECEIVE-VPN-TRAFFIC match application any
set security policies from-zone untrust to-zone trust policy RECEIVE-VPN-TRAFFIC then permit tunnel ipsec-vpn vSRX1-vSRX2
set security policies from-zone untrust to-zone trust policy RECEIVE-VPN-TRAFFIC then permit tunnel pair-policy SEND-VPN-TRAFFIC
set security policies pre-id-default-policy then log session-close
insert security policies from-zone untrust to-zone trust policy RECEIVE-VPN-TRAFFIC before policy default-permit

set security flow tcp-mss ipsec-vpn mss 1350
The first three configuration groups are related to IKE phase 1 or IKE security association.
In the first section. We configure IKE proposal with the name of IKE-PROPOSAL-1. Authentication method pre-shared-key, Diffie-Helman group 2, authentication algorithm sha1, encryption algorithm AES and lifetime of one day are configured in the proposal.
Then we IKE main mode for the policy, IKE-POLICY1.
Then we configure the IP address 192.168.1.252 as VPN gateway with the name of vSRX2 and ge-0/0/0 as outgoing interface.
These three sections are chained together, with each section’s name called in the next section, as shown previously in the diagram.
The next three configuration groups are related to IKE phase 2 or IPsec security association.
We configure IPsec protocol ESP, authentication-algorithm HMAC-SHA1 and encryption algorithm AES-128 as an IPsec proposal with the name of IPSEC-PROPOSAL-1.
Then we configure the IPsec policy named IPSEC-POLICY-1. PFS is enabled in this policy. Therefore, the encryption key is renegotiated in phase 2.
Finally we configure IPsec VPN with the name of vSRX1-vSRX2, which tie IKE phase 1 VPN gateway vSRX2 to the IPsec policy. Therefore all configuration are tied to each other.
We also configure that the IPsec VPN tunnel be established immediately. And does need to wait for interesting traffic.
In the next four groups of configuration, we configure two policies, one from trust to the untrust zone and the other from untrust zone to trust zone with the names of SEND-VPN-TRAFFIC and RECEIVE-VPN-TRAFFIC.
These two policies are inserted before default-permit policy.
In each policy, we configure interesting traffic to be routed through IPsec VPN tunnel.
Interesting traffic of SEND-VPN-TRAFFIC and RECEIVE-VPN-TRAFFIC are exactly reverse of each other.
These two policies are also paired to each other through “pair-policy” keyword which we have already explained about.
The last line of configuration in which, I have not displayed in the diagram is to decrease the segment size of packets to a smaller size. So that when IPsec header is added to the packet, the packet size will not be bigger than 1500 bytes.
Otherwise big packets must be fragmented in the path which decrease the performance of communication or must be dropped when they are not allowed to be fragmented.
This command is very important, otherwise you will notice that you have no problem with ping connectivity since packet size are small but some applications are disrupted over IPsec tunnel since packet size are big and they are not allowed to be fragmented.
The same commands must be configured in the second juniper SRX.
set security ike proposal IKE-PROPOSAL-1 authentication-method pre-shared-keys
set security ike proposal IKE-PROPOSAL-1 dh-group group2
set security ike proposal IKE-PROPOSAL-1 authentication-algorithm sha1
set security ike proposal IKE-PROPOSAL-1 encryption-algorithm aes-128-cbc
set security ike proposal IKE-PROPOSAL-1 lifetime-seconds 86400

set security ike policy IKE-POLICY1 mode main
set security ike policy IKE-POLICY1 proposals IKE-PROPOSAL-1 pre-shared-key ascii-text rayka-co.com

set security ike gateway vSRX1 ike-policy IKE-POLICY1
set security ike gateway vSRX1 address 192.168.1.251
set security ike gateway vSRX1 external-interface ge-0/0/0

set security ipsec proposal IPSEC-PROPOSAL-1 protocol esp
set security ipsec proposal IPSEC-PROPOSAL-1 authentication-algorithm hmac-sha1-96
set security ipsec proposal IPSEC-PROPOSAL-1 encryption-algorithm aes-128-cbc

set security ipsec policy IPSEC-POLICY-1 perfect-forward-secrecy keys group2
set security ipsec policy IPSEC-POLICY-1 proposals IPSEC-PROPOSAL-1

set security ipsec vpn vSRX2-vSRX1 ike gateway vSRX1
set security ipsec vpn vSRX2-vSRX1 ike ipsec-policy IPSEC-POLICY-1
set security ipsec vpn vSRX2-vSRX1 establish-tunnels immediately

set security address-book LOCAL address NET_172_16_2_0__24 172.16.2.0/24
set security address-book LOCAL attach zone trust

set security address-book REMOTE address NET_172_16_1_0__24 172.16.1.0/24
set security address-book REMOTE attach zone untrust

set security policies from-zone trust to-zone untrust policy SEND-VPN-TRAFFIC match source-address NET_172_16_2_0__24
set security policies from-zone trust to-zone untrust policy SEND-VPN-TRAFFIC match destination-address NET_172_16_1_0__24
set security policies from-zone trust to-zone untrust policy SEND-VPN-TRAFFIC match application any
set security policies from-zone trust to-zone untrust policy SEND-VPN-TRAFFIC then permit tunnel ipsec-vpn vSRX2-vSRX1
set security policies from-zone trust to-zone untrust policy SEND-VPN-TRAFFIC then permit tunnel pair-policy RECEIVE-VPN-TRAFFIC
set security policies pre-id-default-policy then log session-close
insert security policies from-zone trust to-zone untrust policy SEND-VPN-TRAFFIC before policy default-permit

set security policies from-zone untrust to-zone trust policy RECEIVE-VPN-TRAFFIC match source-address NET_172_16_1_0__24
set security policies from-zone untrust to-zone trust policy RECEIVE-VPN-TRAFFIC match destination-address NET_172_16_2_0__24
set security policies from-zone untrust to-zone trust policy RECEIVE-VPN-TRAFFIC match application any
set security policies from-zone untrust to-zone trust policy RECEIVE-VPN-TRAFFIC then permit tunnel ipsec-vpn vSRX2-vSRX1
set security policies from-zone untrust to-zone trust policy RECEIVE-VPN-TRAFFIC then permit tunnel pair-policy SEND-VPN-TRAFFIC
set security policies pre-id-default-policy then log session-close
insert security policies from-zone untrust to-zone trust policy RECEIVE-VPN-TRAFFIC before policy default-permit

set security flow tcp-mss ipsec-vpn mss 1350
After copying and committing the configuration, we hope that the connectivity between two subnets 172.16.1.0/24 and 172.16.2.0/24 over IPsec VPN is established.
Monitoring and Troubleshooting Juniper SRX IPsec VPN tunnel
Now how we can test and monitor the IPsec VPN tunnel connectivity.
First we send traffic from subnet 172.16.1.0/24 to subnet 172.16.2.0/24 to make sure that the connectivity is established.
Since we have not created any route between these two subnet, the connectivity between these two subnets must be certainly through IPsec VPN tunnel.
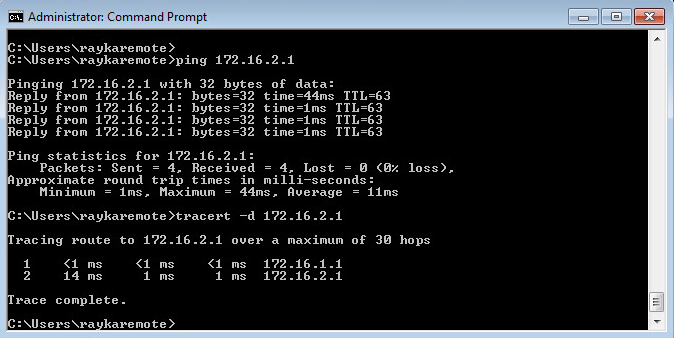
But to make sure we have some IPsec specific monitoring commands.
The commands starting with “show security ike”, are for monitoring of ike phase 1 negotiation.
The commands starting with “show security ipsec” are for monitoring of ike phase 2 negotiation.
With command “show security ike security-associations” and “show security ike security-associations detail”, we monitor ike phase 1 negotiation.
rayka@vSRX2# run show security ike security-associations
Index   State  Initiator cookie  Responder cookie  Mode           Remote Address
7824660 UP     00df9f0e7e0fc3e7  f468103a25d40b93  Main           192.168.1.251

[edit]
rayka@vSRX2# run show security ike security-associations detail
IKE peer 192.168.1.251, Index 7824660, Gateway Name: vSRX1
  Role: Responder, State: UP
  Initiator cookie: 00df9f0e7e0fc3e7, Responder cookie: f468103a25d40b93
  Exchange type: Main, Authentication method: Pre-shared-keys
  Local: 192.168.1.252:500, Remote: 192.168.1.251:500
  Lifetime: Expires in 4390 seconds
  Reauth Lifetime: Disabled
  IKE Fragmentation: Disabled, Size: 0
  Remote Access Client Info: Unknown Client
  Peer ike-id: 192.168.1.251
  AAA assigned IP: 0.0.0.0
  Algorithms:
   Authentication        : hmac-sha1-96
   Encryption            : aes128-cbc
   Pseudo random function: hmac-sha1
   Diffie-Hellman group  : DH-group-2
  Traffic statistics:
   Input  bytes  :               660496
   Output bytes  :                 8920
   Input  packets:                 2245
   Output packets:                   31
   Input  fragmentated packets:       0
   Output fragmentated packets:       0
  IPSec security associations: 28 created, 27 deleted
  Phase 2 negotiations in progress: 1

    Negotiation type: Quick mode, Role: Responder, Message ID: 0
    Local: 192.168.1.252:500, Remote: 192.168.1.251:500
    Local identity: 192.168.1.252
    Remote identity: 192.168.1.251
    Flags: IKE SA is created
The output must show that IKE phase 1 is UP. The details output also shows the parameters configured and negotiated in IKE phase 1.
The commands “show security ipsec security-associations” and “show security ipsec security-associations details” show the negotiation result of phase 2 negotiation.
rayka@vSRX2# run show security ipsec security-associations
  Total active tunnels: 1     Total Ipsec sas: 1
  ID    Algorithm       SPI      Life:sec/kb  Mon lsys Port  Gateway
  <2      ESP:aes-cbc-128/sha1 992ba013 2015/ unlim - root 500 192.168.1.251
  >2      ESP:aes-cbc-128/sha1 abe109fb 2015/ unlim - root 500 192.168.1.251

[edit]
rayka@vSRX2# run show security ipsec security-associations detail
ID: 2 Virtual-system: root, VPN Name: vSRX2-vSRX1
  Local Gateway: 192.168.1.252, Remote Gateway: 192.168.1.251
  Local Identity: ipv4_subnet(any:0,[0..7]=172.16.2.0/24)
  Remote Identity: ipv4_subnet(any:0,[0..7]=172.16.1.0/24)
  Version: IKEv1
  DF-bit: clear, Copy-Outer-DSCP Disabled                             , Policy-name: SEND-VPN-TRAFFIC
  Port: 500, Nego#: 29, Fail#: 0, Def-Del#: 0 Flag: 0x600829
  Multi-sa, Configured SAs# 1, Negotiated SAs#: 1
  Tunnel events:
    Thu Sep 15 2022 21:46:08: IPSec SA negotiation successfully completed (28 times)
    Wed Sep 14 2022 23:25:51: Initial-Contact received from peer. Stale IKE/IPSec SAs cleared (1 times)
    Wed Sep 14 2022 23:25:51: IKE SA negotiation successfully completed (2 times)
    Wed Sep 14 2022 23:25:45: IPSec SA negotiation successfully completed (1 times)
    Wed Sep 14 2022 23:25:44: Tunnel is ready. Waiting for trigger event or peer to trigger negotiation (1 times)
    Wed Sep 14 2022 23:25:44: External interface's address received. Information updated (1 times)
    Wed Sep 14 2022 23:25:44: External interface's zone received. Information updated (1 times)
  Direction: inbound, SPI: 992ba013, AUX-SPI: 0
                              , VPN Monitoring: -
    Hard lifetime: Expires in 2011 seconds
    Lifesize Remaining:  Unlimited
    Soft lifetime: Expires in 1450 seconds
    Mode: Tunnel(0 0), Type: dynamic, State: installed
    Protocol: ESP, Authentication: hmac-sha1-96, Encryption: aes-cbc (128 bits)
    Anti-replay service: counter-based enabled, Replay window size: 64
  Direction: outbound, SPI: abe109fb, AUX-SPI: 0
                              , VPN Monitoring: -
    Hard lifetime: Expires in 2011 seconds
    Lifesize Remaining:  Unlimited
    Soft lifetime: Expires in 1450 seconds
    Mode: Tunnel(0 0), Type: dynamic, State: installed
    Protocol: ESP, Authentication: hmac-sha1-96, Encryption: aes-cbc (128 bits)
    Anti-replay service: counter-based enabled, Replay window size: 64
In the output of these commands you can also make sure if phase 2 negotiation is successfully completed. You can also see the negotiated parameters and policy.
Another important parameter that you can see in the result of these command, are inbound and outbound SPI which we already talked about in the previous section and the theory of IPsec VPN tunnel.
Still to make sure that traffic are forwarding through the IPsec tunnel, you can send traffic between two subnets and then with command “show security ipsec statistics”, make sure if the number of packets sending and receiving through IPsec Tunnel are increasing.
[edit]
rayka@vSRX2# run show security ipsec statistics
ESP Statistics:
  Encrypted bytes:              480
  Decrypted bytes:             3840
  Encrypted packets:              4
  Decrypted packets:             32
AH Statistics:
  Input bytes:                    0
  Output bytes:                   0
  Input packets:                  0
  Output packets:                 0
Errors:
  AH authentication failures: 0, Replay errors: 28
  ESP authentication failures: 0, ESP decryption failures: 0
  Bad headers: 0, Bad trailers: 0

[edit]
rayka@vSRX2# run show security ipsec statistics
ESP Statistics:
  Encrypted bytes:              960
  Decrypted bytes:            11640
  Encrypted packets:              8
  Decrypted packets:             97
AH Statistics:
  Input bytes:                    0
  Output bytes:                   0
  Input packets:                  0
  Output packets:                 0
Errors:
  AH authentication failures: 0, Replay errors: 90
  ESP authentication failures: 0, ESP decryption failures: 0
  Bad headers: 0, Bad trailers: 0