Jinja2 Template in netconf help us separate network device configurations from automation script.
Jinja2 Template is a common configuration template for many network devices, in which in its simplest form, data from network devices are replaced with variables.
When applying the configuration template to network devices, variables in the configuration template are replaced with data of each network device.
Jinja2 Template Review
We already discussed how to write a simple Jinja2 configuration template and also an advanced Jinja2 configuration template in the course “CLI-based network automation with Python Nornir“.
But just to review, we used nornir plugin to take inventory advantage of this plugin which help us to separate inventory information and credentials from the automation script.
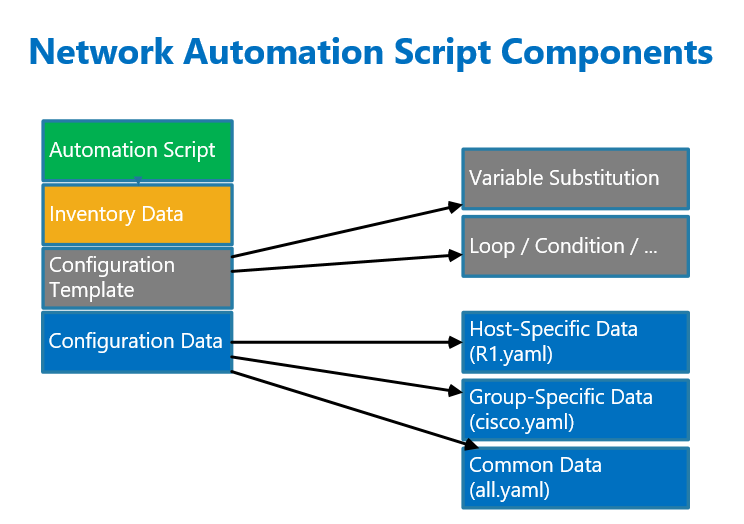
With the use of jinja2 configuration template, we create a common configuration template for many network devices and also separate it from the automation script.
In the simplest form, the configuration template uses variables that are replaced by the data of the respective network device at the time of the configuration deployment.
Jinja2 template also has other programming features like loops and conditionals.
The data of each network device is also kept separate from the network automation script, replacing the variables at the time that configuration templates are deployed to the network devices.
All these concepts can also be used to change the configuration of network devices with NETCONF protocol. The only difference is that we use XML-based and YANG-structured configuration template instead of CLI based configuration template to deploy to the network devices.
Jinja2 Template in NETCONF Example
Edit Config with NETCONF and Jinja2 Template
This is the automation script used to change the configuration of network devices using jinja2 configuration template and netconf protocol.
from nornir import InitNornir
from nornir_scrapli.tasks import netconf_edit_config
#from nornir_netconf.plugins.tasks import netconf_edit_config
from nornir_netconf.plugins.tasks import netconf_commit
from nornir_utils.plugins.functions import print_result
from nornir_jinja2.plugins.tasks import template_file
from nornir_utils.plugins.tasks.data import load_yaml

nr = InitNornir(config_file="config.yaml")

def load_data(task):
  hosts_data = task.run(task=load_yaml, file=f"./host_vars/{task.host}.yaml")
  task.host["hdata"] = hosts_data.result


def netconf_edit_config_with_template(task):
    template_to_load = task.run(task=template_file, template="ospf.j2", path="templates")
    configuration = template_to_load.result
    task.run(task=netconf_edit_config, target="candidate", config=configuration)
#    task.run(task=netconf_edit_config, xmldict="false", target="candidate", config=configuration)
    task.run(task=netconf_commit)

nr.run(task=load_data)
results = nr.run(task=netconf_edit_config_with_template)
print_result(results)
The task “load_yaml” from “nornir_utils” plugin is used to load YAML data into a dictionary structure.
Here, there is a YAML data file for each network device inside “host_vars” folder. the loaded YAML file will be kept inside a dictionary variable with the name of network device and “hdata” key.
In other words “host.hdata” is used to access to the root of data for each network devices.
The task “template_file” from “nornir_jinja2” is used to load the jinja2 configuration template and apply loaded data to the configuration template to extract the configuration for each network device.
And the final configuration will be deployed to the network devices using “netconf_edit_config” from “nornir_scrapli” or “nornir_netconf” plugins.
YAML Data File
The data of router R1 is located inside “host_vars\R1.yaml” YAML file.
majid@ubuntu2204tls:~/devnet/pyhton_nornir/2023/12.netconf$ cat host_vars/R1.yaml
---
ospf:
  - process_id: 1
    router_id: 1.1.1.1
    networks:
      - network: 192.168.11.0
        wildmask: 0.0.0.255
        area: 0
      - network: 192.168.12.0
        wildmask: 0.0.0.255
        area: 0
      - network: 192.168.13.0
        wildmask: 0.0.0.255
        area: 1
      - network: 192.168.14.0
        wildmask: 0.0.0.255
        area: 1
The information related to OSPF routing protocol including “process_id”, “router_id”, “network” and area numbers are stored inside this file.
The “process_id” and “network” numbers are a list of data which can be accessed using a loop logic.
YANG Strcutured Jinja2 Configuration Template
This is the OSPF configuration in the format of YANG data structure that we have used in the previous section to deploy through netconf protocol.
<config>
  <native xmlns="http://cisco.com/ns/yang/Cisco-IOS-XE-native">
    <router>
      <router-ospf operation="replace" xmlns="http://cisco.com/ns/yang/Cisco-IOS-XE-ospf">
        <ospf>
          <process-id>
            <id>1</id>
            <network>
              <ip>172.16.7.1</ip>
              <wildcard>0.0.0.0</wildcard>
              <area>10</area>
            </network>
            <network>
              <ip>172.17.8.1</ip>
              <wildcard>0.0.0.0</wildcard>
              <area>20</area>
            </network>
            <router-id>1.1.1.1</router-id>
          </process-id>
        </ospf>
      </router-ospf>
    </router>
  </native>
</config>
Exactly the same configuration is converted to jinja2 template format using variable substitution and for loops.
This is the jinja2 configuration template which we use in this section to apply to the network devices.
majid@ubuntu2204tls:~/devnet/pyhton_nornir/2023/12.netconf$ cat templates/ospf.j2
<config>
    <native xmlns="http://cisco.com/ns/yang/Cisco-IOS-XE-native">
        <router>
            <router-ospf xmlns="http://cisco.com/ns/yang/Cisco-IOS-XE-ospf">
                <ospf>
                {% for ospf in host.hdata.ospf %}
                    <process-id>
                        <id>{{ ospf.process_id }}</id>
                        {% for networks in ospf.networks %}
                            <network>
                                <ip>{{ networks.network }}</ip>
                                <wildcard>{{ networks.wildmask }}</wildcard>
                                <area>{{ networks.area }}</area>
                            </network>
                        {% endfor %}
                            <router-id>{{ ospf.router_id }}</router-id>
                    </process-id>
                {% endfor %}
                </ospf>
            </router-ospf>
        </router>
    </native>
</config>
“host.hdata” is used to access to root of data dictionary of each network device.
For example, “host.hdata.ospf.process_id” is used to access the list of OSPF process id for each network device.
The variable “host.hdata.ospf.networks” is to access the list of network numbers to be configured in each network device.
The variables “host.hdata.ospf.networks.wildmask” and “host.hdata.ospf.networks.area” are to access the wild mask and area number for each network.
Two for loops are used to access the list of OSPF processes and OSPF networks.
All other parts of the jinja2 template are exactly the same as what we deployed on network devices without jinja2 template.
To use jinja2 template in automation script, beforehand we have to install “nornir_jinja2” plugin.
python3 -m pip install nornir_jinja2Before we run the automation script, let’s check the current OSPF configuration of network device.
router ospf 1
 router-id 1.1.1.1
 network 192.168.11.0 0.0.0.255 area 0
 network 192.168.12.0 0.0.0.255 area 0
 network 192.168.13.0 0.0.0.255 area 1
 network 192.168.14.0 0.0.0.255 area 1
Now we run the script to see the result of the configuration. Before that we change a network in R1.yaml data file.
majid@ubuntu2204tls:~/devnet/pyhton_nornir/2023/12.netconf$ python3 12.9.netconf_edit_config_with_template.py
netconf_edit_config_with_template***********************************************
* R1 ** changed : True *********************************************************
vvvv netconf_edit_config_with_template ** changed : False vvvvvvvvvvvvvvvvvvvvvv INFO
---- template_file ** changed : False ------------------------------------------ INFO
<config>
    <native xmlns="http://cisco.com/ns/yang/Cisco-IOS-XE-native">
        <router>
            <router-ospf xmlns="http://cisco.com/ns/yang/Cisco-IOS-XE-ospf">
                <ospf>
                                    <process-id>
                        <id>1</id>
                                                    <network>
                                <ip>192.168.111.0</ip>
                                <wildcard>0.0.0.255</wildcard>
                                <area>0</area>
                            </network>
                                                    <network>
                                <ip>192.168.12.0</ip>
                                <wildcard>0.0.0.255</wildcard>
                                <area>0</area>
                            </network>
                                                    <network>
                                <ip>192.168.13.0</ip>
                                <wildcard>0.0.0.255</wildcard>
                                <area>1</area>
                            </network>
                                                    <network>
                                <ip>192.168.14.0</ip>
                                <wildcard>0.0.0.255</wildcard>
                                <area>1</area>
                            </network>

                            <router-id>1.1.1.1</router-id>
                    </process-id>
                                </ospf>
            </router-ospf>
        </router>
    </native>
</config>
---- netconf_edit_config ** changed : True ------------------------------------- INFO
<rpc-reply xmlns="urn:ietf:params:xml:ns:netconf:base:1.0" message-id="101">
  <ok/>
</rpc-reply>

---- netconf_commit ** changed : False ----------------------------------------- INFO
{ 'error': None,
  'errors': [],
  'ok': True,
  'rpc': <?xml version="1.0" encoding="UTF-8"?>
<rpc-reply xmlns="urn:ietf:params:xml:ns:netconf:base:1.0" message-id="urn:uuid:b21a68a4-88fb-466c-ba85-501e56554e9f" xmlns:nc="urn:ietf:params:xml:ns:netconf:base:1.0"><ok/></rpc-reply>}
^^^^ END netconf_edit_config_with_template ^^^^^^^^^^^^^^^^^^^^^^^^^^^^^^^^^^^^^
As we expected, by default the configuration is merged with the current configuration.
router ospf 1
 router-id 1.1.1.1
 network 192.168.11.0 0.0.0.255 area 0
 network 192.168.12.0 0.0.0.255 area 0
 network 192.168.13.0 0.0.0.255 area 1
 network 192.168.14.0 0.0.0.255 area 1
 network 192.168.111.0 0.0.0.255 area 1
Now we can add operation=”replace” at <router-ospf> or at <ospf> level, to replace the current configuration with the new configuration.
Then we run again the script to make sure that the OSPF configuration is replaced.
This the result of OSPF configuration after running the script. And as we expected the configuration is replaced.
majid@ubuntu2204tls:~/devnet/pyhton_nornir/2023/12.netconf$ python3 12.9.netconf_edit_config_with_template.py
netconf_edit_config_with_template***********************************************
* R1 ** changed : True *********************************************************
vvvv netconf_edit_config_with_template ** changed : False vvvvvvvvvvvvvvvvvvvvvv INFO
---- template_file ** changed : False ------------------------------------------ INFO
<config>
    <native xmlns="http://cisco.com/ns/yang/Cisco-IOS-XE-native">
        <router>
            <router-ospf xmlns="http://cisco.com/ns/yang/Cisco-IOS-XE-ospf">
                <ospf operation="replace">
                                    <process-id>
                        <id>1</id>
                                                    <network>
                                <ip>192.168.111.0</ip>
                                <wildcard>0.0.0.255</wildcard>
                                <area>0</area>
                            </network>
                                                    <network>
                                <ip>192.168.12.0</ip>
                                <wildcard>0.0.0.255</wildcard>
                                <area>0</area>
                            </network>
                                                    <network>
                                <ip>192.168.13.0</ip>
                                <wildcard>0.0.0.255</wildcard>
                                <area>1</area>
                            </network>
                                                    <network>
                                <ip>192.168.14.0</ip>
                                <wildcard>0.0.0.255</wildcard>
                                <area>1</area>
                            </network>

                            <router-id>1.1.1.1</router-id>
                    </process-id>
                                </ospf>
            </router-ospf>
        </router>
    </native>
</config>
---- netconf_edit_config ** changed : True ------------------------------------- INFO
<rpc-reply xmlns="urn:ietf:params:xml:ns:netconf:base:1.0" message-id="101">
  <ok/>
</rpc-reply>

---- netconf_commit ** changed : False ----------------------------------------- INFO
{ 'error': None,
  'errors': [],
  'ok': True,
  'rpc': <?xml version="1.0" encoding="UTF-8"?>
<rpc-reply xmlns="urn:ietf:params:xml:ns:netconf:base:1.0" message-id="urn:uuid:f7809877-3530-48e9-86fe-d4e4c2ec4fc8" xmlns:nc="urn:ietf:params:xml:ns:netconf:base:1.0"><ok/></rpc-reply>}
router ospf 1
 router-id 1.1.1.1
 network 192.168.12.0 0.0.0.255 area 0
 network 192.168.13.0 0.0.0.255 area 1
 network 192.168.14.0 0.0.0.255 area 1
 network 192.168.111.0 0.0.0.255 area 1
you can download the script to change the configuration using jinja2 template and netconf here.