Cisco SD-WAN Topology
The installation and configuration of vBond is mostly similar to the vManage Controller. But after vBond has been installed and it is also provisioned with a certificate, we will configure our first DTLS tunnel between vBond and vManager controllers.
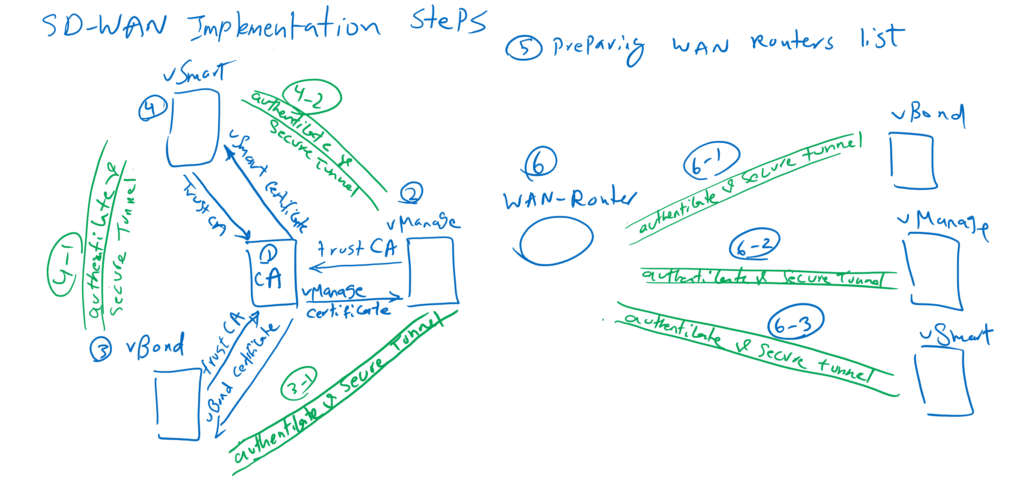
Probably you remember that there are DTLS tunnels between all the controllers, and also between the controllers and WAN routers, which are used to securely transfer management and control traffic.
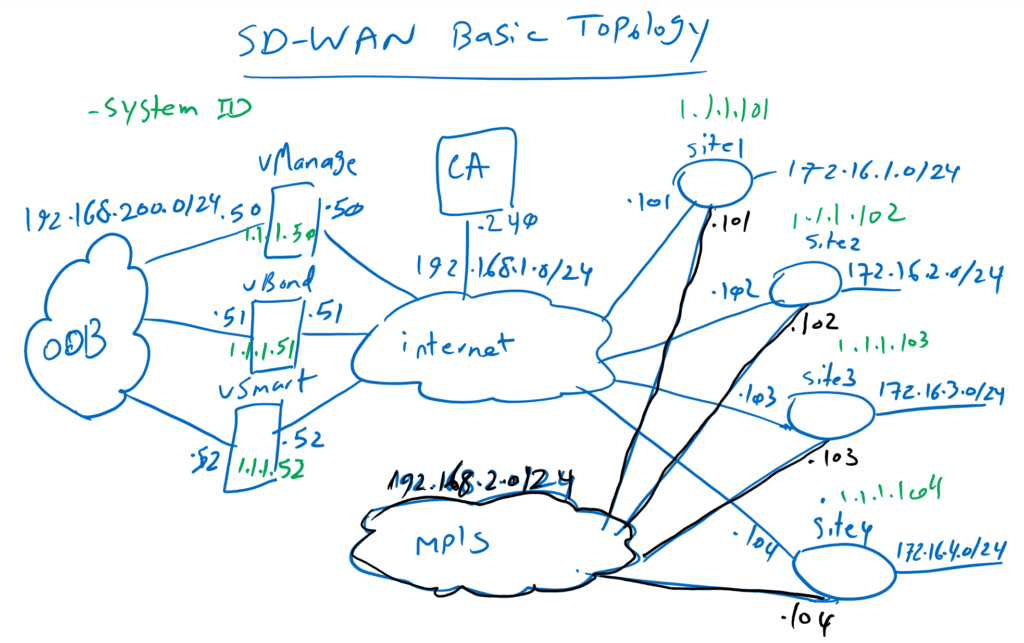
As a reminder, let’s take another look at the topology. As you can see, vBond is connected to both Out of Band Management (OOB) network and Internet transport. IP address 192.168.200.51 is the address of OOB and 192.168.1.51 is the address of the interface connected to the Internet, which must be reachable to all other controllers and WAN routers. 1.1.1.51 is the IP address that we will configure as system-ip in vBond controller.
1. Introduction to Cisco SD-WAN Architecture
Download vBond 20.3.4 in Cisco Website
vBond Installation and Configuration
Now let’s import the vBond OVF virtual machine. You need to know that both the vEdge WAN router and vBond controller use the same OVF, and only the configuration is different. Therefore we will import vEdge OVF as a vBond virtual machine.
vBond has four (4) network adapters by default. Actually, it’s better to say that vEdge has four network adapters to be connected to different WAN transports. in vBond controller, I only use two network adapters, the first network adapter as an OOB interface and the second network adapter to connect to the internet. In my ESX environment, they are both in the same port group called external.
Now let’s review the configuration and then configure vBond controller.
!!!!! vBond
!
Adpater1 for oob : eth0: 192.168.200.51/24
Adpater2 for transport: ge0/0: 192.168.1.51/24
!
user: admin
pass: admin --> rayka-co.com
!!! vBond initial Configuration
conf t
system
host-name vBond
system-ip 1.1.1.51
site-id 100
organization-name RAYKA
vbond 192.168.1.51 local vbond-only
clock timezone Aisa/Tehran
ntp server 37.156.28.13 prefer vpn 0
show configuration
commit
!
vpn 0
ip route 0.0.0.0/0 192.168.1.1
interface ge0/0
ip address 192.168.1.51/24
no shutdown
no tunnel-interface
commit
vpn 512
interface eth0
ip address 192.168.200.51/24
no shutdown
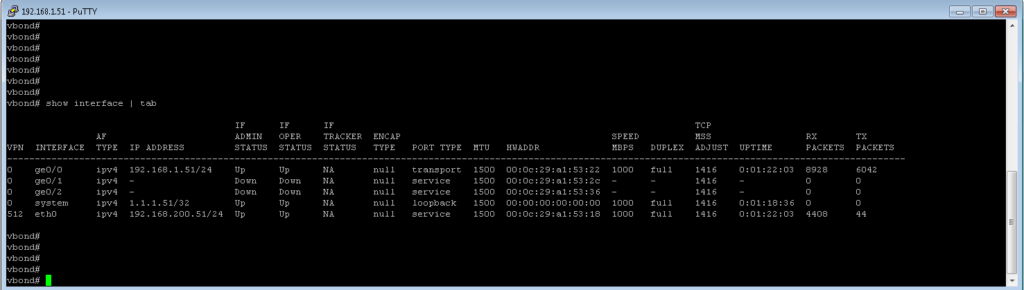
commitAs you can see the first adapter is used as eth0 for OOB and the second transport GE0/0 is used to connect to the internet. 192.168.200.51 will be configured in eth0 and 192.168.1.51 will be configured in GE0/0.
By default, username and passwords are admin/admin. The password is changed to rayka-co.com like what we did in vManage Controller.
The system configuration is the same as vManage. Hostname, System-ip, site-id, Organization name and NTP will be configured in vBond controller like vManage. The details of each of these commands are already explained in previous section, vManage installation.
The only difference is when we specify the vbond IP address. parameters, “local vbond-only” is added at the end of this command. “local” means this machine itself is vBond controller. “vbond-only” means that this machine will not be used as a WAN router since they are using the same OVF virtual machine.
!!! vBond
system
 host-name vBond
 system-ip 1.1.1.51
 site-id 100
 organization-name RAYKA
 vbond 192.168.1.51 local vbond-only
 clock timezone Aisa/Tehran
 ntp server 37.156.28.13 prefer vpn 0
 show configuration
 commit
Then we configure VPN 0 and VPN 512. Like the vManage Controller, VPN 512 is used as the management VRF and VPN 0 as the default VRF for forwarding the data traffic. interface eth0 is configured in VPN 512 with IP address 192.168.200.51. interface GE0/0 is configured inside VPN 0 with IP address 192.168.1.51. default route is configured in VPN 0 with gateway address 192.168.1.1. Default route can also be configured in VPN 512 but I have not configured, since my management client is directly connected to OOB network.
!!! vBond
vpn 0
 ip route 0.0.0.0/0 192.168.1.1
 interface ge0/0
  ip address 192.168.1.51/24
  no shutdown
  no tunnel-interface
 commit

vpn 512
 interface eth0
  ip address 192.168.200.51/24
  no shutdown
  commit
The tunnel interface is configured by default in the vEdge virtual machine. Now I delete the tunnel interface but it will be recreated in a few minutes after certificate is provisioned in vBond.
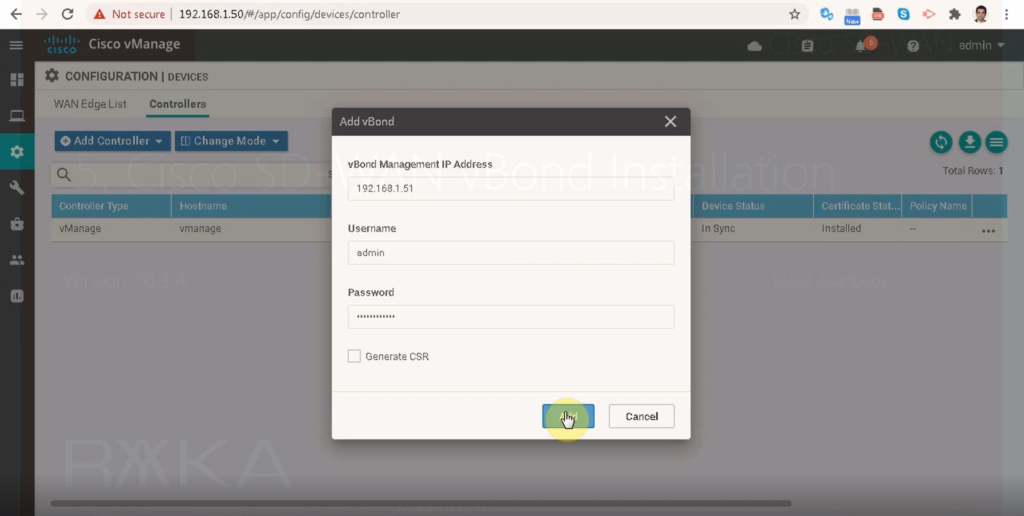
Now let’s add vBond controller in vManage controller.
configuration -> devices -> controllers -> add controller -> vBond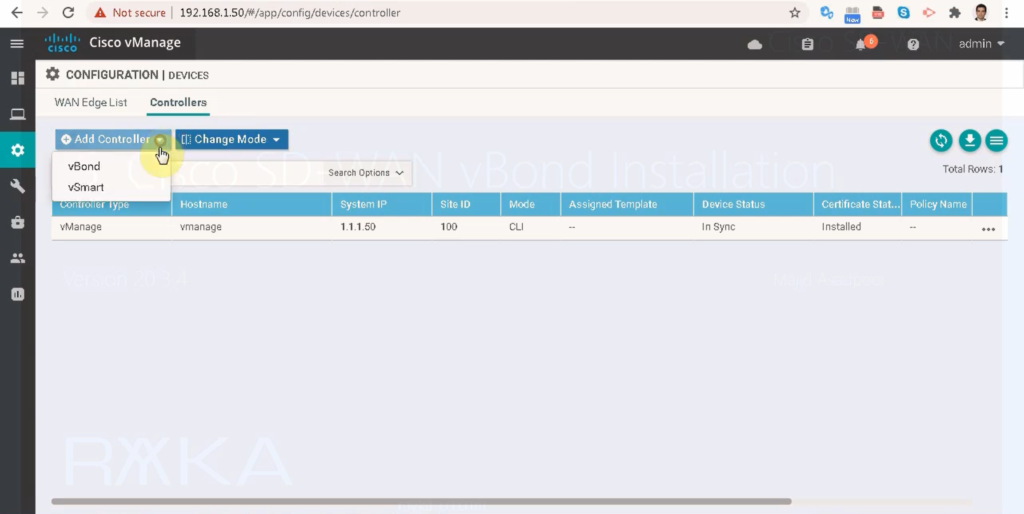
vBond Certificate Installation
Probably you remember that for the installation of vManage we manually copied the CA certificate to vManage before we request and install certificate. But when we add the vBond controller in vManage, the CA certificate is copied automatically to vBond controller and we don’t have to copy it manually.
To ensure that the CA certificate is automatically transferred into vBond controller, we can use the following command in the vBond controller.
!!! vBond
vbond# show certificate root-ca-cert | inc rayka
        Issuer: DC=local, DC=rayka-co, CN=CA
        Subject: DC=local, DC=rayka-co, CN=CA
Now we can request and install certificate for vBond.
Configuration -> certificate -> controllers -> vBond -> generate CSR -> copy csr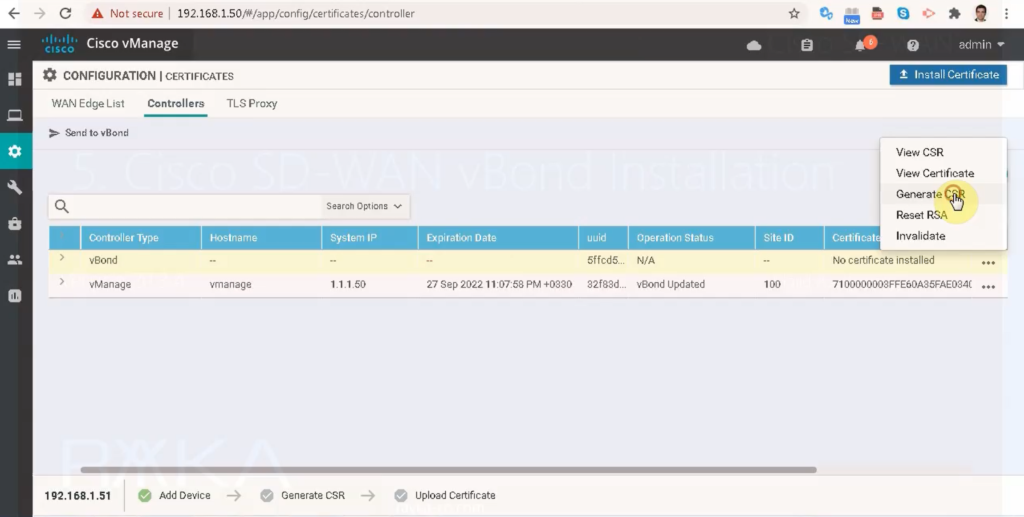
Give certificate request to CA server and receive vBond certificate
http://192.168.1.240/certsrv -> request a certificate -> advanced certificate request -> paste csr -> use sdwan template -> save with vBond name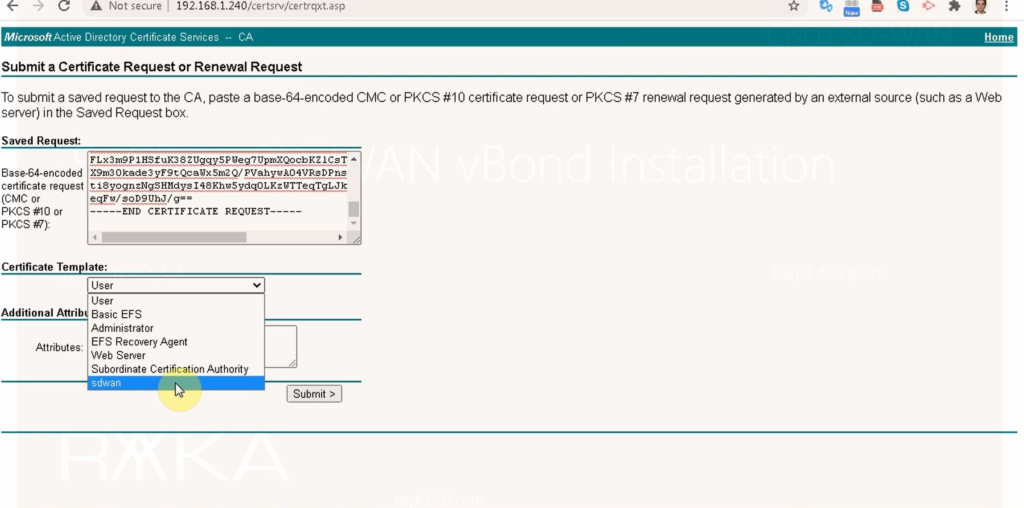
received certificate will be installed in vBond controller and through vManage web interface.
Configuration -> certificate -> controllers -> vBond -> Install Certificate -> add generated vBond certificate.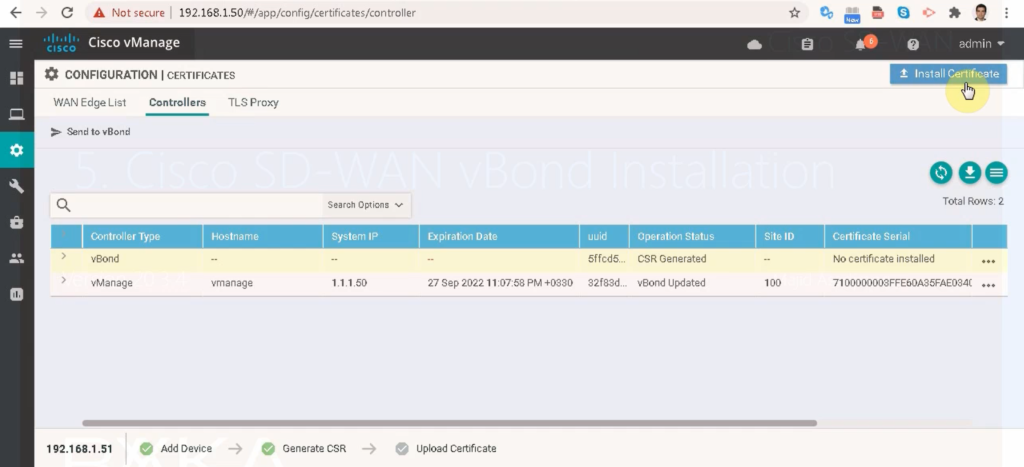
You can see that the certificate is installed but not yet in sync. We need to create DTLS tunnels between vManage and vBond so that they can be synchronized.
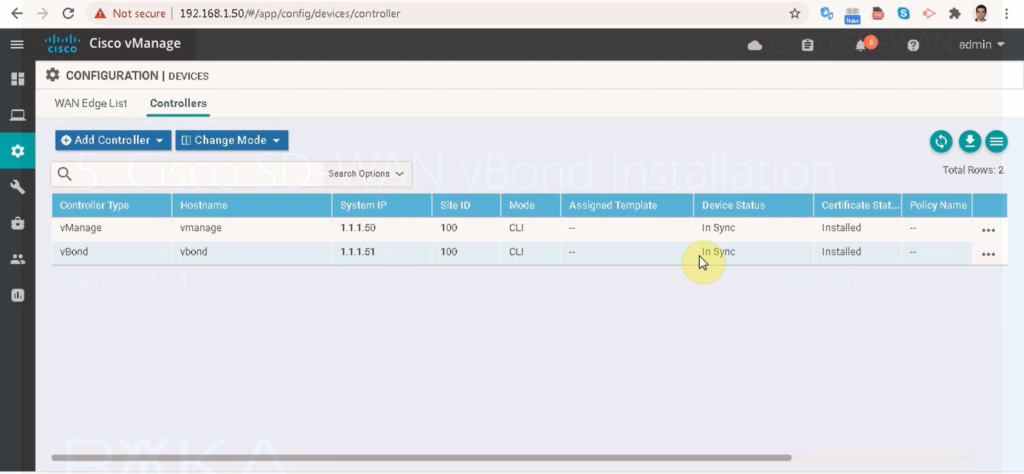
Configuration -> devices -> controllers
Create DTLS Tunnel between vManage and vBond
DTLS Tunnel must be created in both vManage and vBond over internet transport. As you know internet transport is in default VRF (VPN 0). In vMange, eth1 is connected to internet transport and in vBond, GE0/0 is connected to transport internet.
!!! vManage
vpn 0
 int eth1
  tunnel-interface
    allow-service all
   commit

!!! vBond
vpn 0
 int ge0/0
  tunnel-interface
    allow-service all
    encapsulation ipsec
   commit
We allow all services in Tunnel interface.
In vBond we have to configure encapsulation IPSec, otherweise we will receive error.
In vManage, with “show control connections”, you can make sure if two DTLS tunnels between vManage and vBond is up.
Monitor DTLS Tunnel between vManage and vBond
vmanage# show control connections
                                   PEER                                                                        PEER                                          PEER
      PEER    PEER PEER            CONFIGURED        SITE       DOMAIN PEER                                    PRIV  PEER                                    PUB
INDEX TYPE    PROT SYSTEM IP       SYSTEM IP       ID         ID     PRIVATE IP                              PORT  PUBLIC IP                               PORT  ORGANIZATION            REMOTE COLOR     STATE UPTIME
--------------------------------------------------------------------------------------------------------------------------------------------------------------------------------------------------------------------------
0     vbond   dtls 1.1.1.51        1.1.1.51        0          0      192.168.1.51                            12346 192.168.1.51                            12346 RAYKA                   default         up     0:01:25:18
1     vbond   dtls 0.0.0.0         -               0          0      192.168.1.51                            12346 192.168.1.51                            12346 RAYKA                   default         up     0:01:25:19

In vBond, with “show orchestrator connections”, you can check the same result.
vbond# show orchestrator connections
                                                                                     PEER                      PEER
         PEER     PEER     PEER             SITE        DOMAIN      PEER             PRIVATE  PEER             PUBLIC                                   ORGANIZATION
INSTANCE TYPE     PROTOCOL SYSTEM IP        ID          ID          PRIVATE IP       PORT     PUBLIC IP        PORT    REMOTE COLOR     STATE           NAME                    UPTIME
-----------------------------------------------------------------------------------------------------------------------------------------------------------------------------------------------
0        vmanage  dtls     1.1.1.50         100         0           192.168.1.50     12346    192.168.1.50     12346   default          up              RAYKA                   0:01:27:17
0        vmanage  dtls     1.1.1.50         100         0           192.168.1.50     12446    192.168.1.50     12446   default          up              RAYKA                   0:01:27:17

In the event of an error, you can check the cause with “show control connection-history”. It tells us when the tunnel has encountered an error, along with the reason code and description.
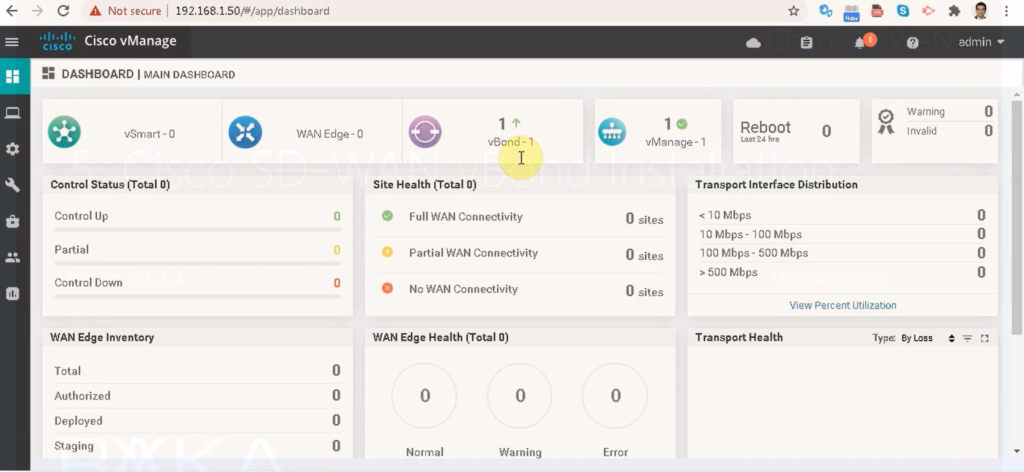
show control connection-historyNow you can see in the dashboard if vBond has been added to the list. if The color is green, it means it is activated and ok.
In Configuration -> Devices -> Controllers, you should see that it is now in sync and the second controller is added to SDWAN infrastructure.
Congratulations!
Your project and explanations were extremely well-executed and professional.
Thank you very much.
Thank you so much for your support and kind words!