1. Introduction to Cisco SD-WAN Architecture
download Cisco SD-WAN Installation Configuration Notes
The first step is to download the latest version of the Cisco SD-WAN vManage software from the Cisco website. As you can see, version 20.3.4 is the latest stable version in the last days of September 2021.
Download vManage 20.3.4 in Cisco Website
You can also download other components of SD-WAN Architecture with the same version from the Cisco website.
Download Cisco SD-WAN Softwares from Cisco Website
SD-WAN Infrastructure Topology
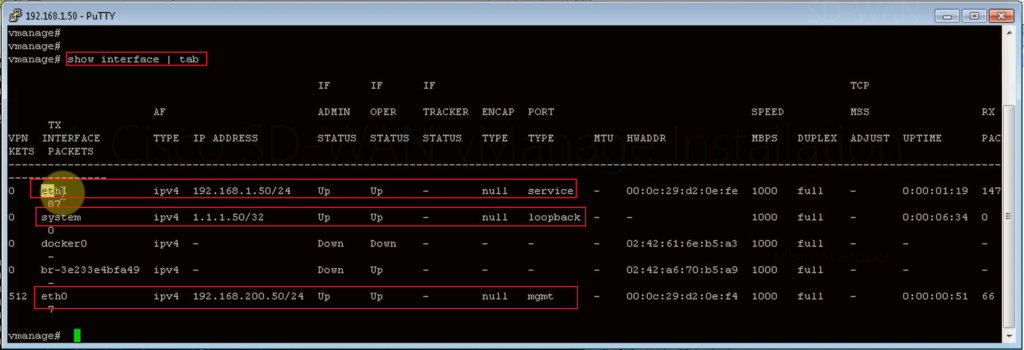
Before installing vManage, let’s take a look at the topology and check how vManage is connected to the network. As you can see, vManage is connected to the network through two network adapters. One with OOB (Out of Band Management) network and the other with Internet transport. 192.168.200.0/24 is the subnet address of OOB and 192.168.1.0/24 is the subnet address of internet transport. .50 is the last digit of vManage IP Address in both OOB and Internet Transport.
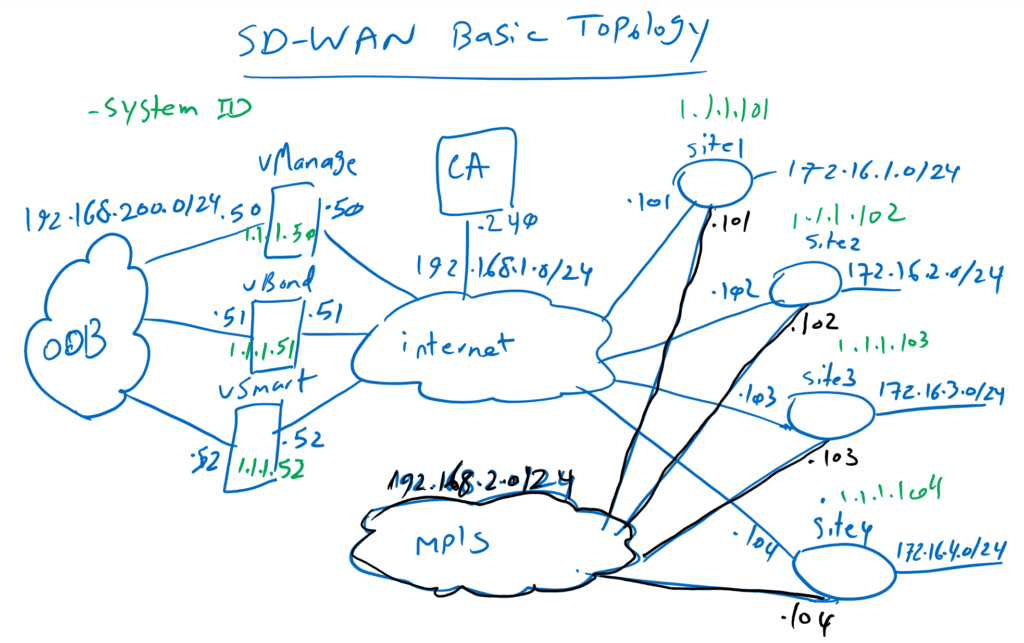
It is also good to remember IP address of vBond, 192.168.1.51, which has to be configured in every controllers and also WAN routers.
Now we can import the OVF version of vManage into VMware ESX.
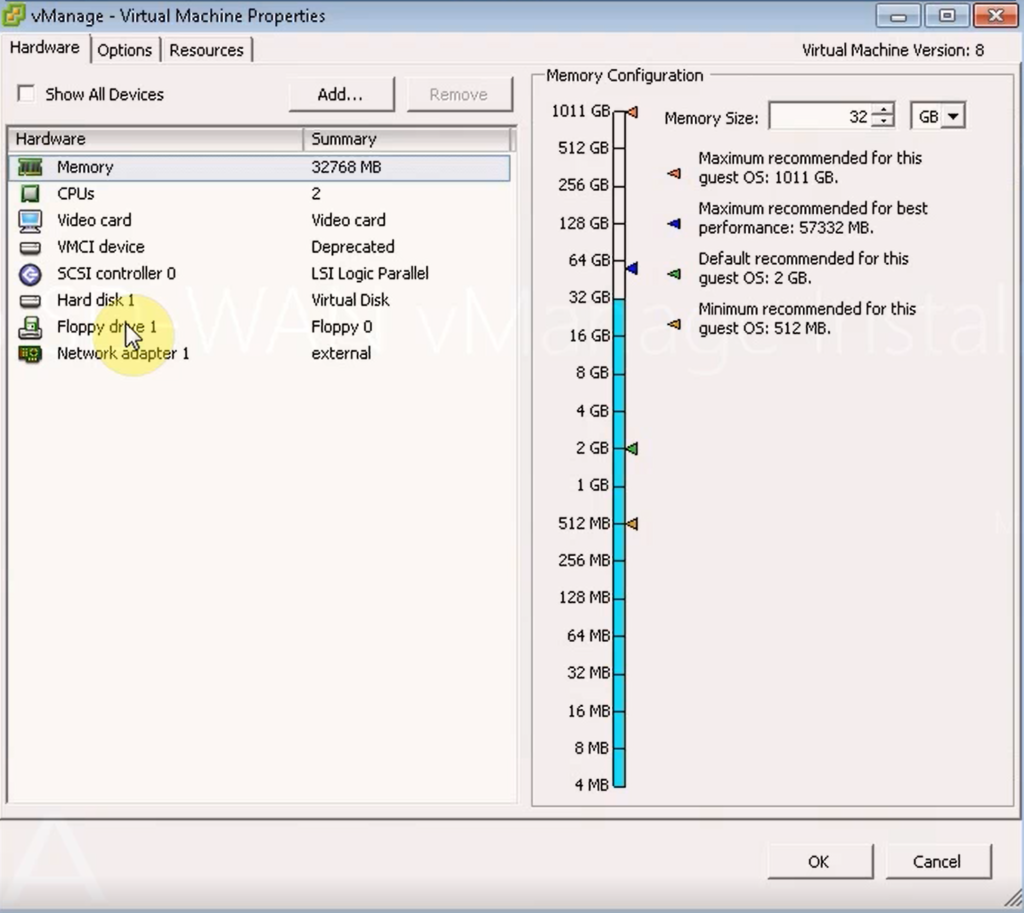
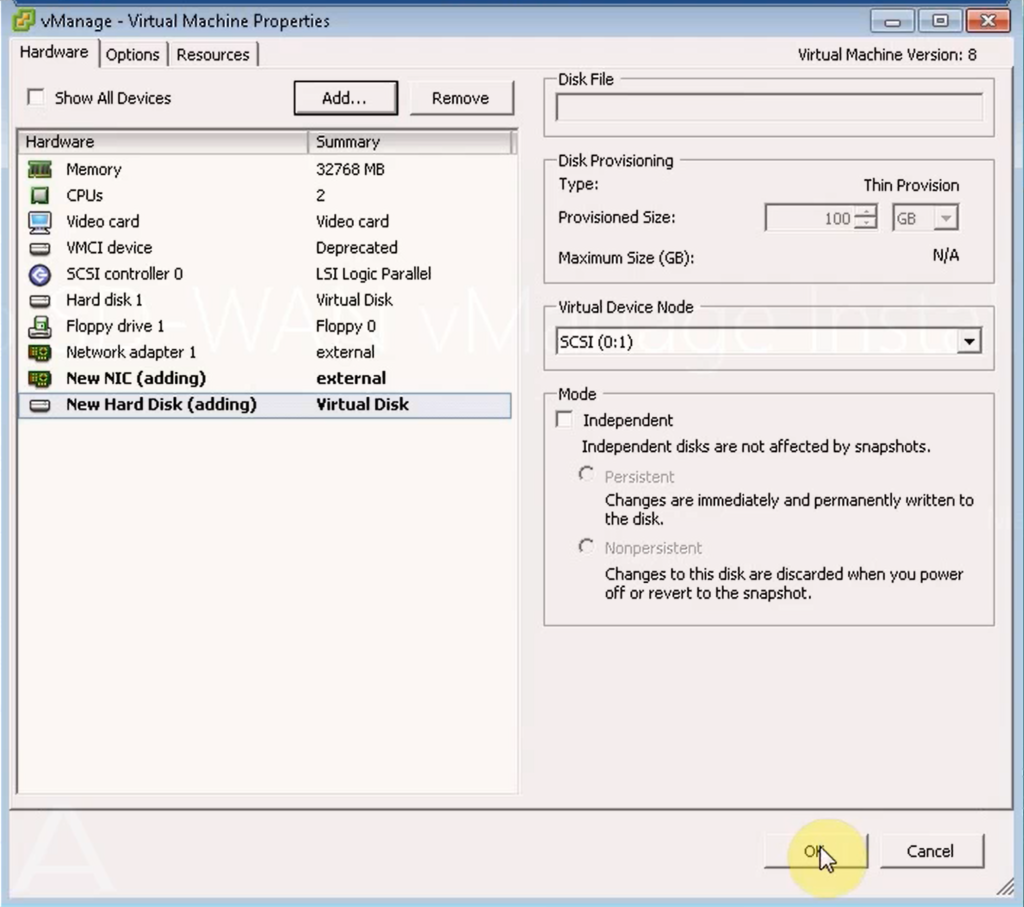
OVF comes with just one Disk and one network adapter by default. But we need two network adapters and two Disks. So we do not turn on the machine at this time.
Before configuring vManage, let’s review what we are going to configure.
vManage Configuration
!!! vManage Configuration
Adapter1 (oob): eth0: 192.168.200.50
Adapter2 (first transport): eth1 : 192.168.1.50
Disk1: for os
Disk2: for configuration (100GB thin)
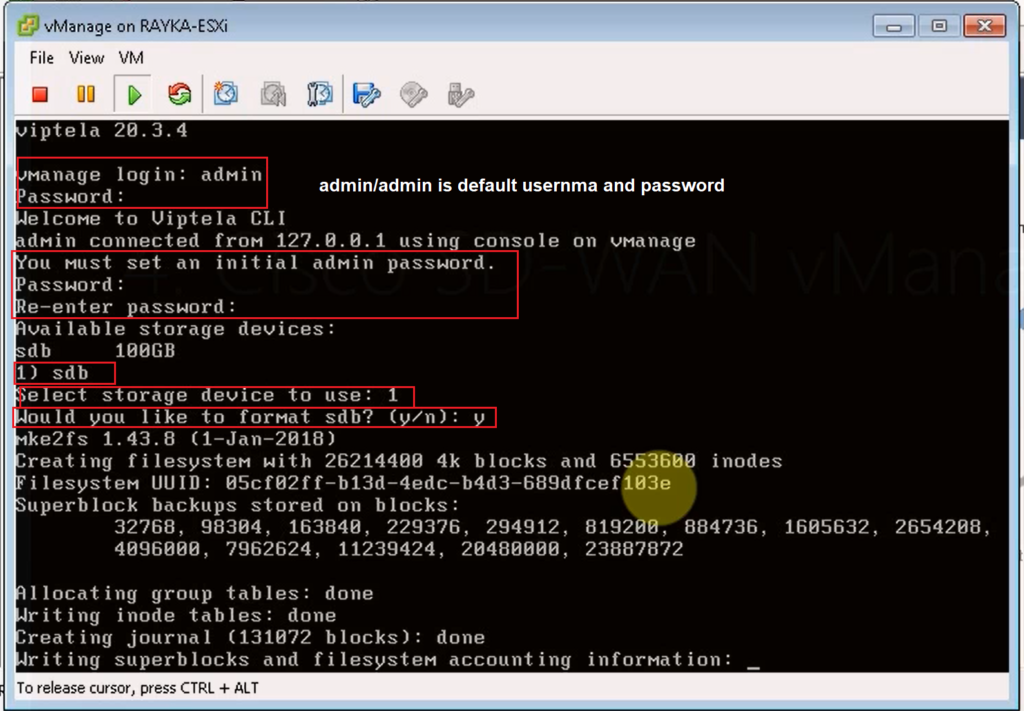
user: admin
pass: admin --> rayka-co.com
disk: 1 (Disk2 100GB)
conf t
system
host-name vManage
system-ip 1.1.1.50
site-id 100
organization-name RAYKA
vbond 192.168.1.51
clock timezone Asia/Tehran
ntp server 37.156.28.13 prefer vpn 0
show configuration
commit
vpn 0
no interface eth0
interface eth1
ip address 192.168.1.50/24
no shutdown
ip route 0.0.0.0/0 192.168.1.1
dns 8.8.8.8
commit
vpn 512
interface eth0
ip address 192.168.200.50/24
no shutdown
commitAs you know, vManage OVF loads with just one network adapter to be connected to transport network. but I want also to connect vManage to OOB (out of band management) network. so I will add another adapter. The first adapter eth0 will connect to OOB network and the second adapter will connect to internet transport.
There is also just one Disk with default OVF configuration. but two Disks are required to install vManage. First Disk will be used to load Operating System and the second Disk will be used for the configuration.
Default username and password is admin/admin. We will change the password to rayka-co.com.
Here you can also see the configuration that we will copy into vManage. We do the same or similar configuration in all controllers.
!!! vManage System Configuration
system
 host-name vManage
 system-ip 1.1.1.50
 site-id 100
 organization-name RAYKA
 vbond 192.168.1.51
 clock timezone Asia/Tehran
 ntp server 37.156.28.13 prefer vpn 0
 show configuration
 commit
Host-name is configured to vManage.
Then system-ip is configured. system IP is very important in the SD-WAN infrastructure. It is good to know that system-ip is configured as a loopback interface address in all controllers. System-ip does not have to be routable. I chose 1.1.1.50 for the vManage system IP address, which is not routable and not pingable in our infrastructure.
With site-id we can specify the site number for each component of the SD-WAN infrastructure. If there are two WAN routers in the same site, then the controllers need to know which WAN routers are in the same site since we don’t need IPSec tunnels between WAN routers in the same site. Controllers can distinguish if WAN routers are in the same site through site-id. we will use site-id 100 for all controllers. Every WAN router will be configured with different site-id number.
The organization name is important in certificate-based authentication and also in provisioning WAN router on the Cisco website. Therefore we have to use the same organization name throughout the SD-WAN infrastructure.
The vBond IP address is important to be configured in all controllers and also WAN routers, since it is the first point of contact for all SD-WAN infrastructure components. As you know 192.168.1.51 is the IP address of vBond in our infrastructure.
Clock, time zone and NTP configuration are very important since the time is important in certificate based authentication.
This part of configuration is mostly the same in all controllers.
now we must configure VPN 0 and VPN 512 in vManage. What are VPN 0 and VPN 512? Most Cisco routers and switches, by default, have two VRF configured. VRF management for out-of-band management and VRF default for data traffic. In Cisco SD-WAN controllers, we also have two VRFs by default. But here they are called VPN which is a Viptela Terminology. VPN 512 is the same as management VRF. therefore eth0 (our first adapter) is configured within VPN 512. VPN 0 is the same as default VRF and we will configure eth1 interface (our second adapter) inside VPN 0. we will configure also other VPNs which will be discussed later.
By default, eth0 is in VPN 0. I configure eth0 out of VPN 0 and add eth1 inside VPN 0 which is our internet transport in default VRF. The IP address 192.168.1.50 is assigned to eth1 as we have defined in our topology. Default route and name server is also configured in VPN 0. DNS name-server normally should be the IP address of name server belonging to organization. But I configured 8.8.8.8 as name-server.
vpn 0
 no interface eth0
 interface eth1
  ip address 192.168.1.50/24
  no shutdown
 ip route 0.0.0.0/0 192.168.1.1
 dns 8.8.8.8
  commit
In VPN 512 we add eth0 as an out-of-band management interface and the IP address 192.168.200.50 is also configured. I didn’t add a default route in VPN 512 since my management client computer is directly connected to this network. But you probably also need a default route in VPN 512.
vpn 512
 interface eth0
  ip address 192.168.200.50/24
  no shutdown
  commit
Now it is the time to install and configure vManage.
First we have to add one Network Adapter and also one Disk into vManage1.
Then we turn on the machine and configure as we have discussed.
Now let’s connect to vManage through SSH to check the configuration, interface IP addresses and NTP association status.
then the configuration is done as explained above.
vManage Certificate Installation
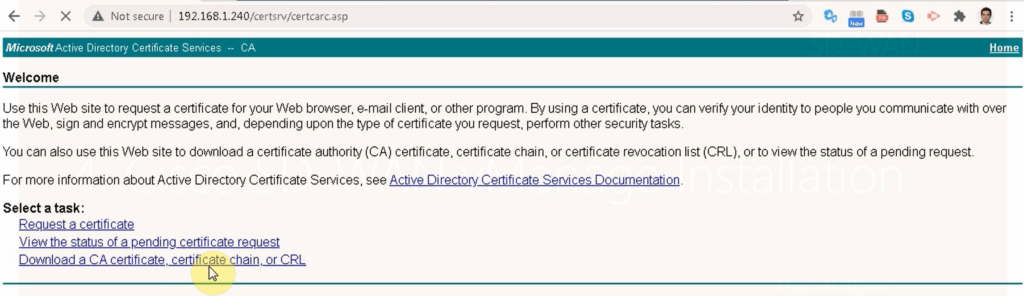
Now we have to trust CA certificate in vManage and receive a certificate for vManage itself.
https://192.168.1.50
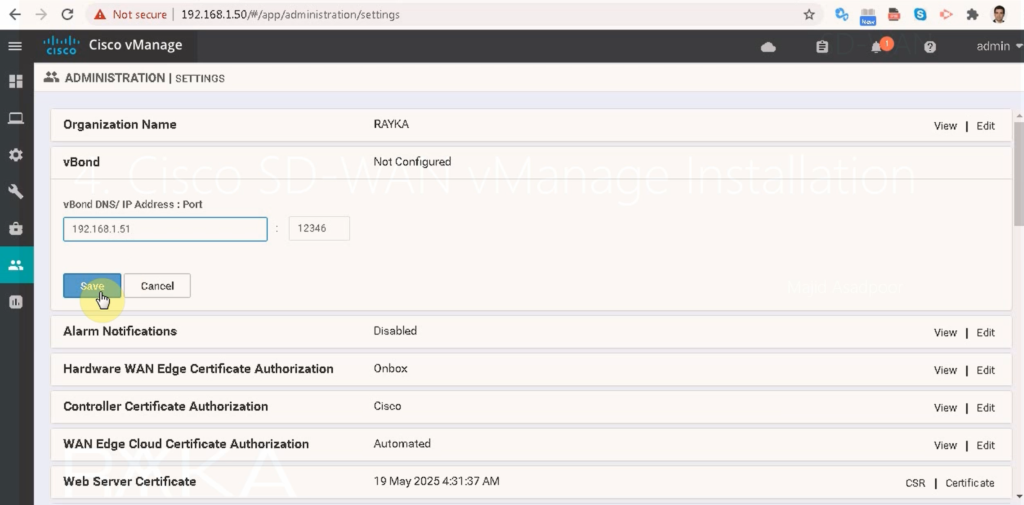
administration --> setting
organization name: RAYKA
vBond: 192.168.1.51:12346
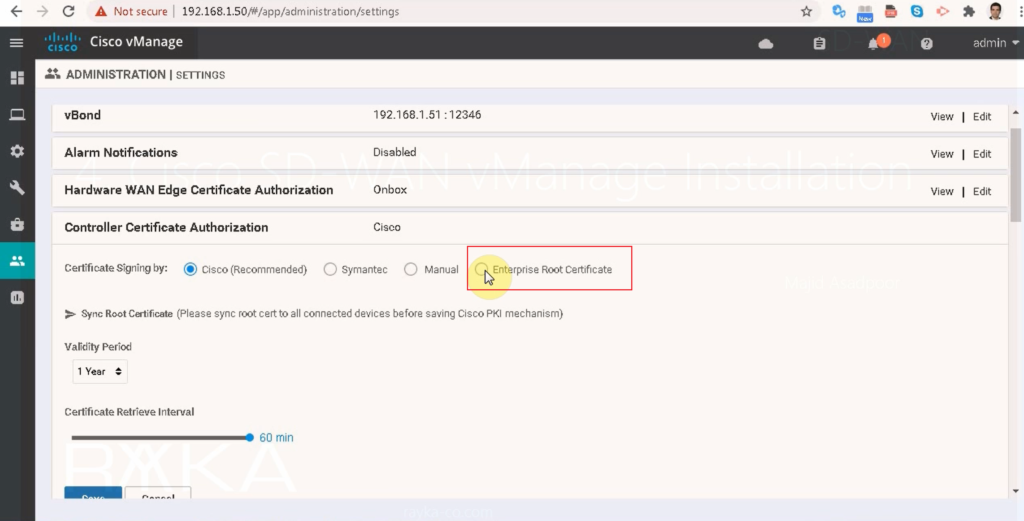
controller certificate authorization: Enterprise root
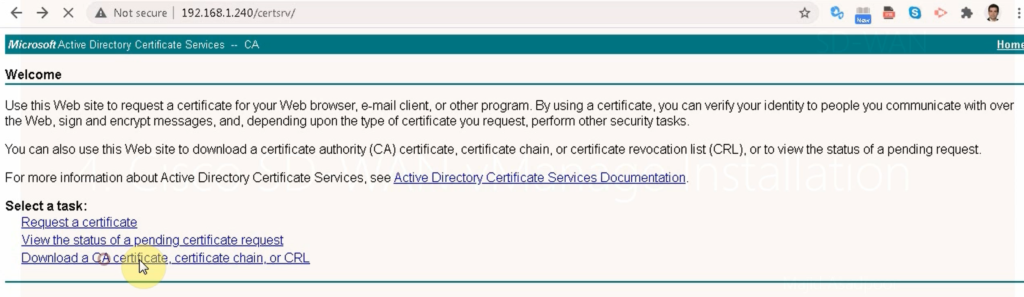
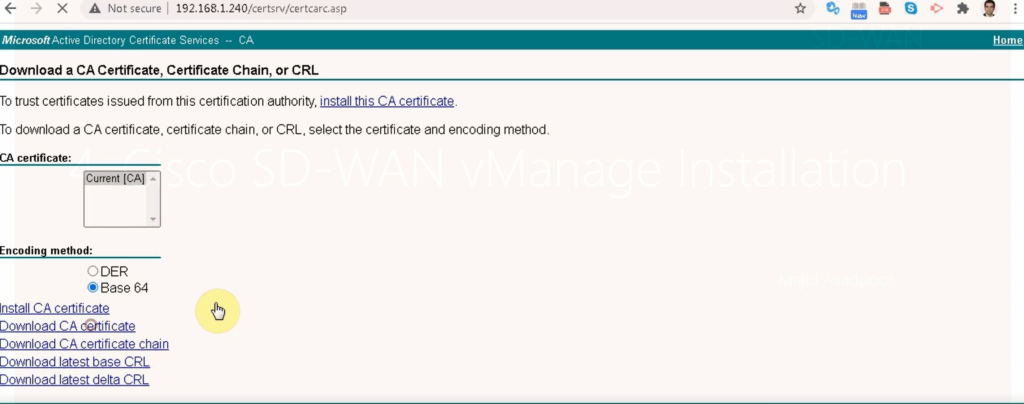
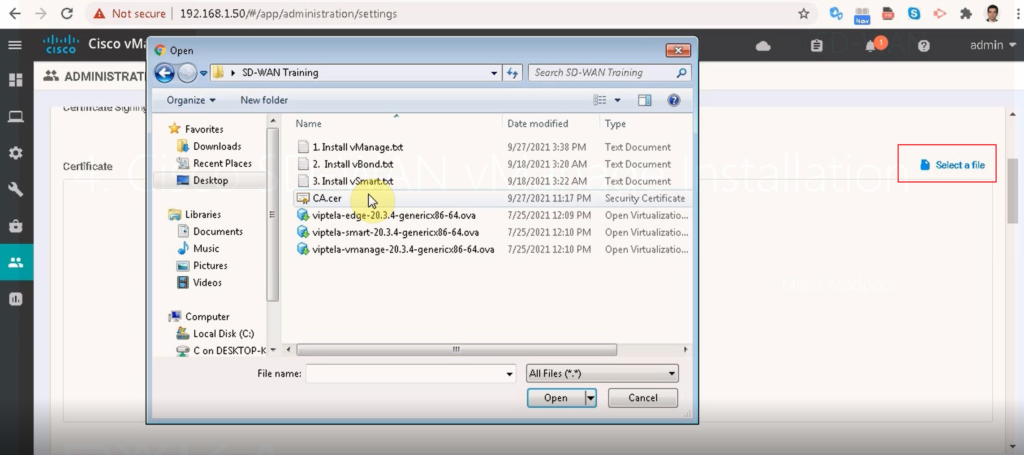
download CA certificate from CA Server and add it into vManage
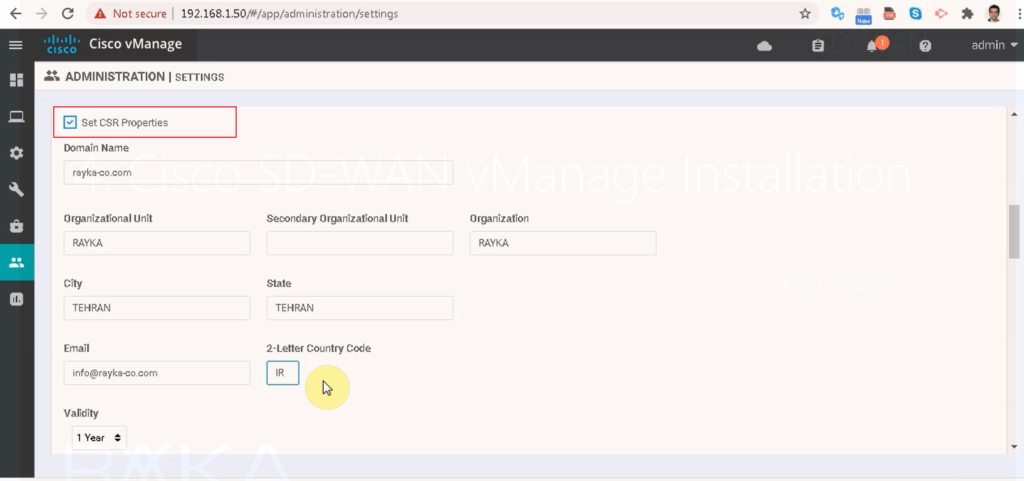
set CSR properties
domain name: rayka-co.com
ou: RAYKA
organization: RAYKA
city: Tehran
State: Tehran
email:[email protected]
2-letter country code: IR
validity: 1 year
;; you can check if CA certificate is installed in vManage
ssh 192.168.1.50 (vManage)
show certificate root-ca-cert | inc rayka
in administration -> settings, we configure Organization name (RAYKA), and vBond IP Address (192.168.1.151), import certificate of CA server and also configure certificate parameters of vManage itself so we can send a certificate request (CSR) to CA server and receive a certificate for vManage from Certificate Authority.

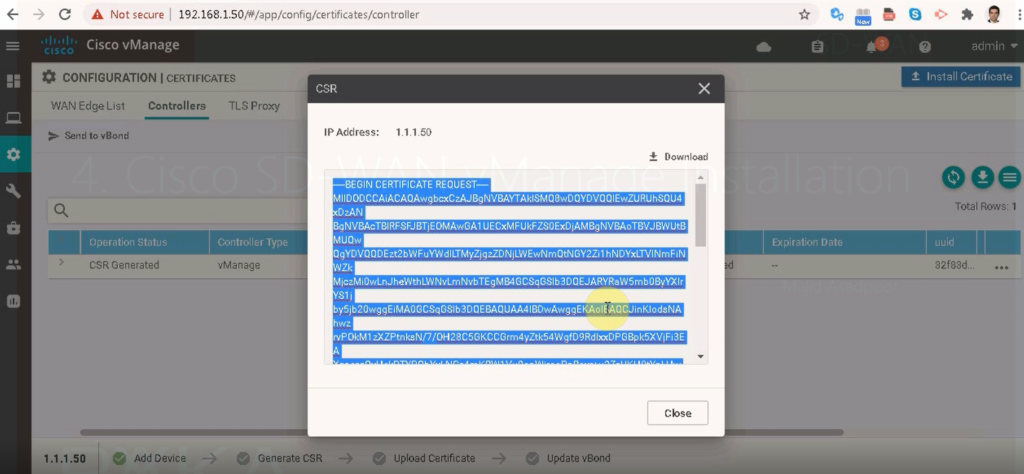
in configuration -> certificate -> controllers, we generate a CSR based on the parameters already given.
configuration --> certificates --> controllers --> ...
--> geerate csr
the copy csr
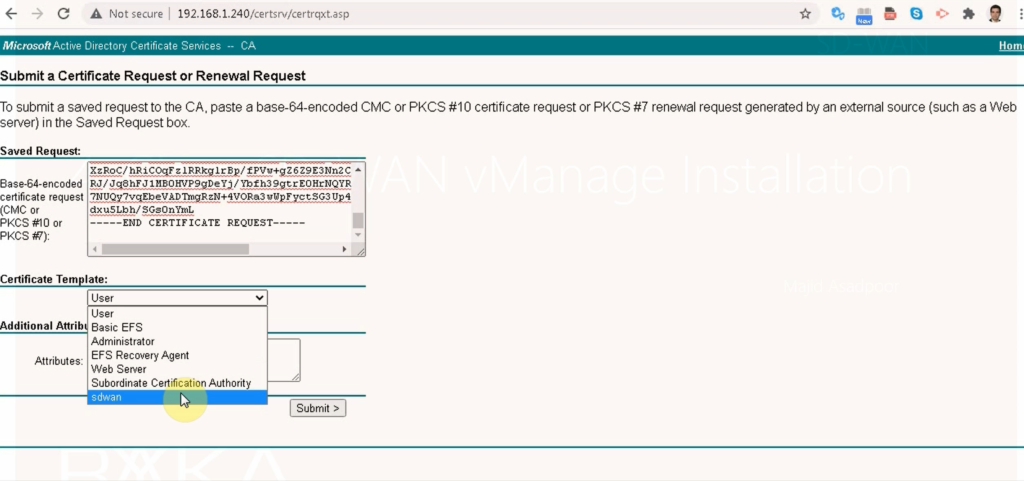
http://192.168.1.240/certsrv
request a certificate
advanced certificate request
paste csr
use a sdwan template
save certificate with the name vManage
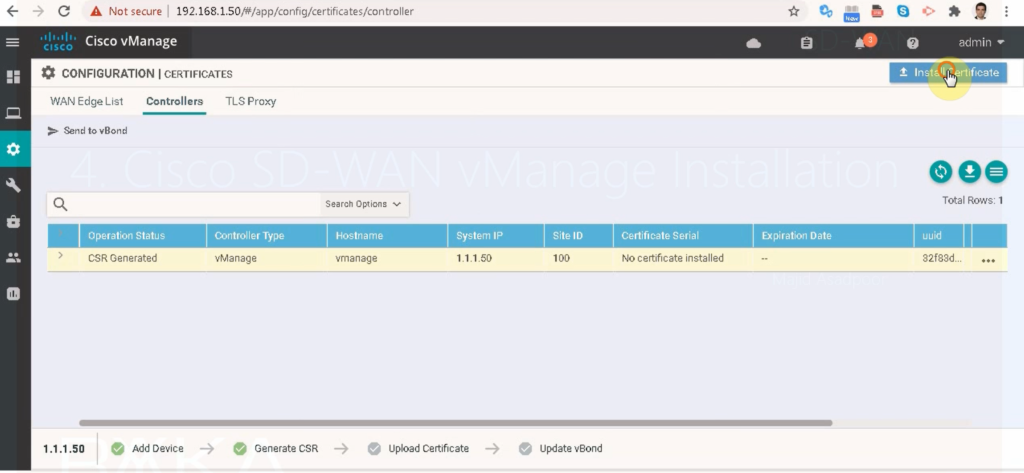
configuration --> certificates --> controllers -->
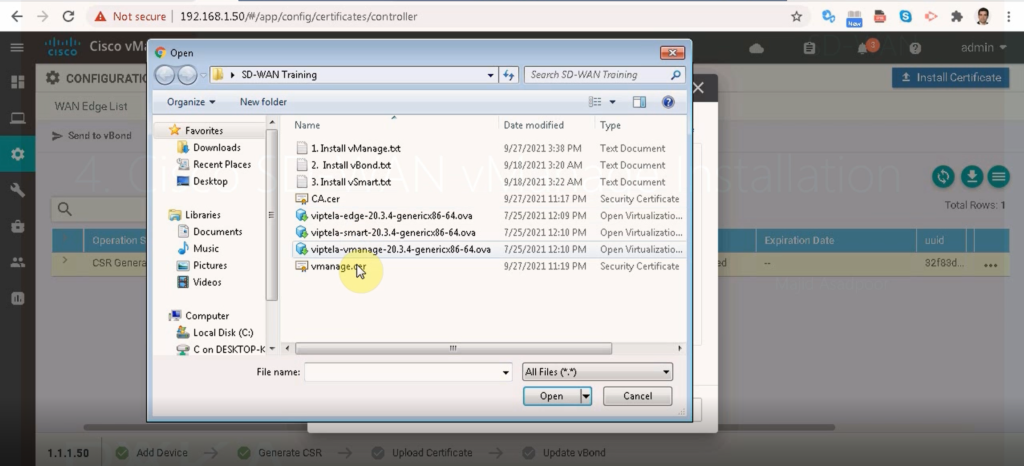
install certificate
Then we give our certificate request to CA server to receive a certificate for vManage.

in configuration -> certificate -> controllers, we install the received certificate.
Hello Mr. Asadpour. Thank you so much for your educationg. I’m in Iran and I can’t download OVA Vmanage and Vbond file from the cisco website. please gaude me how to download the files?? cisco website has permission deny for Iraninan people.