Network Automation Lab requires at least one controller to manage devices and one device to be managed.
We will be using Ubuntu with Visual Studio Code and Python as the controller and a Cisco IOS XE device managed through the controller throughout the course.
In this section, you will learn how to prepare these components for the rest of the course.
Network Automation Lab Preparation
I have already prepared the lab environment, but just to show how I prepared it, I will point out the main steps and points I have had. They are not exact but hopefully help you.
Install Ubuntu, Visual Studio Code and Python
In the first step I installed an Ubuntu desktop version. At the time of writing the latest version is 22.04.1 which you can download from this link.
Then I installed Python3 on the Ubuntu machine with these commands.
sudo apt-get update
sudo apt-get install python3 python3-venv python3-pip
majid@devnet:~$ python3 --version
Python 3.10.6
You probably have multiple versions of python2 and python3 on your machine, but that’s not a problem because in Visual Studio Code we choose our correct Python version.
In the next step I installed Visual Studio Code. It’s an environment where you can easily create your code.
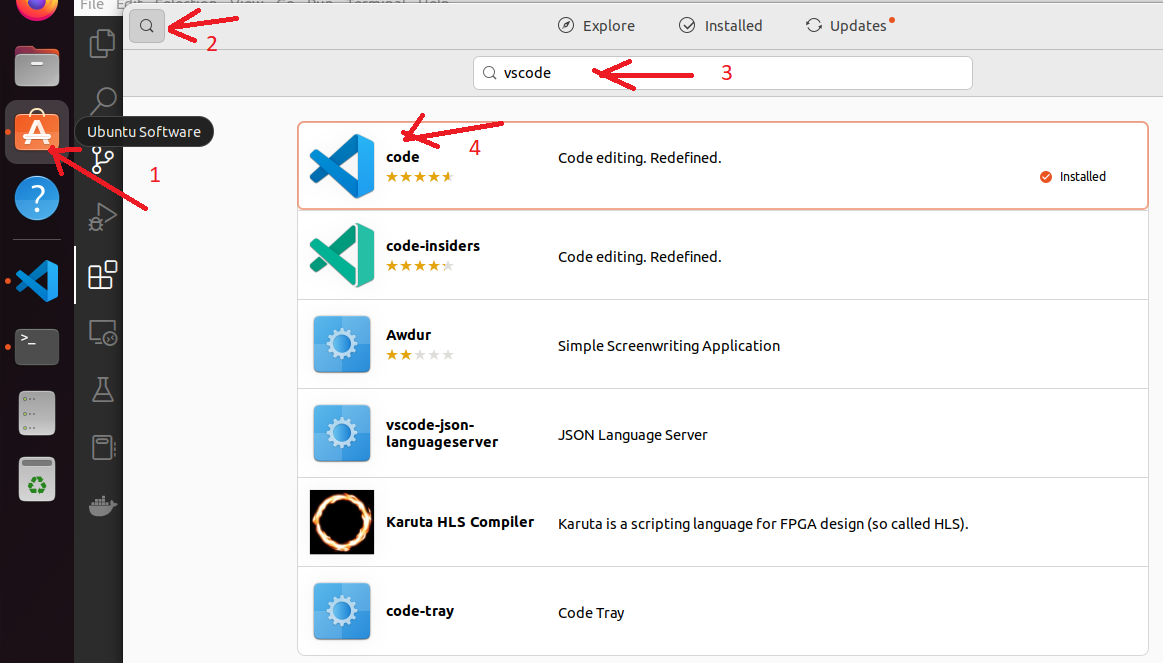
To install Visual Studio Code, you can search in Ubuntu software for “vscode” as a keyword and then install “code”.
To start your Python codes in Visual Studio Code, you must install the Python extension in Visual Studio Code. Therefore in extension section or “file -> preferences -> extension”, search and install python.
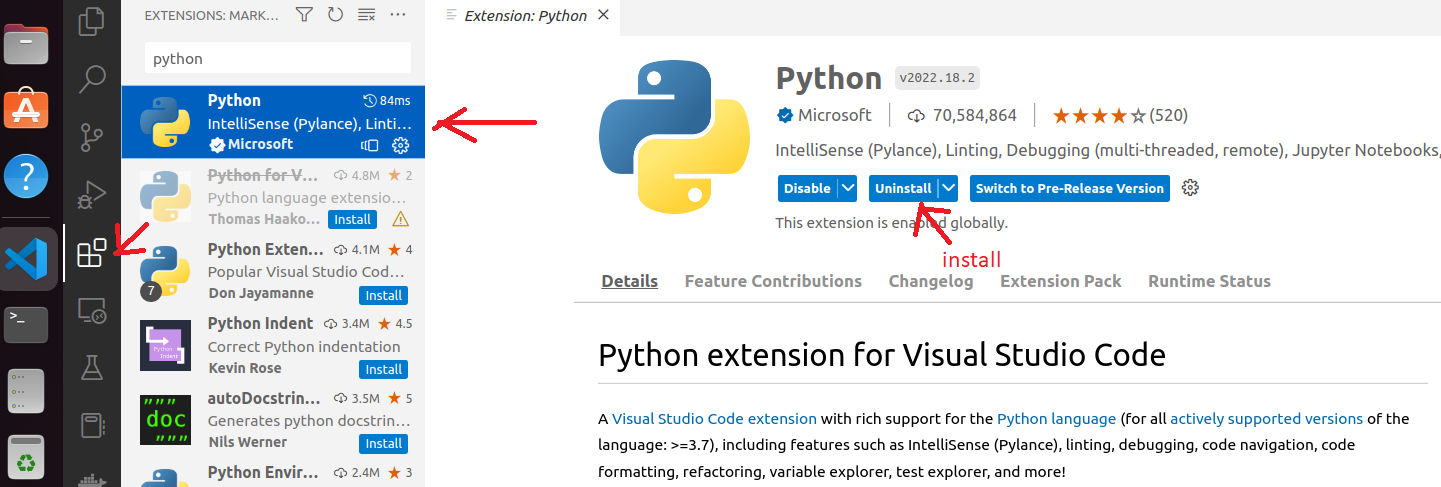
After installing the Python extension in Visual Studio Code, in the same page there is a section asking you to select your correct Python version in Visual Studio Code.
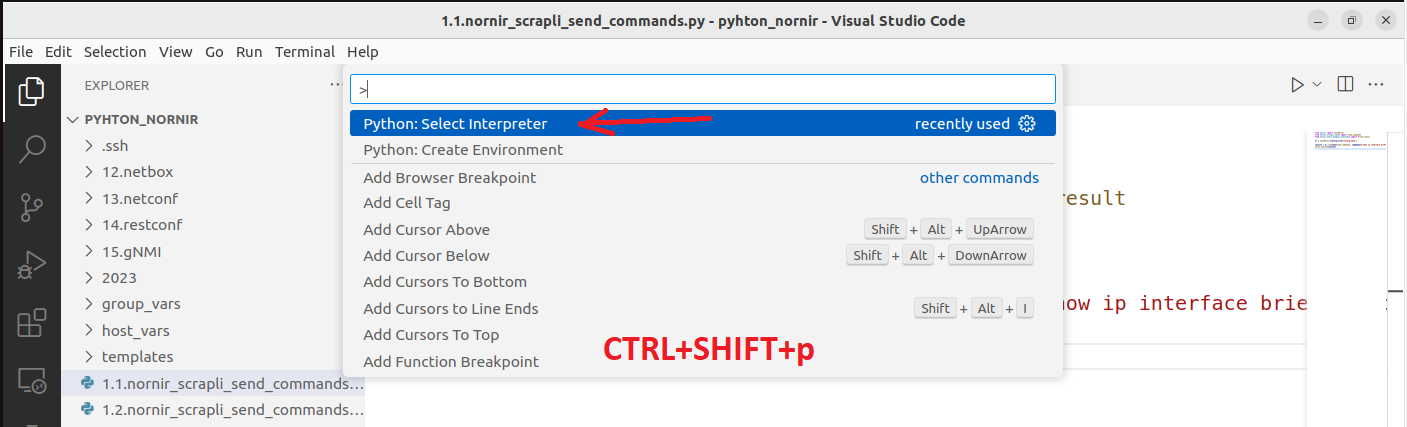
If you no longer see this section, you can open or create a Python “.py” file. When you open a Python file, the lower-right section of Visual Studio code shows the current Python version. If you click on the current version, all installed python versions will be shown and you can choose the right version, preferably the latest version of Python3.

Another option is to use the keyboard shortcuts “Ctrl+Shift+p“. You see the Visual Studio Code command environment. Then type or choose “Python: Select Interpreter”. Now you can choose the right version of python to be used in visual studio code.
Prepare Cisco CSR 1000v IOS XE
In addition to the automation controller, we also need at least one router to be managed by the controller. To follow this course I chose to use Cisco IOS XE during the course. A lab with routers from multiple vendors is of course preferred.
To prepare network devices, we have many options. Cisco Sandbox, Eve-ng, GNS3, add virtual devices in VMware Workstation or vSphere Server or any other virtual hypervisor. It is important that you can prepare a connection between your controller and your devices.
Here I will show you two methods, Cisco sandbox and local Cisco IOS XE on VMware vSphere Server.
For the Cisco sandbox environment, simply search Google for “cisco sandbox”. Then select the “Networking” section and then and IOS XE Lab.
Google search: cisco sandbox -> networking -> IOS XE lab
current lab on cisco sanbox at 26.11.2022
https://developer.cisco.com/site/sandbox/
-> networking
-> IOS XE on CSR Latest Code with ZTP
At the time of writing, there is only one IOS XE lab in Cisco Sandbox that you can access by reserving and creating a VPN connection
There you can see the IP address to connect to the device, the username, the password and the methods of connection which is SSH, NETCONF and RESTCONF. At this course we need only SSH connection to the device.
CSR1000V Host: 10.10.20.48 (After VPN connection)
SSH Port: 22
NETCONF Port: 830
RESTCONF Ports: 443
Username: developer
Password: C1sco12345
But I will be using the CSR 1000v Cisco IOS XE during the course, which I imported locally into my VMware vSphere Server. The version I’m using is 17.01.01 which you can download from Cisco’s website.
csr1000v-universalk9.17.01.01.ova
To prepare Cisco IOS XE, I gave the device an IP address and configured SSH for the remote connection.
This is the configuration I have already applied to the device.
hostname R1
ip domain name rayka-co.local
!
username rayka privilege 15 secret rayka-co.com
!
interface GigabitEthernet1
ip address 192.168.1.11 255.255.255.0
no shutdown
!
line vty 0 4
privilege level 15
login local
transport input all
!
crypto key generate rsa modulus 2048
Prepare Ubuntu to connect to the device via SSH
Ma Lab is prepared. I could connect to the device via SSH.
But when I tried to connect to the device via Ubuntu, I have received the error that some algorithms does not match between Ubuntu and Cisco IOS XE device.
majid@majid-ubuntu:~$ ssh -l rayka 192.168.1.11
Unable to negotiate with 192.168.1.11 port 22: no matching key exchange method found. Their offer: diffie-hellman-group14-sha1
After troubleshooting I solved the problem by adding the supported SSH algorithm for the IP address of the IOS XE device in the “config” file in the “.ssh” folder in the home directory.
majid@majid-ubuntu:~$ sudo cat ~/.ssh/config
Host 192.168.1.11
KexAlgorithms +diffie-hellman-group14-sha1
HostKeyAlgorithms=+ssh-rsa
PubkeyAcceptedKeyTypes +ssh-rsa
Pull Python codes in your Ubuntu machine
If you want to have all python codes locally on your machine, you can install and clone my automation python codes from my GitHub.
sudo apt-get install git
majid@devnet:~/testdir$ git clone https://github.com/asadpoor/devnet.git
Cloning into 'devnet'...
remote: Enumerating objects: 1512, done.
remote: Counting objects: 100% (254/254), done.
remote: Compressing objects: 100% (182/182), done.
remote: Total 1512 (delta 149), reused 165 (delta 63), pack-reused 1258
Receiving objects: 100% (1512/1512), 2.81 MiB | 5.18 MiB/s, done.
Resolving deltas: 100% (413/413), done.