Junos routing is the main topic of the next sections. In order to better understand the concepts related to the routing, in this section we prepare a simple lab based on vSRX that will be used in the next sections to practically configure various concepts.
Junos Routing Lab Fundamental
In order to test and review the routing concepts, I have considered two vSRX without any configuration to be configured from scratch.
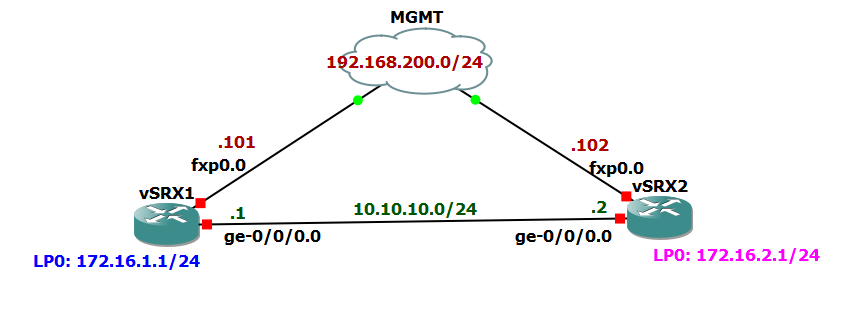
Both are connected to the out-of-band management network with IP address range 192.168.200.0/24, one with IP address .101 and the other with IP address .102.
These two vSRX are also connected to each other through ge-0/0/0 interface with IP address range 10.10.10.0/24. One side IP address is .1 and the other side is .2.
For each vSRX we configure a loopback interface with IP addresses 172.16.1.0/24 and 172.16.2.0/24, for which routing must be configured in order to be able to reach each other.
since we are preparing the lab based on vSRX device, in VSRX all data interfaces need to be added in one zone. And allowed traffic between zones must also be configured.
If you’re using an MX router, you don’t need to configure a zone and all traffic are also allowed by default.
Just to minimize configuration, I will put all interfaces in the same zone, trust zone, therefore all traffic will be allowed by default and I don’t need to configure any access control rule. We will discuss zoning concepts in the next course.
Junos Routing Lab Configuration
To start the configuration, I have already deleted all vSRX configuration with “request system zeroize” command.
rayka@vSRX1> request system zeroize
warning: System will be rebooted and may not boot without configuration
Erase all data, including configuration and log files?. In case of Dual RE system, both Routing Engines will be zeroized [yes,no] (no) yes

warning: zeroizing re0
In the next step, we configure, root authentication password, add a new user and management interface IP address to be able to connect to the device remotely.
!!!! vSRX1
set system  root-authentication plain-text-password
set system login user rayka class super-user
set system login user rayka authentication plain-text-password
set system services web-management http interface fxp0.0
set interfaces fxp0 unit 0 family inet address 192.168.200.101/24

!!!! vSRX2
set system  root-authentication plain-text-password
set system login user rayka class super-user
set system login user rayka authentication plain-text-password
set system services ssh root-login allow
set interfaces fxp0 unit 0 family inet address 192.168.200.102/24
Now we can connect to the devices remotely and with SSH protocol.
Then, we configure data interfaces. ge-0/0/0 interface which connects two devices to each other and loopback0 as an internal interface.
All data interfaces are required to be member of a zone in SRX device. I will configure all interfaces to be member of common trust zone. In this way, I don’t need to configure inter-zone access control rules.
Discussion of zones and access control between zones is postponed to the next course.
I will also permit all system services to the device itself with host-inbound-traffic command so we can check the connectivity with ping, ssh and any other services.
!!!! vSRX1
set interfaces ge-0/0/0 unit 0 family inet address 10.10.10.1/24
set interfaces lo0 unit 0 family inet address 172.16.1.1/24
set security zones security-zone trust inetrfaces ge-0/0/0 host-inbound-traffic system-services all
set security zones security-zone trust inetrfaces lo0 host-inbound-traffic system-services all


!!!! vSRX2
set interfaces ge-0/0/0 unit 0 family inet address 10.10.10.2/24
set interfaces lo0 unit 0 family inet address 172.16.2.1/24
set security zones security-zone trust inetrfaces ge-0/0/0 host-inbound-traffic system-services all
set security zones security-zone trust inetrfaces lo0 host-inbound-traffic system-services all
Now connectivity between two vSXR is possible via directly connected ge-0/0/0 interface. But loopback interfaces in two devices cannot see each other because the routing is not yet configured and that is the subject of the next section.
[edit]
rayka@vSRX1# run ping 10.10.10.2
PING 10.10.10.2 (10.10.10.2): 56 data bytes
64 bytes from 10.10.10.2: icmp_seq=1 ttl=64 time=1.174 ms
64 bytes from 10.10.10.2: icmp_seq=2 ttl=64 time=1.033 ms
64 bytes from 10.10.10.2: icmp_seq=3 ttl=64 time=0.968 ms
64 bytes from 10.10.10.2: icmp_seq=4 ttl=64 time=0.914 ms
^C
--- 10.10.10.2 ping statistics ---
5 packets transmitted, 4 packets received, 20% packet loss
round-trip min/avg/max/stddev = 0.914/1.022/1.174/0.097 ms

[edit]
rayka@vSRX1# run ping 172.16.2.1
PING 172.16.2.1 (172.16.2.1): 56 data bytes
ping: sendto: No route to host
ping: sendto: No route to host
^C
--- 172.16.2.1 ping statistics ---
2 packets transmitted, 0 packets received, 100% packet loss

[edit]
rayka@vSRX1#