

In this section, we will explore how to configure F5 DNS GSLB with two F5 devices, each with both DNS and LTM modules, in different data centers.
With F5 DNS GSLB, we can distribute traffic between data centers. With F5 LTM, we can distribute traffic locally among servers in each data center.
We will also learn how to monitor the health and performance of remote F5 devices by using iQuery protocol and big3d agent with the “bigip_add” tool, and how to synchronize the GSLB configuration between F5 devices by using iQuery protocol and the “gtm_add” tool.
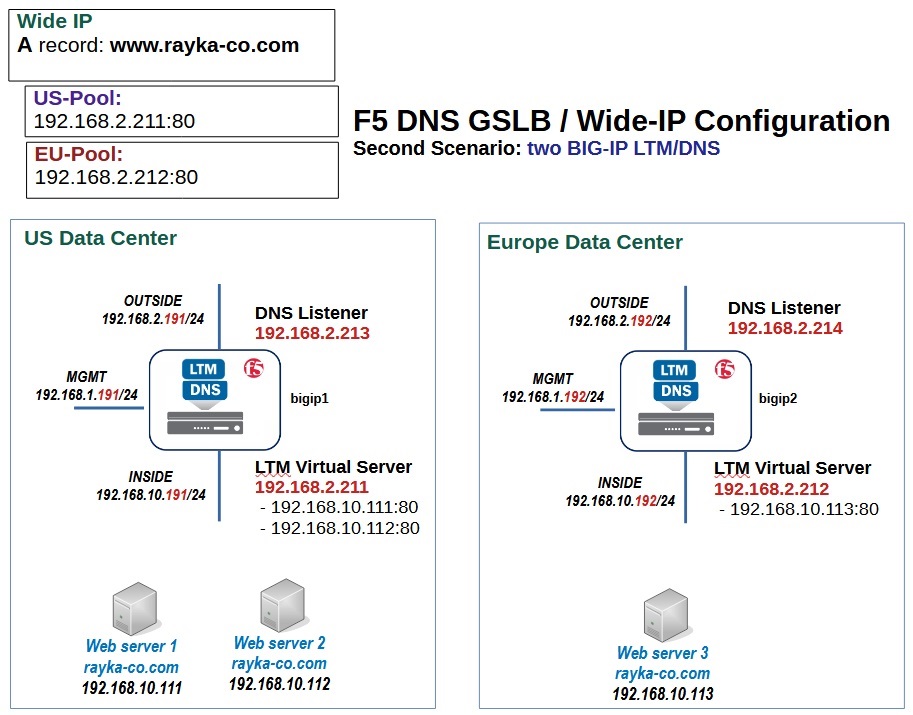
This is the topology we will implement as the second configuration example for F5 DNS GSLB.
We have two data centers in the US and EU and in each data center there is an F5 device with both DNS and LTM enabled.
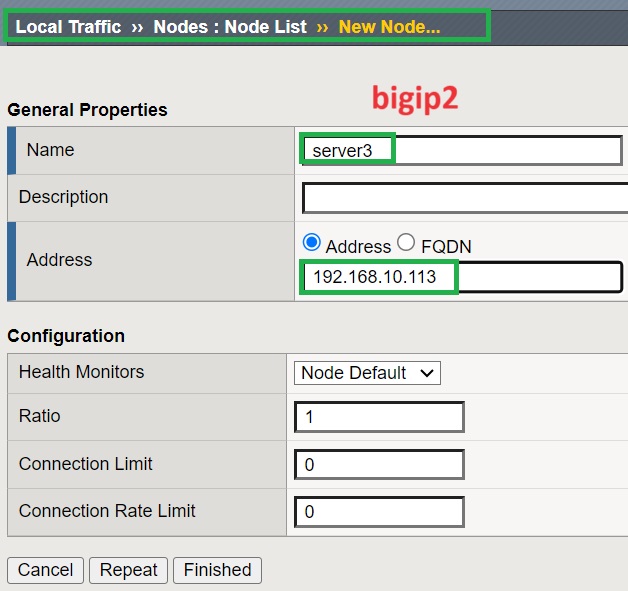
There are three servers responsible for “www.rayka-co.com”, two in the US data center with IP addresses 192.168.10.111 and 192.168.10.112 and one in the EU data center with IP address 192.168.10.113 .
Each F5 device has three interfaces in the MGMT, INSIDE and OUTSIDE zones with the subnet 192.168.1.0/24, 192.168.10.0/24 and 192.168.2.0/24. All interfaces have an IP address with .191 at the end in the US data center and .192 at the end in the EU data center.
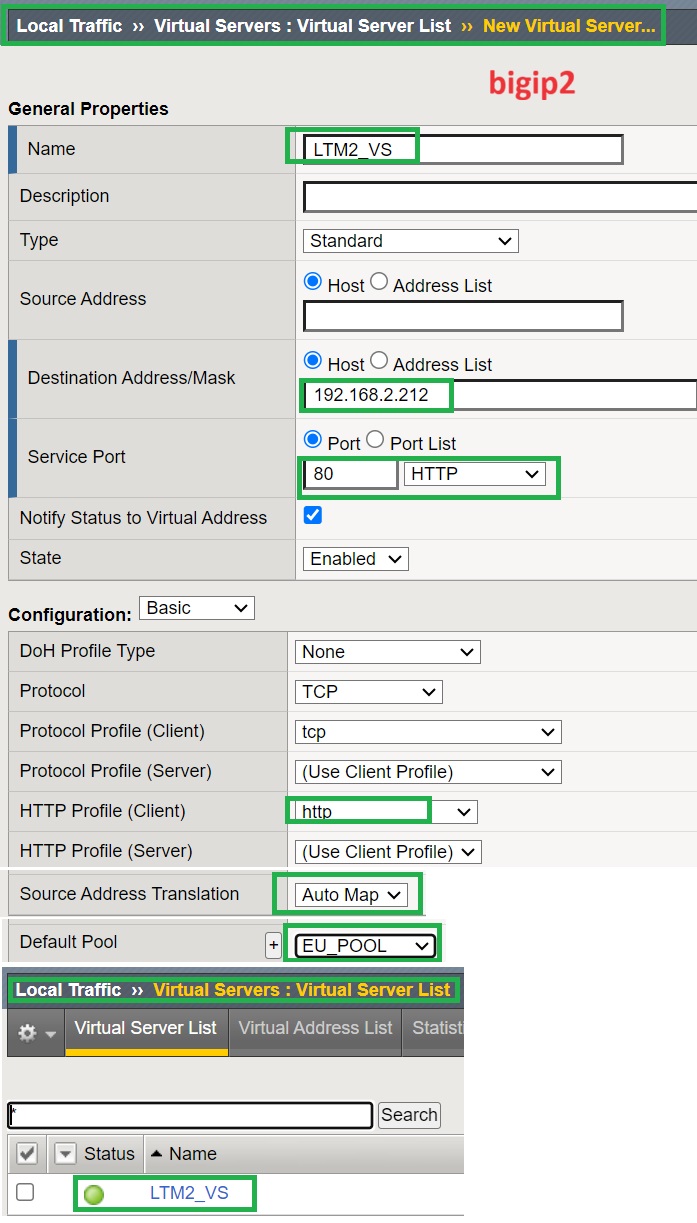
In each F5 device LTM module, we create a virtual server to distribute traffic locally between servers in each data center with IP address 192.168.2.211 in the US data center and 192.168.2.12 in the EU data center.
In the f5 device DNS module, we create a Wide IP for the name “www.rayka-co.com” with two pools, one for US and one for EU, pointing to LTM corresponding virtual servers.
The DNS GSLB configuration is configured on one F5 device only and then the configuration is synchronized to the other F5 device.
Finally, we create a DNS listener on both F5 devices with the IP address 192.168.2.213 in the US data center and 192.168.2.214 in the EU data center.
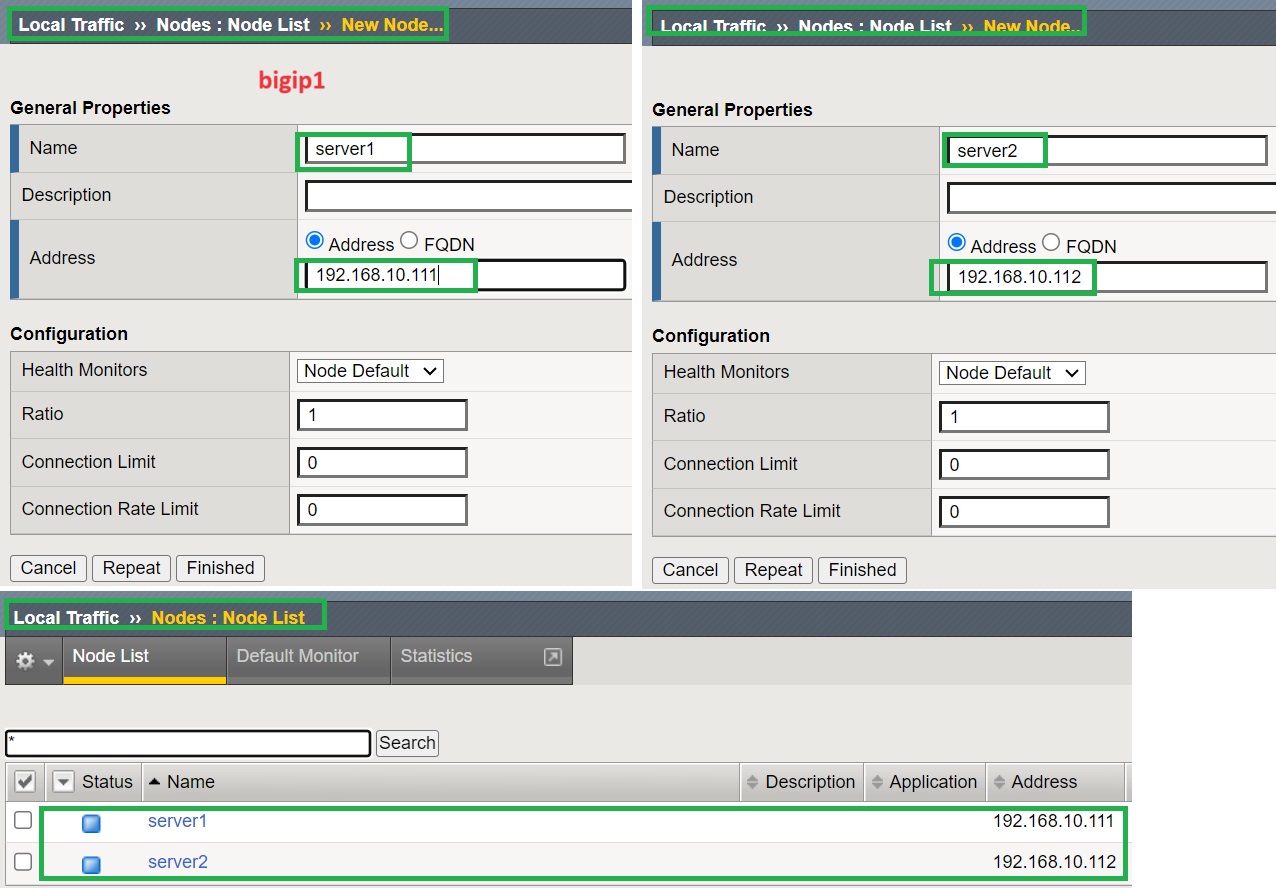
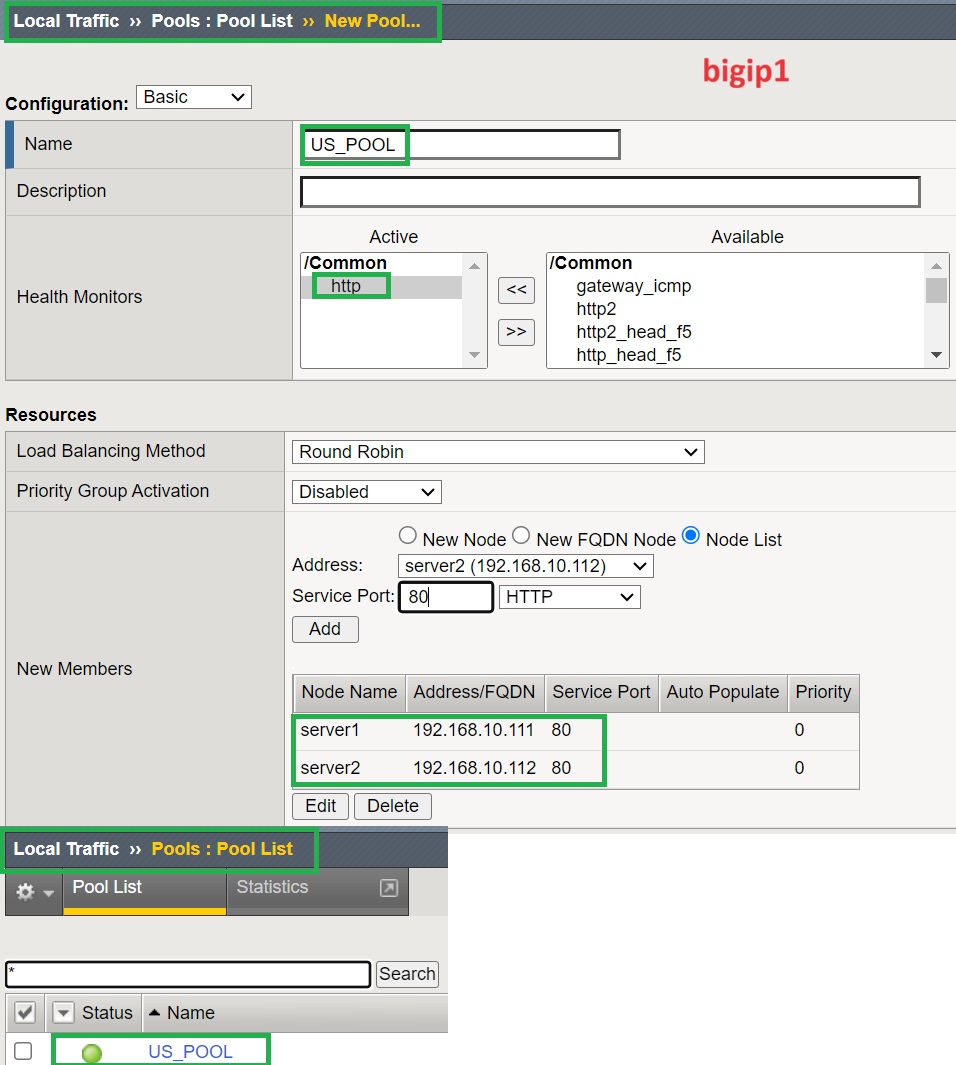
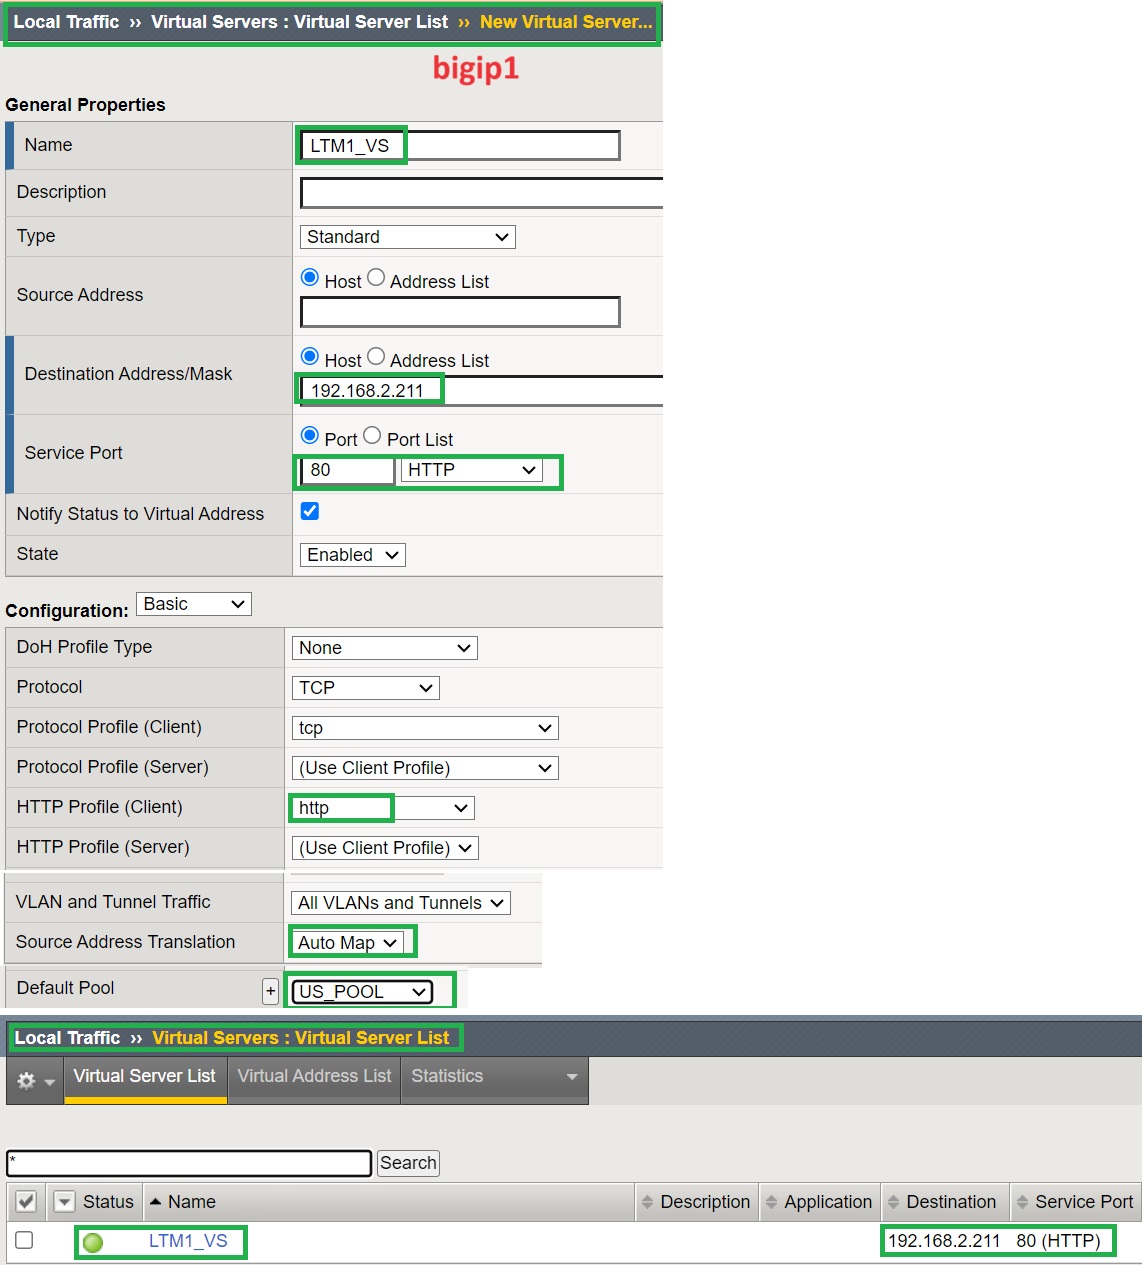
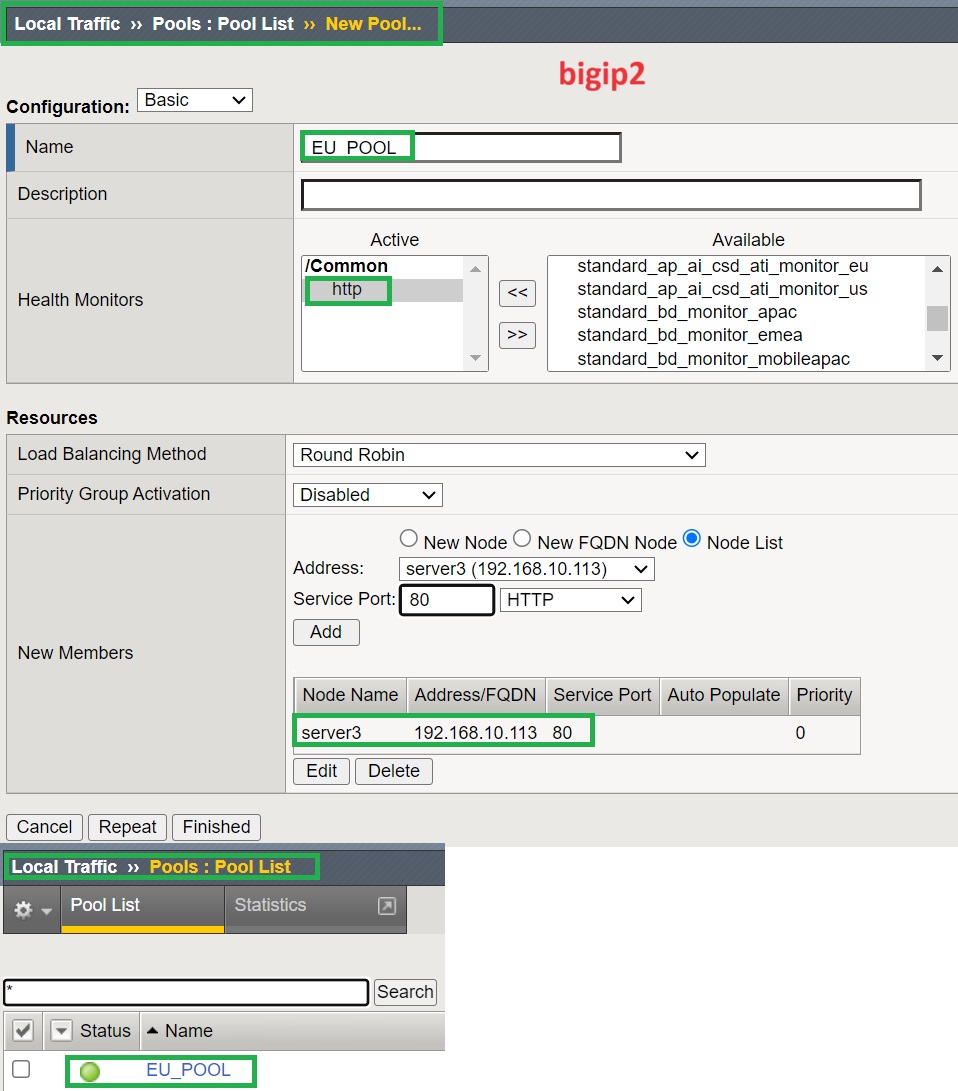
To begin the configuration, we start with LTM module configuration.
In each BIG-IP, we configure servers, pool members, pool and virtual servers that exist in the same data center.
I assume we know the concepts behind this configuration as we discussed in the F5 LTM course.
In the next step, we start to configure GSLB in F5 DNS module.
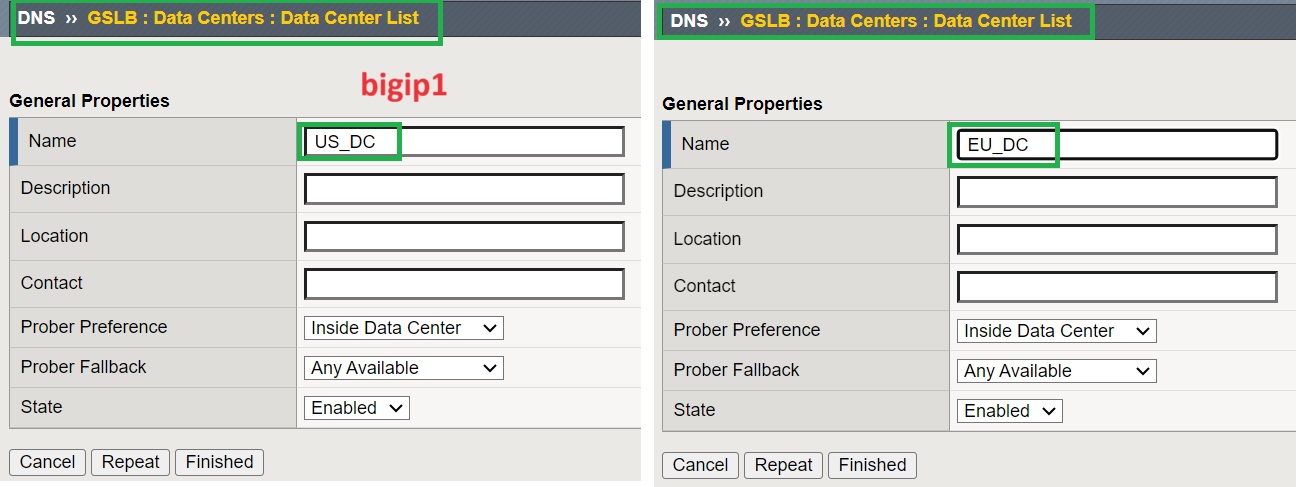
First we create two data centers with the names US_DC and EU_DC.
By configuring data centers, F5 has the opportunity to know the physical topology of servers, helping it to better decide how to distribute traffic between data centers.
We then add all F5 devices in both data centers as physical servers in the bigip1 DNS module.
We only add them in bigip1 as all the configuration will be synced to bigip2 later.
We have one F5 device in US data center and one in EU data center.
In our example, Both DNS and LTM modules are in the same F5 device. But If they are in different devices, we will add all of them as physical servers in F5 DNS module.
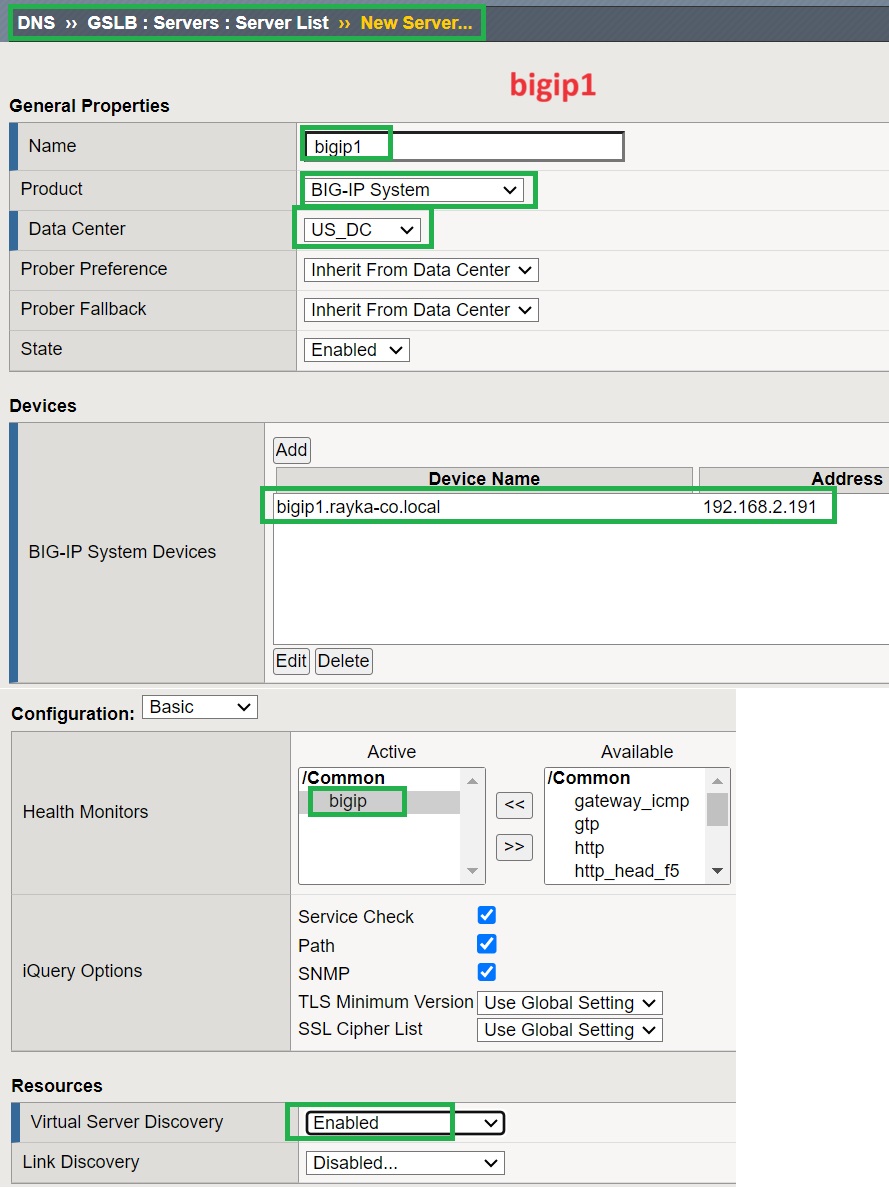
We will add „bigip1.rayka-co.local“ with product type “BIG-IP” in the US data center. We configure the external IP address of the F5 device (192.168.2.191) as this is the interface through which incoming DNS queries are received.
We choose “bigip” as the health monitoring because it is specific to BIG-IP devices.
We enable “Virtual Server Discovery” to automatically discover the LTM virtual server. Discovery is automatic because the LTM module is in the same F5 device as the DNS module. If they are on different devices, you can add them manually or they will be discovered automatically when you create a trust relationship between the local F5 DNS device and the remote F5 LTM device.
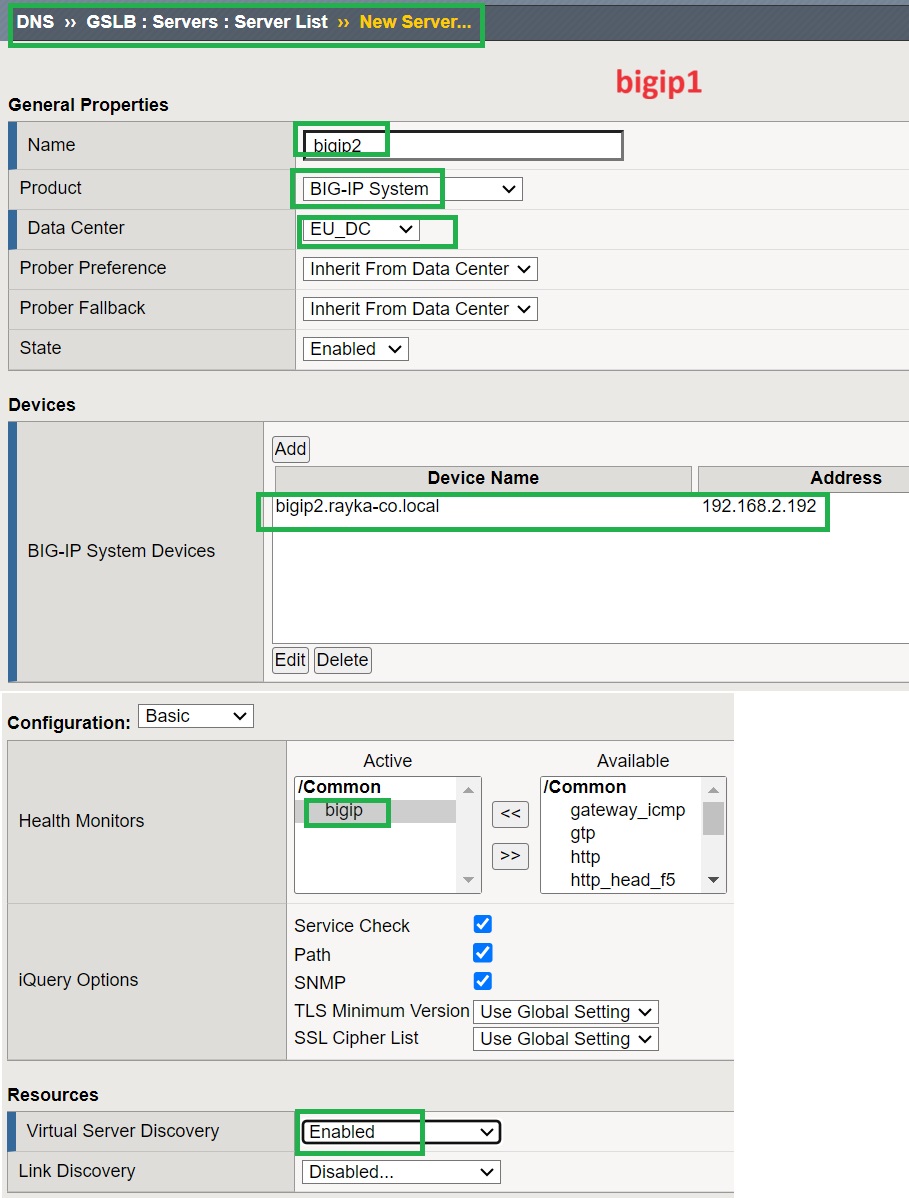
Then we add the second F5 device with name “bigip2.rayka-co.local” and IP address 192.168.2.192 with the same configuration as bigip1.
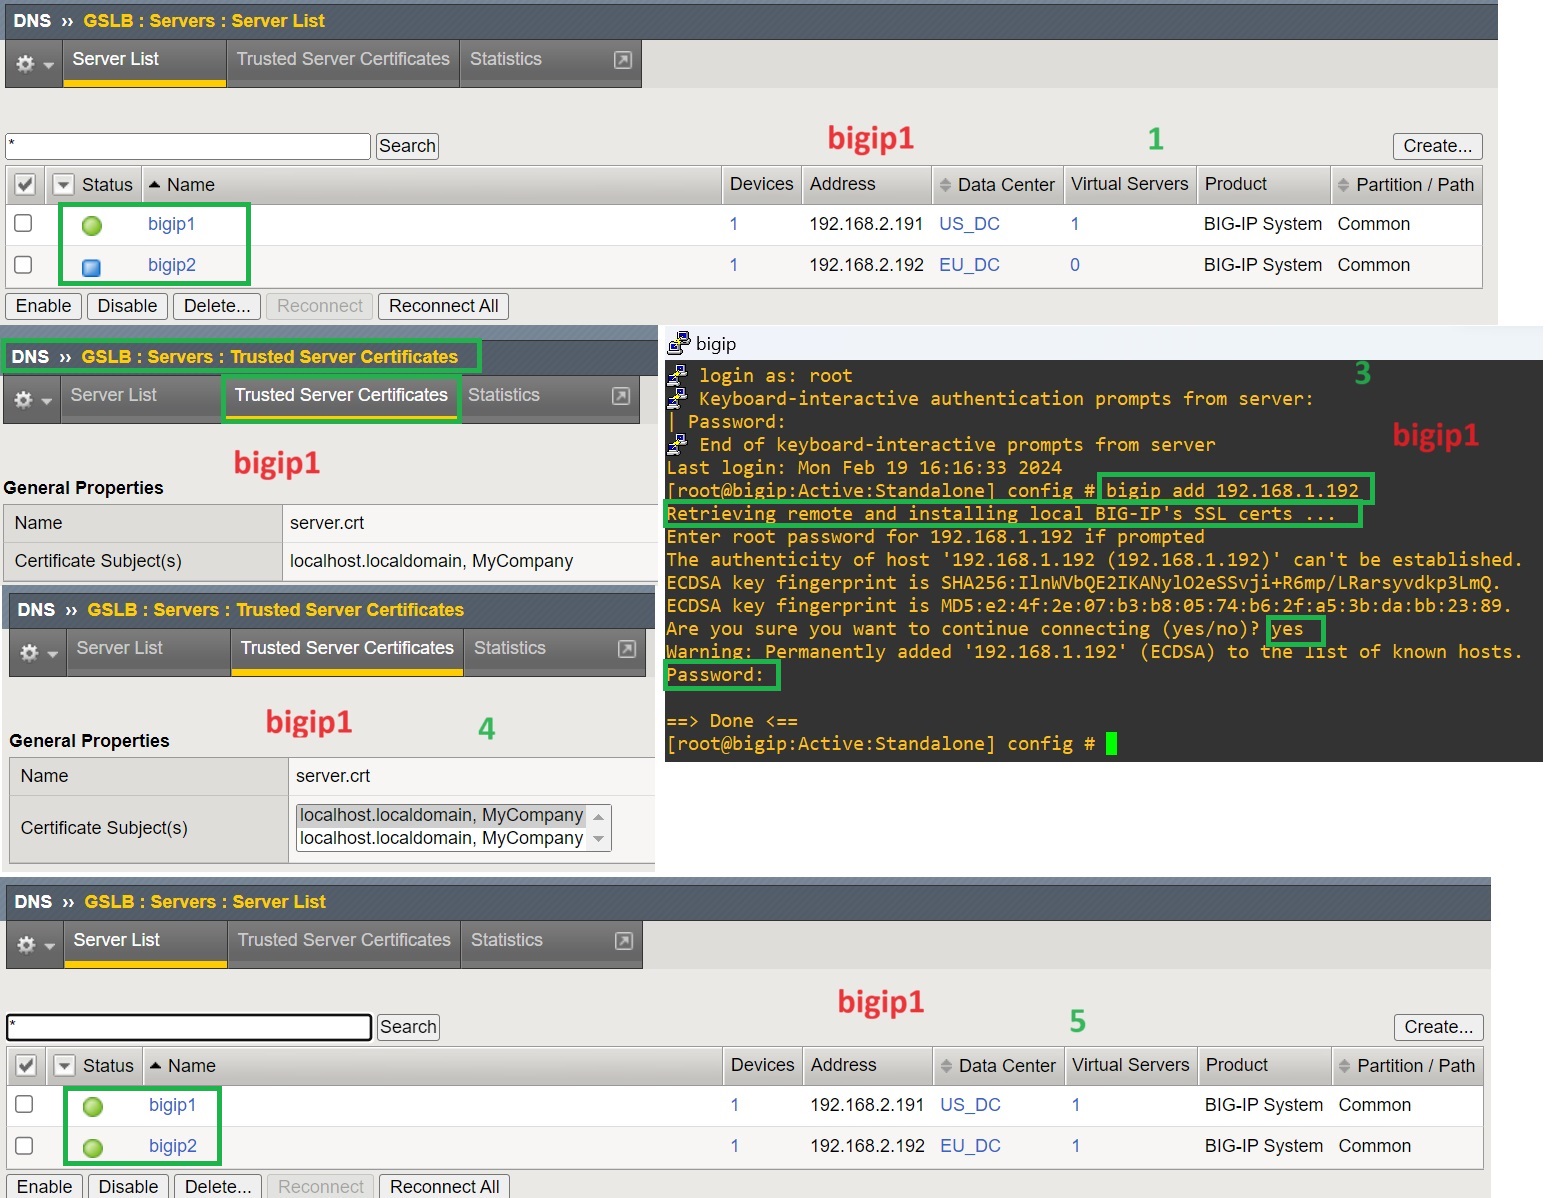
If you add bigip1 and bigip2 F5 devices to the server list in DNS module, you will notice that the local bigip1 F5 device is green, but the remote bigip2 F5 device is blue and will be red after a while.
This is because you need to establish a trust relationship between the BIG-IP DNS system and the remote BIG-IP system using the bigip_add command-line utility.
On the local F5 device, we need to run the bigip_add script with the IP address of the remote F5 device. This adds the remote F5 device as a server object, exchanges SSL certificates, and enables the iQuery protocol and big3d agent for communication and synchronization, as well as monitoring the health and performance of the remote F5 device.
After running the bigip_add script, you will notice that the status of the remote F5 device is also green.
After creating a trust relationship between local and remote BIG-IP devices, if you check the “Virtual Servers” tab in BIG-IP devices, you will see that LTM virtual servers are automatically discovered.
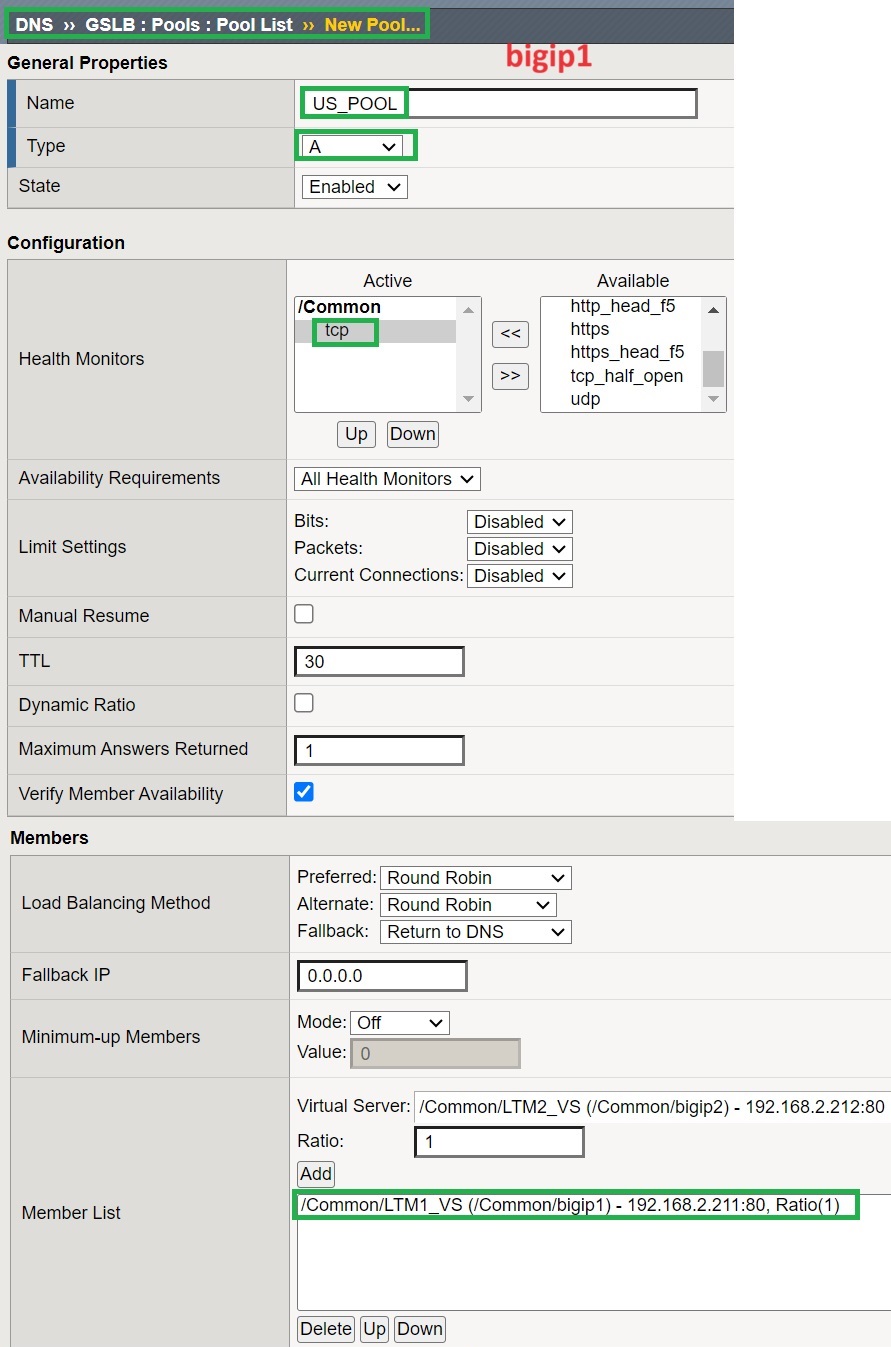
In the next step, as we discussed in the previous lesson, we create pools of virtual servers in the GSLB section in F5 DNS. Traffic is distributed between these pools based on a load balancing algorithm.
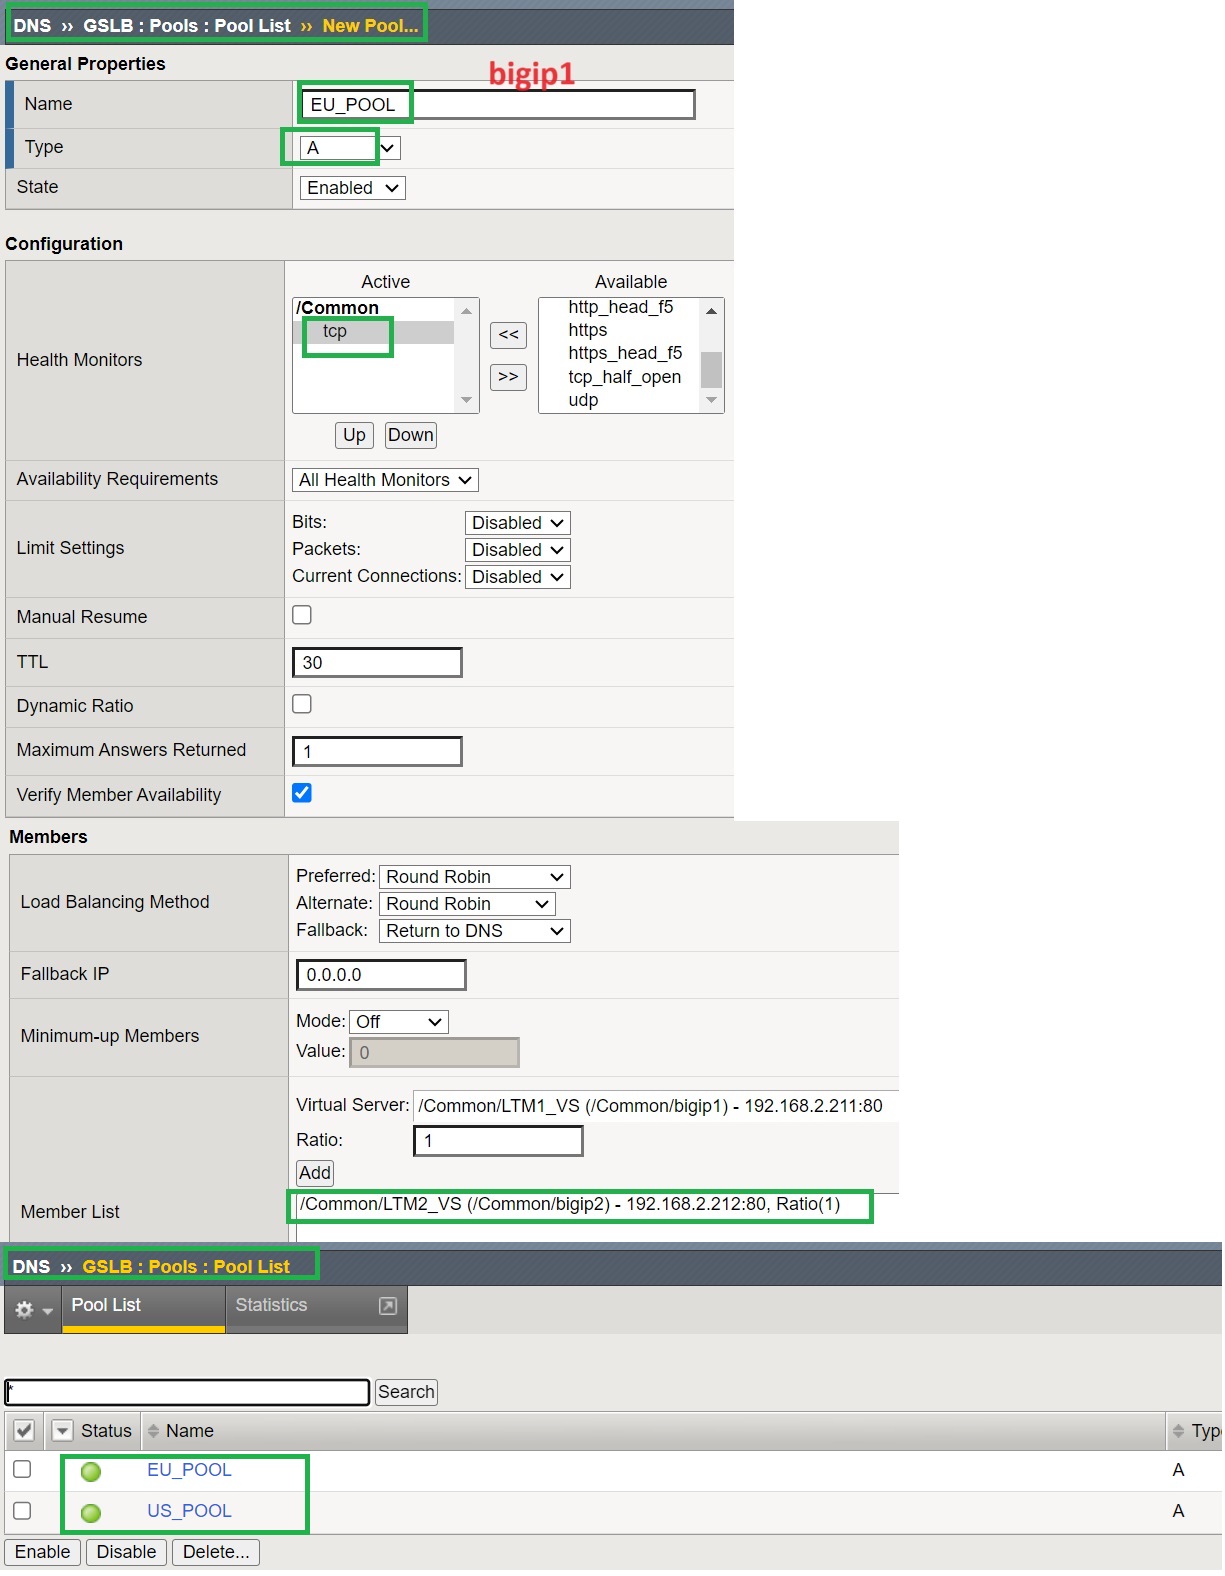
First, we create “US_POOL” with Type “A” record with bigip1 LTM virtual server as a member. We choose “tcp” for pool health monitoring.
Then we create another pool with the name “EU_POOL” and the bigip2 LTM virtual server as a member with the same configuration.
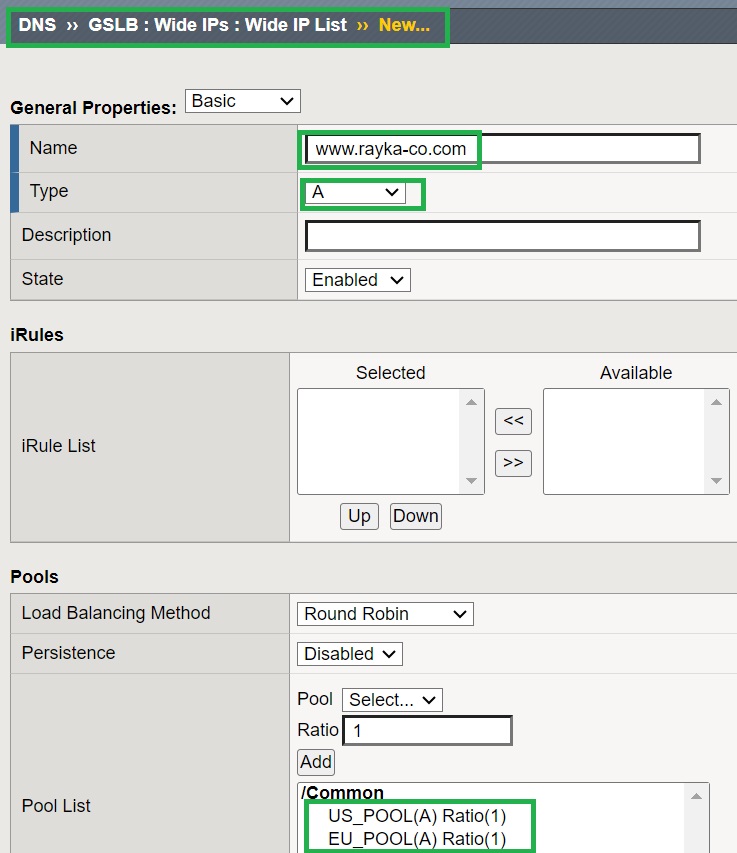
And in the last step of GSLB configuration, we create a Wide IP named “rayka-co.com” with type “A” record, including “US_POOL” and “EU_POOL” that we just created.
This provides the capability to distribute traffic for the destination “www.rayka-co.com” between pools based on configured load balancing algorithm. The load balancing algorithm will be discussed in the next sections.
As you noticed, all GSLB configurations are done only in the bigip1 F5 device. Now it is required to synchronize the GSLB configuration with other remote F5 DNS devices. So it makes no difference which of the F5 DNS devices are queried for a name.
In this section, we will discuss how to synchronize GSLB configuration from bigip1 to bigip2 F5 device.
To enable GSLB configuration synchronization, we first enable automatic configuration synchronization in the section “DNS > Settings > GSLB > General”.
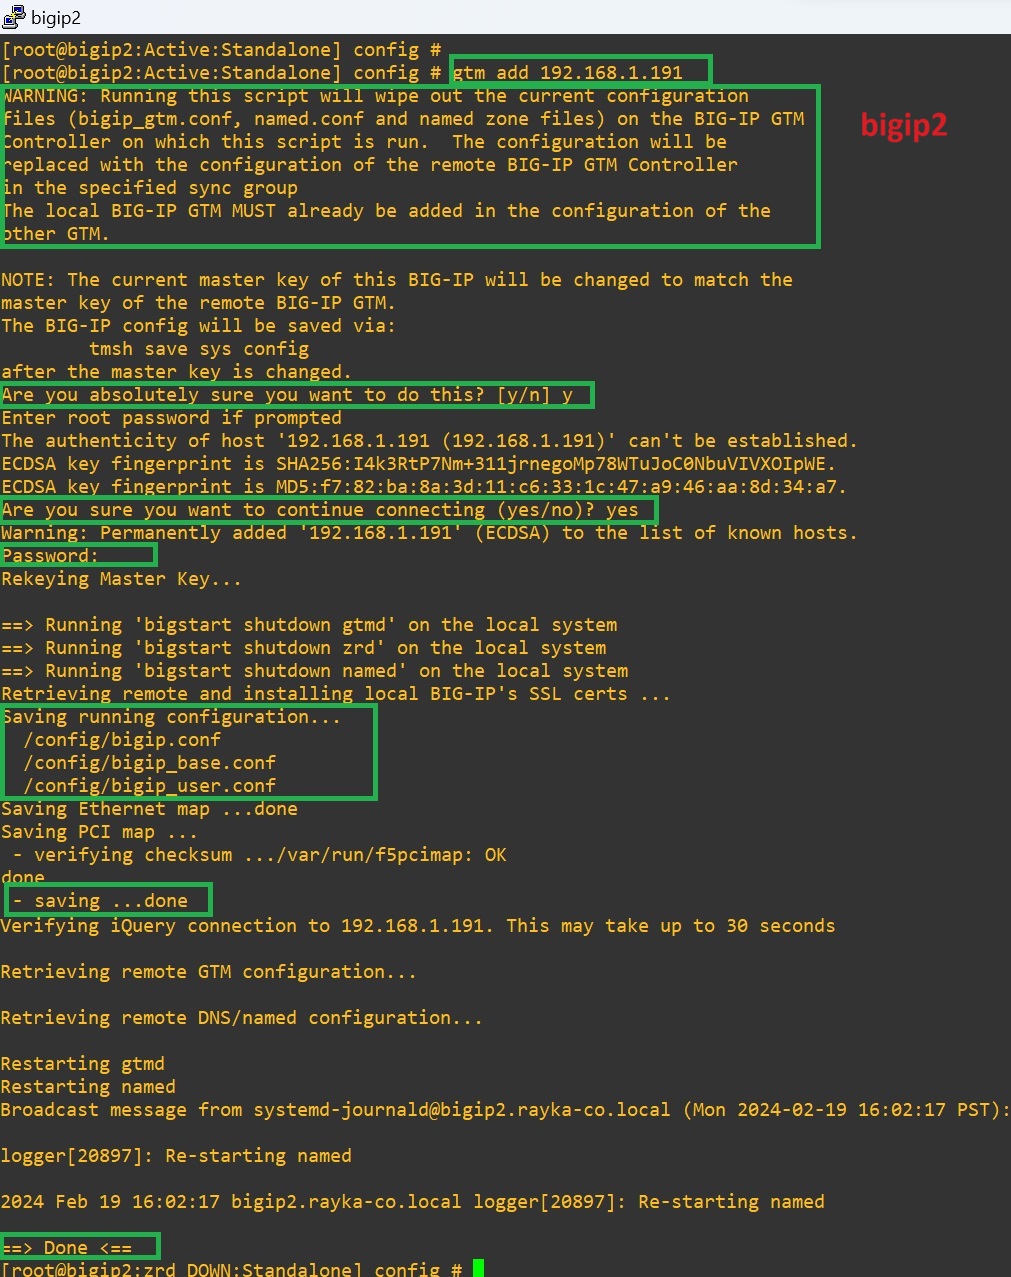
Then we go to the remote F5 DNS device and use the “gtm_add” script to add the remote F5 device to an existing sync group and get the DNS/GSLB configuration.
Notice that you must run the “gtm_add” script on bigip2, not bigip1. Running this script will erase the current DNS configuration on the device running the script (bigip2). And the DNS configuration is replaced with the configuration of another F5 device (bigip1).
After configuration synchronization, you can check the entire GSLB configuration on bigip2 to ensure that GSLB configuration is replicated correctly.
Now, in order to query F5 DNS devices for the name “www.rayka-co.com”, we need to create a DNS listener.
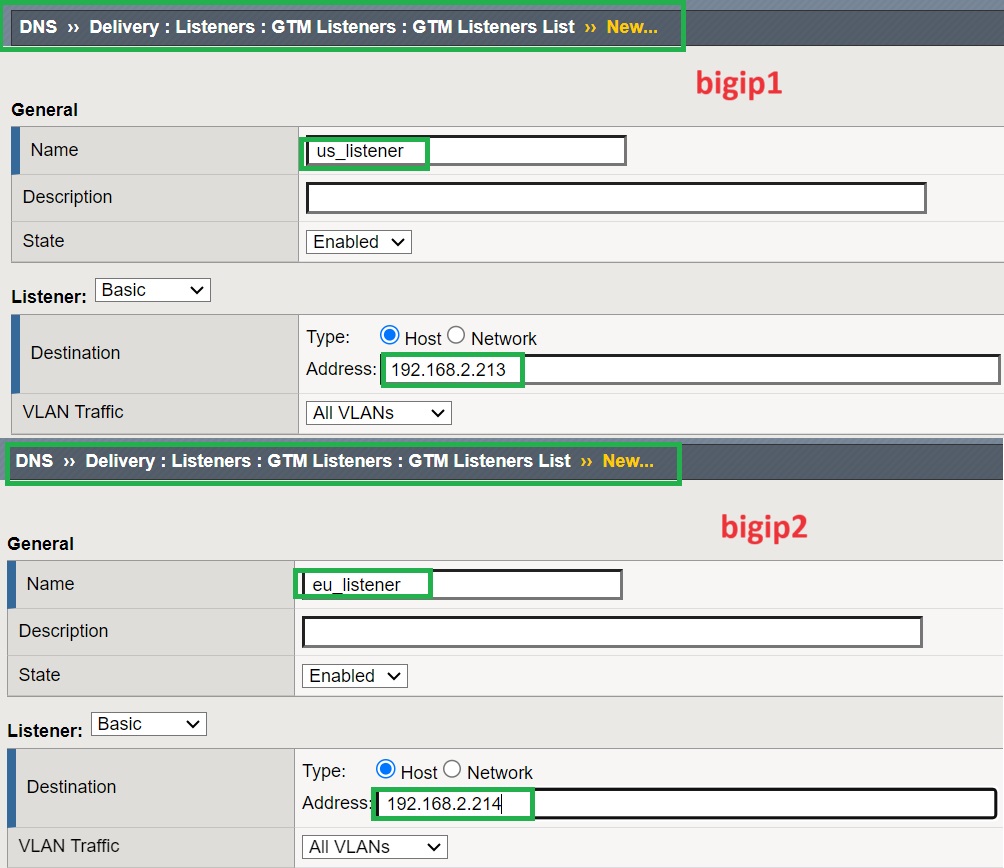
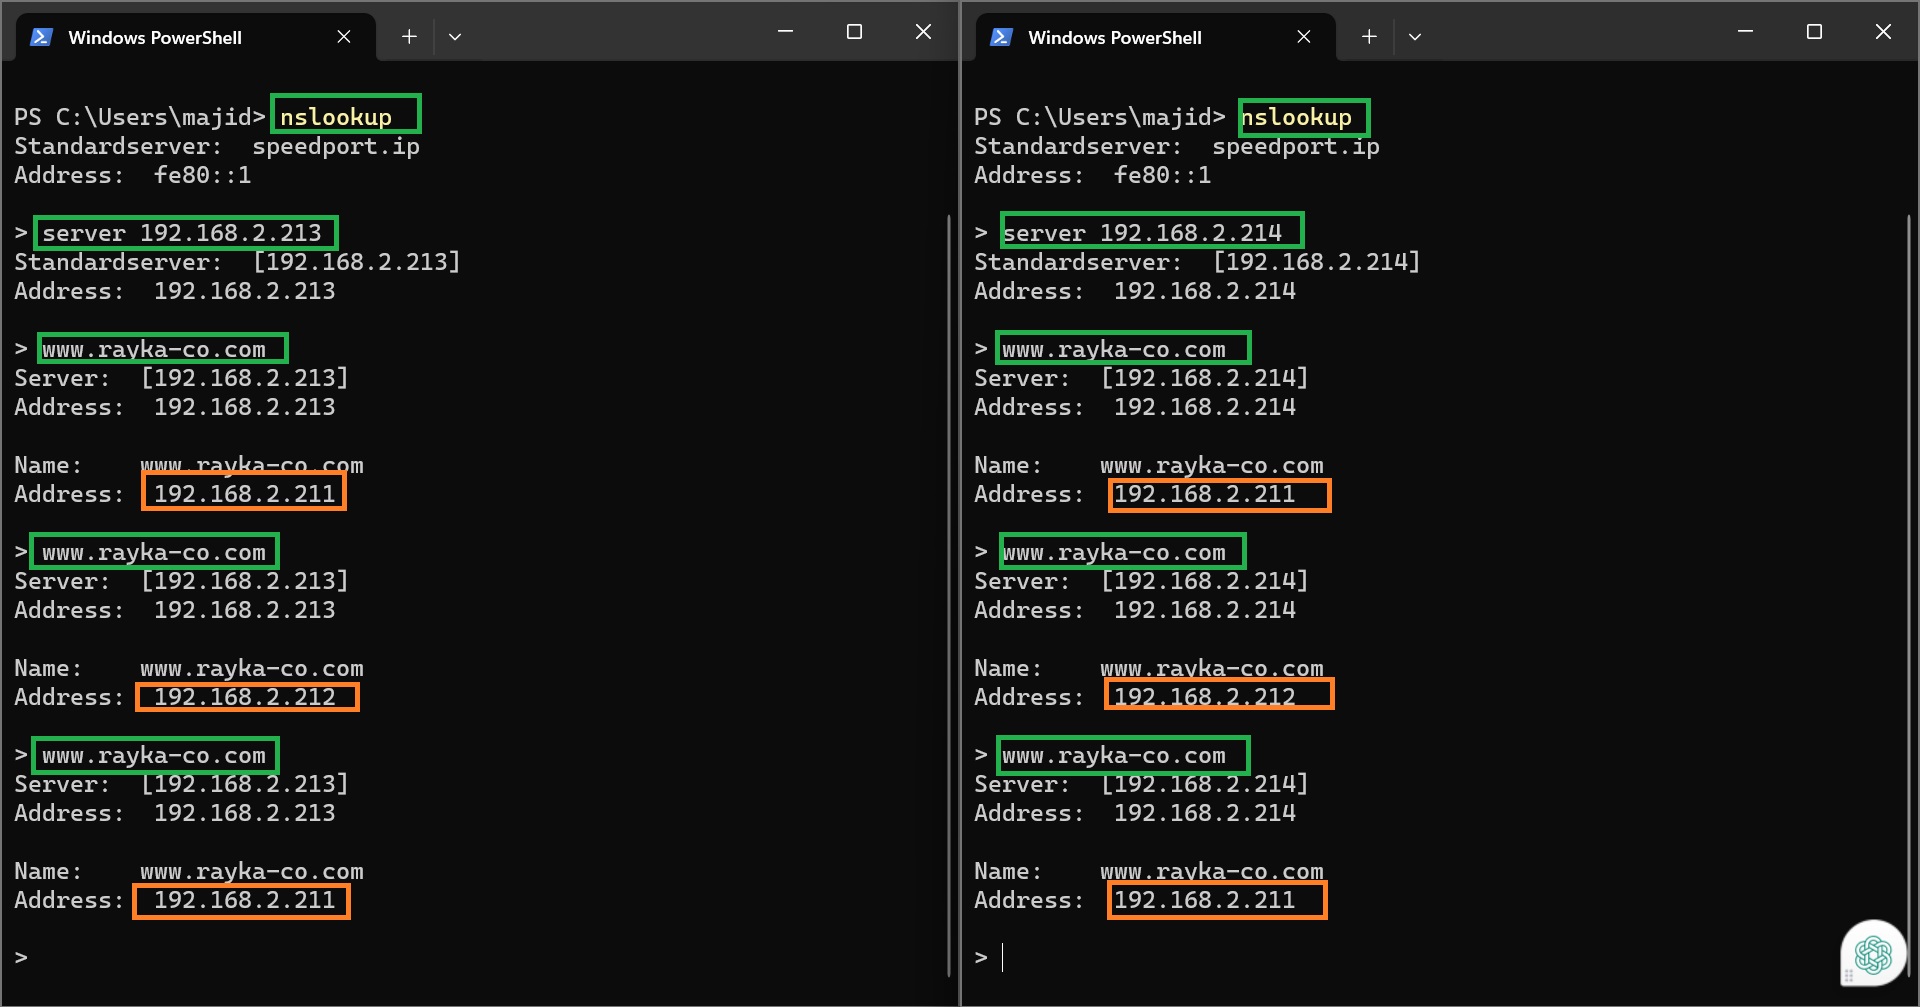
As we discussed in the topology, we create a DNS listener in both bigip devices, one with IP address 192.168.2.213 in bigip1 and the other with IP address 192.168.2.214 in bigip2.
As We know, we create DNS listener in the section „DNS > Delivery > Listeners > GTM Listeners > GTM Listeners list“.
To verify the operation of GSLB, we can use “nslookup” to send a query for the name “www.rayka-co.com” to each F5 DNS device.
Based on the Wide IP and Pool level load balancing algorithm discussed in the next sections, you will be redirected to one of the servers located in US or EU data centers.
Dear RAYKA,
If the DNS and LTM servers are on different machines,
do I still need to set up LTM nodes (LTM VIP)/pools/listeners, or are there other ways to configure it?
Please give me some advice, thank you very much.
Sincerely, Bruce Liu