access ansible codes of this course in github
this is a video-based training therefore the output of running commands are not show in the text.
With the help of Ansible we can manage or monitor many many devices at the same time. This is the greatest benefit we get from using Ansible.
ansible in GNS3
As you can see, I’ve already set up a simple network with the help of GNS3. I think you will agree before you touch the Ansible to take a look at what I have already configured in the GNS3 environment.
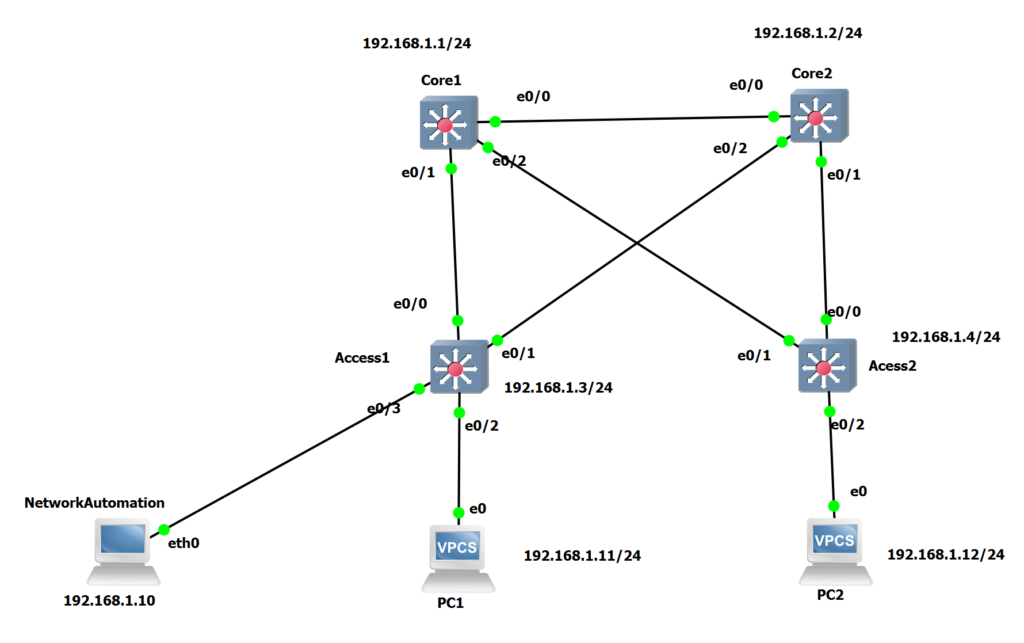
Our network consists of 4 switches, including 2 core switches and 2 access switches with the IP addresses 192.168.1.1, 1.2, 1.3, 1.4. Our topology also includes 2 PCs with IP addresses 1.11 and 1.12.
I have already activated SSH in all switches. As an example, you can see the configuration of the Core1 switch here. The only difference between the switch configurations is the IP address. enabling ssh is required for ansible to configure devices remotely.
!!!!!!!!! CORE1 !!!!!!!!!!!
hostname Core1
ip domain-name rayka-co.com
crypto key generate rsa modulus 1024
!
username rayka password rayka
username rayka privilege 15
!
line vty 0 4
 transport input ssh
 login local
!
interface vlan 1
no shutdown
ip address 192.168.1.1 255.255.255.0
Configuring ssh includes generating an rsa key pair, defining a new username with permission 15, and specifying an IP address. I activated the username rayka with permission 15 so I don’t have to enter an enable password when managing devices remotely via ansible.
There is also an automation machine on our network with Ansible already installed. I have to point out that I have not installed ansible in the automation machine. I’ve used what’s already provided by gns3 but I’ve changed some of the configurations that are already shown here.
I configured the IP address 192.168.1.10 in /etc/network/interface. I configured the /etc/hosts file for name resolution. As you can see, the switch names are configured with the corresponding IP addresses in this file. To make sure it works, we can ping the switches from the automation machine with both the IP address and their name.
root@NetworkAutomation:~# cat /etc/network/interfaces

# Static config for eth0
auto eth0
iface eth0 inet static
        address 192.168.1.10
        netmask 255.255.255.0
!
root@NetworkAutomation:~# cat /etc/hosts
192.168.1.1     core1
192.168.1.2     core2
192.168.1.3     access1
192.168.1.4     access2
# ping 192.168.1.1
# ping core1configure ansible hosts file in GNS3
I also configured the /etc/ansible/hosts file. Do not confuse these two files with the same name. The /etc/hosts file is used for name resolution. In /etc /ansible/hosts, however, we enter the name or IP address of the devices that are to be managed by ansible. In Ansible we have the option of grouping devices. So we can monitor or manage many devices in the same group at the same time. As you can see, two access switches are in the same group with the name of the access and two core switches are also in the same group with the name of the core.
root@NetworkAutomation:~# cat /etc/ansible/hosts
[core]
core1
core2


access1
access2
Now it is the time to start discovering Ansible.
First we need to make sure that ansible is already installed on the automation machine and that our /etc/ansible/hosts file is correctly linked to ansible. We’ll use two simple commands to do this.
# ansible --version! See the output of all commands in this document in the video
This command shows us whether ansible is already installed on the computer and also the version of the ansible. To make sure it’s the latest version of Ansible, we will install our own Ansible in next videos on a real Linux machine.
also the second command ansible –list-hosts all that list the devices that are already configured in ansible.
# ansible --list-hosts allNow that we are sure of our configuration, we can monitor the network via ansible.
We have two Ansible command options: Ansible and Ansible-playbook
With ansible command, which is mainly used for monitoring and network troubleshooting, we are using one line command, which is also called adhoc commands (anisble adhoc comands for network monitoring troubleshooting), However, for the ansible-playbook command, which is mainly used for configuration, we need a configuration file into which we insert our configuration commands. Throughout the course we will mainly be using Ansible playbooks and there are a few videos related to Ansible ad-hoc commands.
Ansible adhoc commands in ansible website
Then we use the name of the device or group of devices to be monitored or managed at the same time. For the beginning, we’ll use core1.
then the name of the module. We will use the raw module in this step. Just to add a comment, each vendor, or rather each operating system, has its own module in ansible. With the help of the module, vendor-specific commands can be translated into standard netconf commands in the standard Yang data structure model.
Now I don’t want to talk about the netconf or Yang data structure, , but as you have probably noticed, netconf and Yang data structure models are vendor-independent configuration models.
raw module in ansible
The raw module is the module that doesn’t translate our commands and ansible purley transfer our commands on remote devices via ssh. The raw module is mainly used for monitoring and troubleshooting and not for configuration.
ansible adhoc syntax
then we enter our username with the -a switch and then our commands with the -a switch. for example “show version”. With -k, ansible ask us to enter the password interactively . This is the more secure method of giving the password.
# anible core1 -m raw -u rayka -a “show version” -kwe probably don’t want to see every line of the output from “show version” command. So we can use grep, to filter, for example, the name of the device and also the image name.
# anible core1 -m raw -u rayka -a “show version” -k | grep “CHANGED\|images”Now we use the group name core to monitor two devices at the same time
# anible core -m raw -u rayka -a “show version” -k | grep “CHANGED\|images”or with the predefined group name “all” we can monitor all devices at the same time.
# anible all -m raw -u rayka -a “show version” -k | grep “CHANGED\|images”You have probably noticed that the output of commands for different devices does not appear in the order we already defined in the hosts file in ansible. In fact, the order of the outputs is in the order of the response time. If a device responds earlier, that device’s output will be displayed higher on the console.
now suppose we want to find out whether an illegal or extra username is configured on any devicees. for that we use “show running-config | inc username”
# anible all -m raw -u rayka -a “show running-config | include username” -kWe can also check the IP addresses that are already configured in the devices in the network.
# anible all -m raw -u rayka -a “show ip interface brief” -kWe don’t want to see interfaces with unassigned IP addresses. Hence we can add “exclude unassigned” in the command given to the Ansible.
# anible all -m raw -u rayka -a “show ip interface brief | exclude unass” -kWe can see the arp table of the devices with the “show arp” command which is mainly used for troubleshooting.
# anible all -m raw -u rayka -a “show arp” -kAnother practical example is finding an active spanning-tree path for a particular VLAN which is difficult to find out with the “show spanning-tree” command. To do this, we use the mac address of PC1 and the command “show mac address-table” to find out which path in the spanning tree is active for the VLAN to which this mac address belongs.
# anible all -m raw -u rayka -a “show mac address-table | include ” -kIn this example you have seen how ansibel helps us to quickly monitor many devices at the same time (anisble adhoc comands for network monitoring troubleshooting.). Hope you have a good feeling about Ansible now, so we can continue installing and configuring Ansible in the next video.