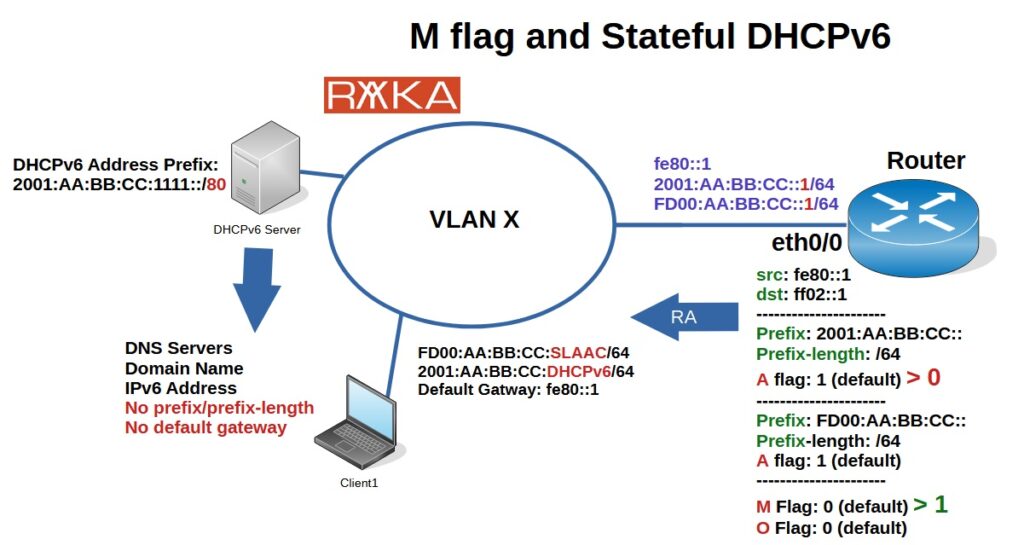
When an endpoint receives a Router Advertisement (RA) with the M flag, it uses stateful DHCPv6 to obtain its IPv6 address and configuration details like the DNS server and domain name, while still learning the default gateway, prefix, and prefix length from the RA. We will also demonstrate a DHCPv6 configuration on a Cisco IOS router, with the DHCPv6 relay agent covered in the next lesson.
Stateful DHCPv6 and M Flag
By default, routers send Router Advertisements (RA) with the A flag (auto-config) enabled, allowing endpoints to obtain IPv6 addresses through the SLAAC process. However, when using a DHCPv6 server, we typically disable the A flag—at least for the prefix assigned by the DHCPv6 server—and enable the M flag (Managed Address Configuration), which instructs endpoints to start the DHCPv6 process.
This example demonstrates how the M flag enables endpoints to receive IPv6 addresses from a DHCPv6 server. The router interface is configured with two /64 prefixes: one global unicast address and one unique local address. By default, the A flag is enabled for both prefixes, while the M flag and O flag are disabled. To shift the IP address assignment to DHCPv6, we disable the A flag for the global address and enable the M flag. This triggers the DHCPv6 process, allowing clients to obtain an IPv6 address from the DHCPv6 server.
In our configuration, the /80 prefix—a subset of the /64 global address—is used for assigning IPv6 addresses. This is done because DHCPv6 lacks a native exclusion mechanism, so we choose a subset that avoids reserved or assigned addresses.
Note that even with DHCPv6 handling address assignment, the prefix, prefix length, and default gateway are still learned via RAs, not DHCPv6, even when the A flag is disabled.
In this setup, clients generate an IPv6 address from the unique local address via SLAAC, and receive the global address through DHCPv6.
Stateful DHCPv6 Configuration Example
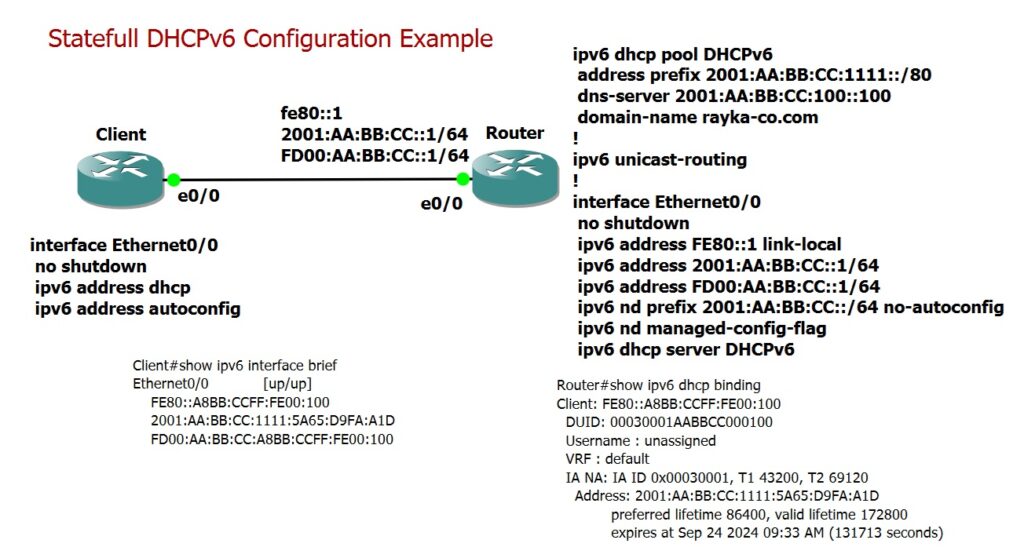
This is the topology I have prepared: two routers, one acting as a gateway and the other as a client, connected through interface eth0/0. The gateway’s eth0/0 interface is configured with three IPv6 addresses: a link-local address (fe80::1), a global unicast address, and a unique local address.
The command ipv6 unicast-routing is crucial; without it, the router will not send Router Advertisement (RA) packets.
We disable the A (autonomous address configuration) flag for the global unicast prefix, while leaving the A flag enabled (the default setting) for the unique local address.
Additionally, we enabled the M (managed address configuration) flag on eth0/0, ensuring the client receives its IPv6 address through the DHCPv6 process.
To configure the DHCPv6 server, we set up a pool with the prefix 2001:AA:BB:CC:1111::/80, which is a subset of the global unicast address. The configuration includes a DNS server and the domain name rayka-co.com, and we applied the pool to the eth0/0 interface.
ipv6 dhcp pool DHCPv6
 address prefix 2001:AA:BB:CC:1111::/80
 dns-server 2001:AA:BB:CC:100::100
 domain-name rayka-co.com
!
ipv6 unicast-routing
!
interface Ethernet0/0
 no shutdown
 ipv6 address FE80::1 link-local
 ipv6 address 2001:AA:BB:CC::1/64
 ipv6 address FD00:AA:BB:CC::1/64
 ipv6 nd prefix 2001:AA:BB:CC::/64 no-autoconfig
 ipv6 nd managed-config-flag
 ipv6 dhcp server DHCPv6
Router Advertiement and M Flag
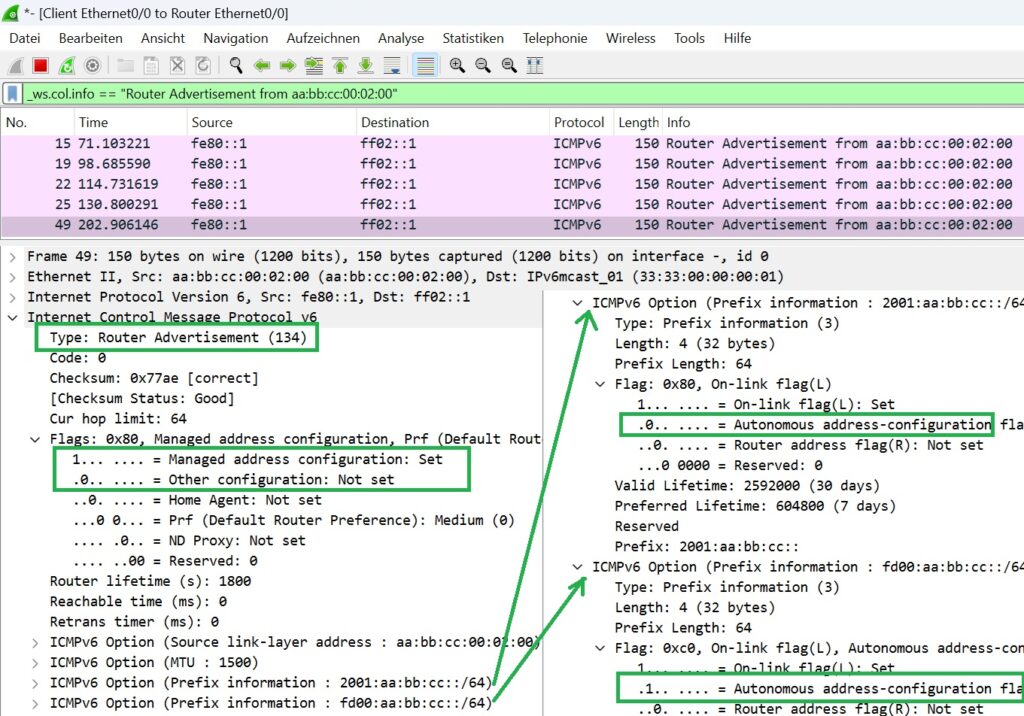
Before configuring the client to receive an IPv6 address via DHCPv6, let’s first capture the Router Advertisement (RA) to ensure it matches our expectations.
As shown in the output, the M flag (Managed Address Configuration) is enabled, and the O flag (Other Configuration) is disabled. For the global unicast prefix, the A flag (Autonomous Address Configuration) is disabled, while for the unique local prefix, the A flag remains enabled.
DHCPv6 Process Oveview
Now, we expect that once the DHCP client is enabled on the client side, the DHCPv6 process will begin, allowing the client to obtain an IPv6 address from the global unicast prefix.
Next, we’ll capture DHCPv6 packets on the link between the client and the router. We will enable both SLAAC and DHCPv6 on the client using the commands ipv6
address autoconfig and ipv6
address dhcp, then activate the interface to capture the DHCPv6 traffic.
interface Ethernet0/0
 no shutdown
 shutdown
 ipv6 address dhcp
 ipv6 address autoconfig
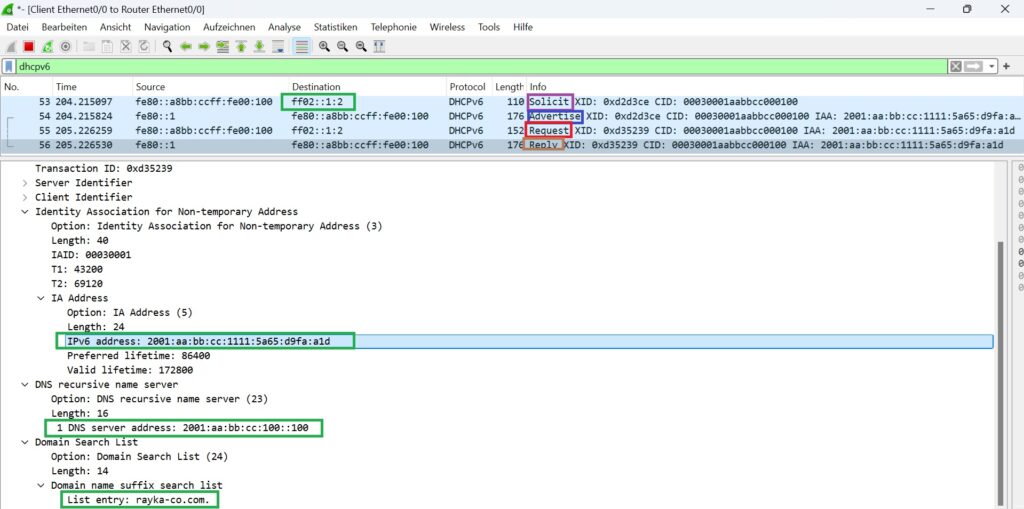
As shown in the packet capture output, here is a brief overview of the DHCPv6 process:
Solicit: Sent by the client to the multicast address
ff02::1:2to locate available DHCPv6 servers. This address is specifically used by DHCPv6 servers to listen for solicitations. The source address is a link-local address, as the communication occurs within the local link. If the DHCPv6 server is located on a different link (e.g., another VLAN), a DHCP relay must be configured, which we’ll cover in the next section.
Advertise: Sent by DHCPv6 servers in response to the Solicit message, offering configuration options such as IPv6 addresses and other network settings.
Request: The client sends this packet to request specific configuration details from the selected DHCPv6 server.
Reply: The server responds to the client’s Request with the assigned IPv6 address and any additional requested configuration parameters.
Please notice that except for the solicit message which is send to a multicast address, other DHCPv6 packets are unicasted between client and DHCPv6 server.
If you check inside, Advertise packet and Reply packet which are sent by DHCPv6 server, you can see the IPv6 address and other information suggested by DHCPv6 server.
verify DHCPv6 process
We can verify the DHCPv6 binding on the DHCPv6 server by using the show ipv6 dhcp binding command.
The output shows the IPv6 address assigned to each client, with the client being identified by its DUID (DHCP Unique Identifier). The DUID is a unique identifier that includes the client’s MAC address along with other parameters, such as the hardware type.
Router#show ipv6 dhcp binding
Client: FE80::A8BB:CCFF:FE00:100
  DUID: 00030001AABBCC000100
  Username : unassigned
  VRF : default
  IA NA: IA ID 0x00030001, T1 43200, T2 69120
    Address: 2001:AA:BB:CC:1111:5A65:D9FA:A1D
            preferred lifetime 86400, valid lifetime 172800
            expires at Sep 24 2024 09:33 AM (131713 seconds)
You can also verify the IPv6 address on the client by using the show
ipv6 interface brief command. As shown in the output, the client has three IPv6 addresses: a link-local address, a unique local address assigned via the SLAAC process, and a global unicast address assigned through the DHCPv6 process.
Client#show ipv6 interface brief
Ethernet0/0            [up/up]
    FE80::A8BB:CCFF:FE00:100
    2001:AA:BB:CC:1111:5A65:D9FA:A1D
    FD00:AA:BB:CC:A8BB:CCFF:FE00:100


