F5 tcpdump is a normal tcpdump traffic capture utility, usually used for troubleshooting.
However, F5 tcpdump also has some specific options that provide the ability to capture a specific session on both the client and server sides.
F5 tcpdump
F5 is on top of the CentOS Linux environment and hence you can use the open source tcpdump utility to troubleshoot the connections.
However, there are some specific tcpdump options for F5 devices that will be the main focus of this section.
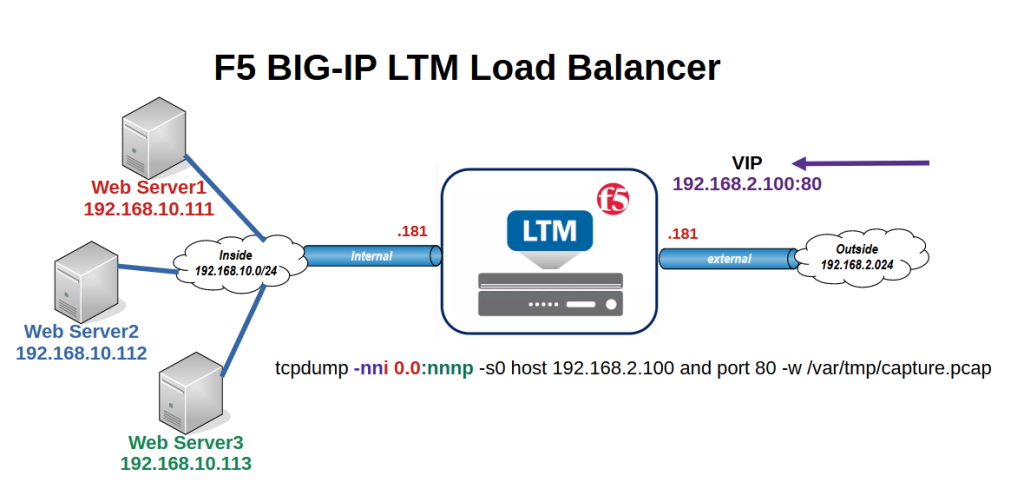
This is the topology that we have already prepared several times throughout the course. The user connects to the virtual server IP address 192.168.2.100 using the HTTP protocol.
In the figure you can also see the tcpdump command, which we use to capture the packet between the client and the F5 virtual server and also the internal server.
tcpdump -nni 0.0:nnnp -s0 host 192.168.2.100 and port 80 -w /var/tmp/capture.pcap
This command is used as a sample command to discuss tcpdump options, particularly F5 tcpdump specific options.
F5 tcpdump parameters
tcpdump -i
The first option is “-i“, which allows you to specify which interface/vlan to capture traffic from.
You can specify interface name or interface identifier. Interface identifier “0.0” means that traffic is captured from all interfaces.
tcpdump -i #Select an Interface or VLAN
tcpdump -i 1.1
tcpdump -i internal
tcpdump -i 0.0  #To view traffic on all data interfaces
tcpdump host and port
To specify traffic from a specific host or port to be captured, we use normal host and port options in the tcpdump command and there is nothing new in F5 tcpdump
tcpdump host <IP address>
tcpdump src host <IP address>
tcpdump dst host <IP address>
tcpdump port <port number>
tcpdump src port <port number>
tcpdump dst port <port number>
tcpdump -n or -nn
The option „-n“ in tcpdump disables name resolution, which helps improve processing performance. Using “-nn” disables both name resolution and service port resolution.
tcpdump -n #disable name resolution
tcpdump -nn  #disable both name and service port resolution
tcpdump -ni internal
tcpdump -nn src host 172.16.101.20 and dst port 80
tcpdump -w
The option „-w“ in tcpdump allows you to save your captured traffic to a file. I will then use Wireshark to open the captured file.
tcpdump -w #to save the tcpdump output
tcpdump -w /var/tmp/capture.pcap
tcpdump -s
The option „-s“ is used to specify the amount of each packet to be captured. Size 0 means entire packet.
tcpdump -s0 #specify the amount of each packet to capture. 0 means entire packet.
tcpdump -s200 src host 192.168.2.100 and dst port 80
F5 tcpdump :nnnp option
but the “:nnnp” option placed after the interface option is the most important F5-specific parameter.
Please do not confuse the “-n” switch with the “:n” switch that comes after the interface name.
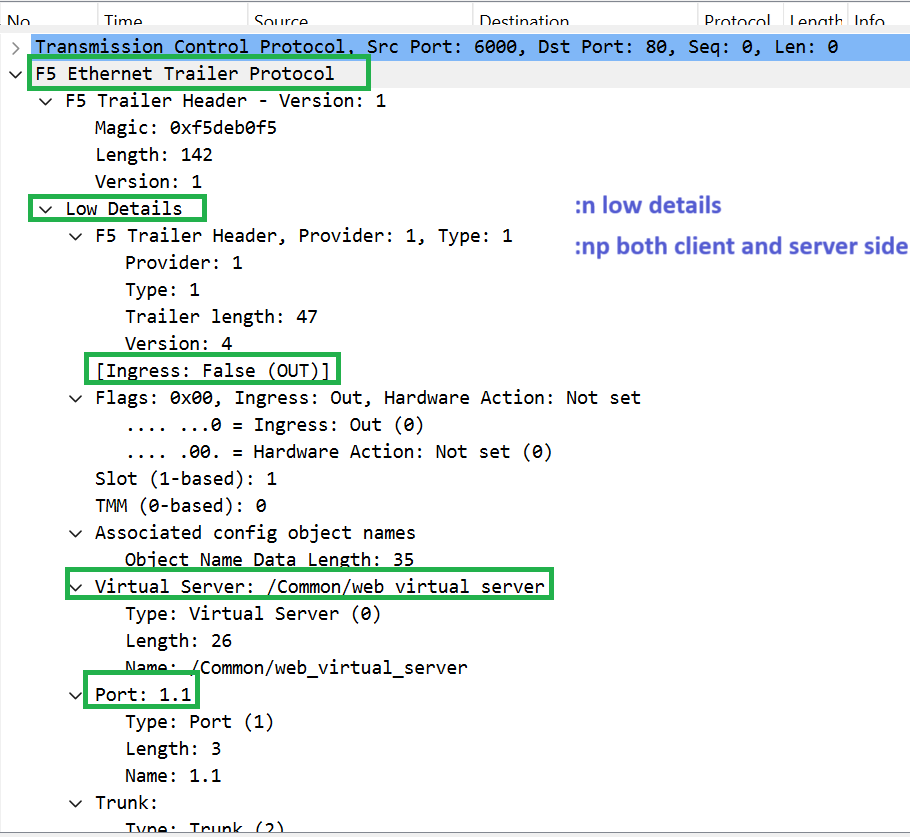
One “:n” option is used to capture F5 low details. The virtual server name in F5, the interface name and the direction in the interface are displayed in low detail.
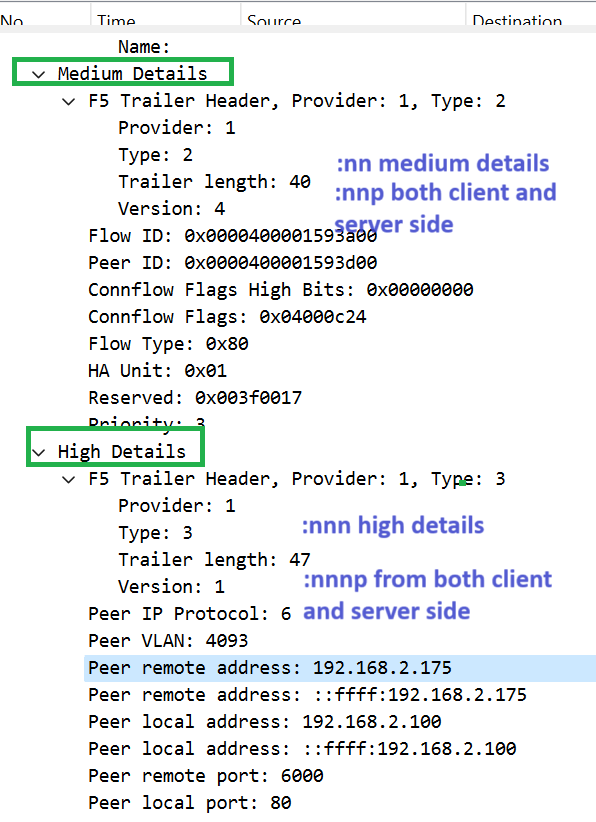
Two “:nn” options is used to capture F5 medium details. In addition to low detail, it also displays information like flow details.
Three “:nnn” options captures F5 high detail. In addition to low and medium details, the IP address and port of both sides of F5 are displayed in high details.
Finally, “:p” option captures traffic from both sides of F5, from the client to F5 and the corresponding traffic to pool members.
run tcpdump command
now let’s run tcpdump command with „0.0:nnnp“ and store the result in a binary file.
to capture traffic we browse the virtua IP, 192.168.2.100.
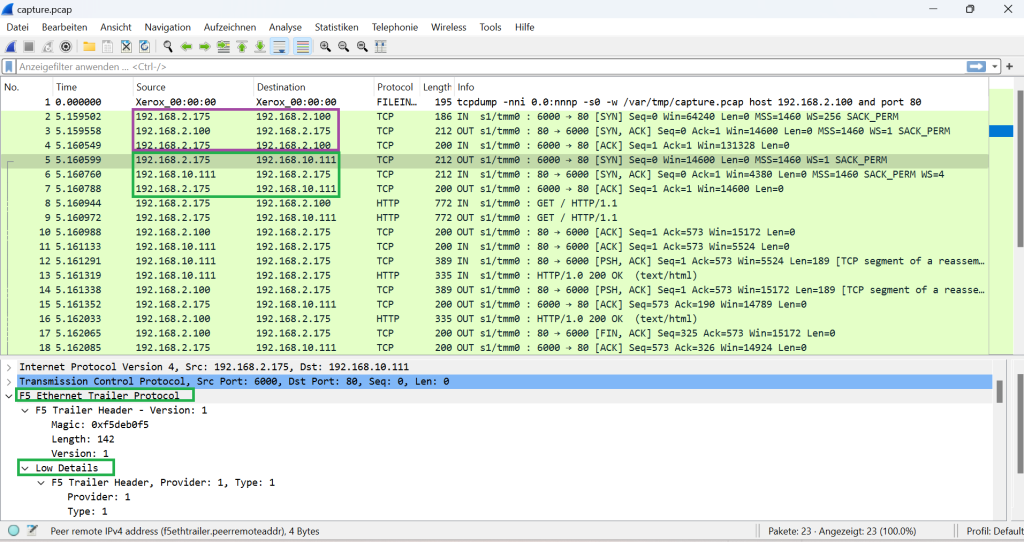
Then we open the binary file with wireshark to see the details captured traffic.
In the tcpdump command, we only capture traffic that matches the virtual server IP address, 192.168.2.100 and port 80.
However, in the output from Wireshark you can see that traffic on the server side is also being captured by F5.
if you check the details of traafic, you can also see F5 header including low details, medium details and high details


