Cisco FTD NAT configuration is the topic of this section. In the last section, we discussed the concept of different types of NAT and how they are implement in a Cisco FTD device. In this section we implement examples of different types of NAT.
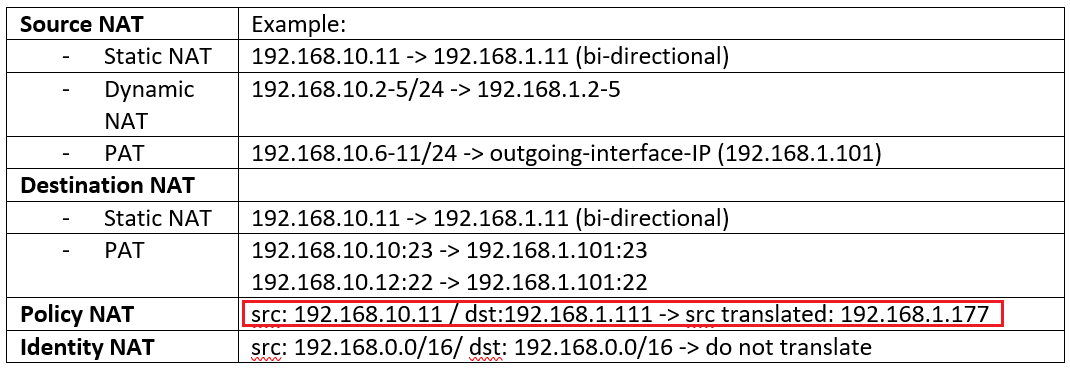
Cisco FTD NAT Review
In the last section, we introduced different types of NAT.
just to review:
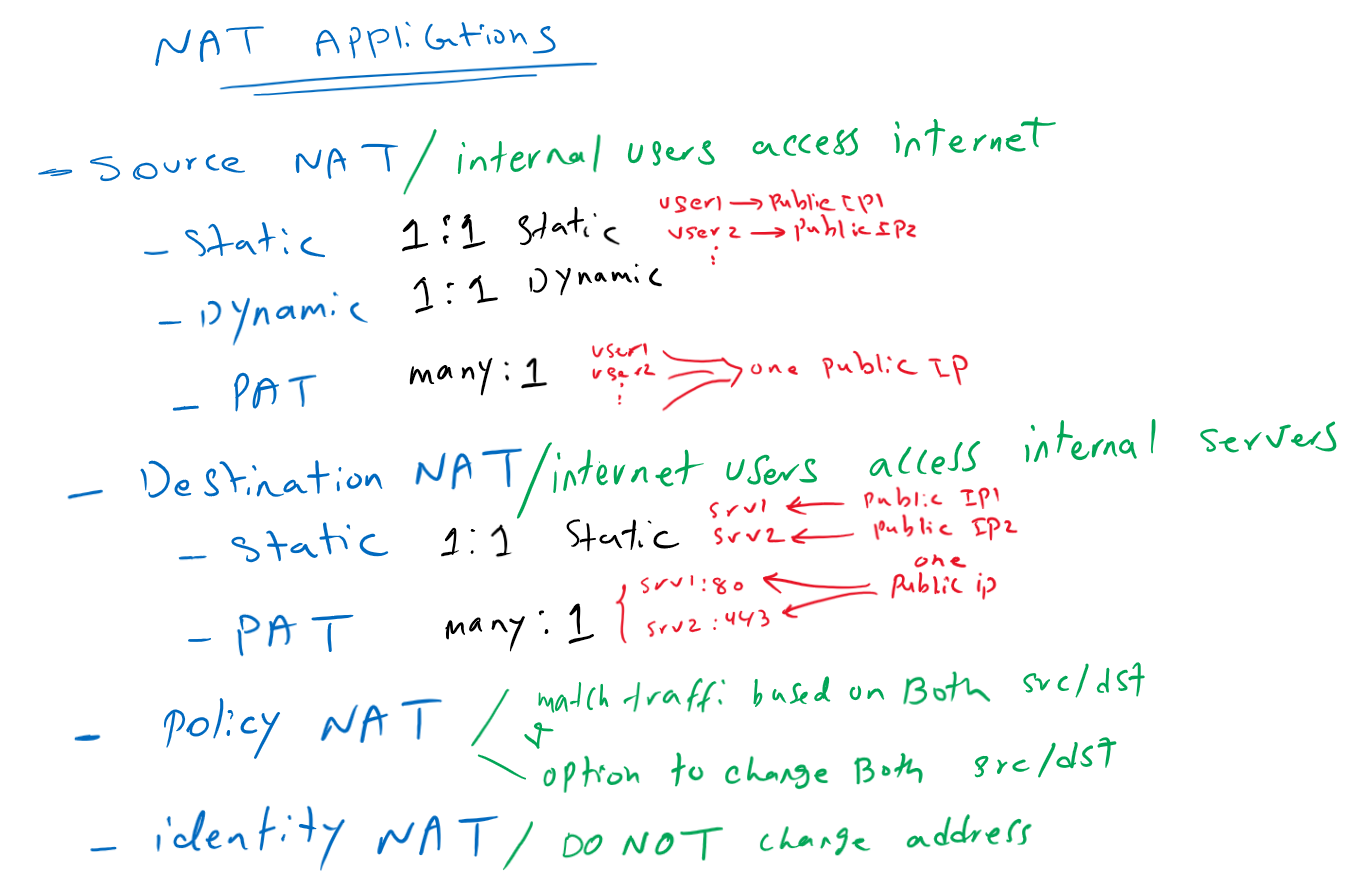
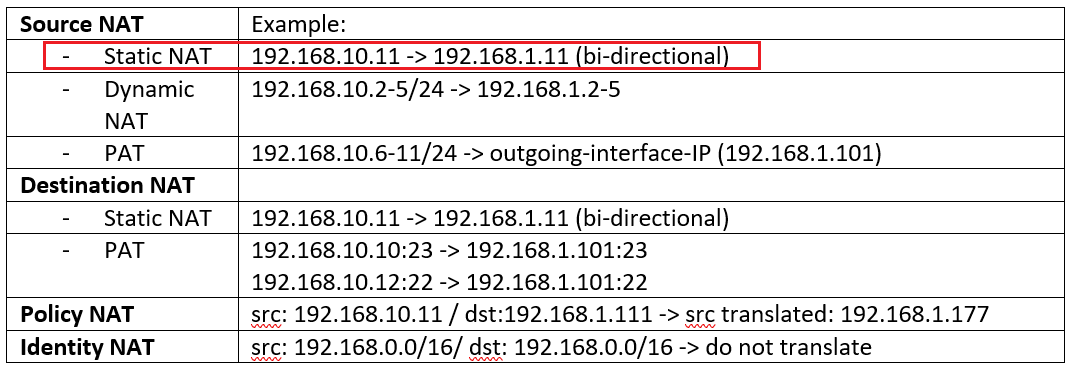
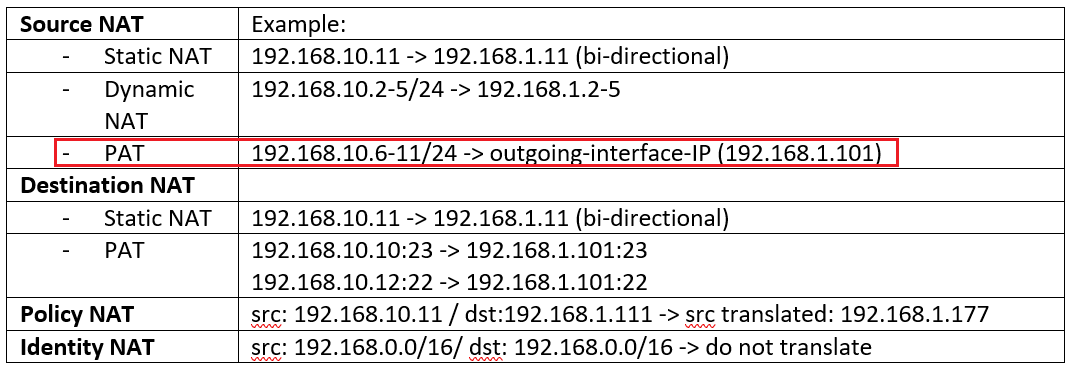
- With Source NAT, internal users with private IP addresses connects to the Internet.
- With destination NAT, users from the internet, connect to the enterprise servers with private IP addresses.
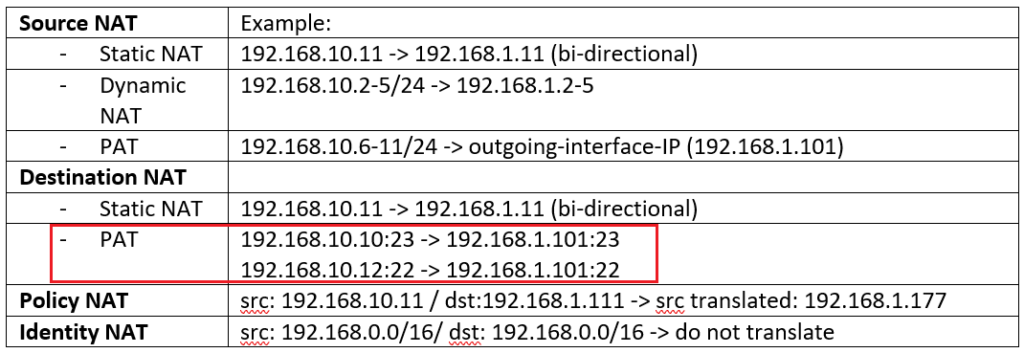
- With Static NAT and dynamic NAT, there is one to one mapping between real address and translated address.
- With PAT, many real addresses will be translated to just one or a few addresses.
- With Policy NAT, we can match the traffic based on specific source and destination address and also port numbers. We have the flexibility to translate the source address, the destination address, or both.
- With Identity NAT, we will exclude some traffic to be translated especially over VPN tunnels.
Cisco FTD NAT Configuration
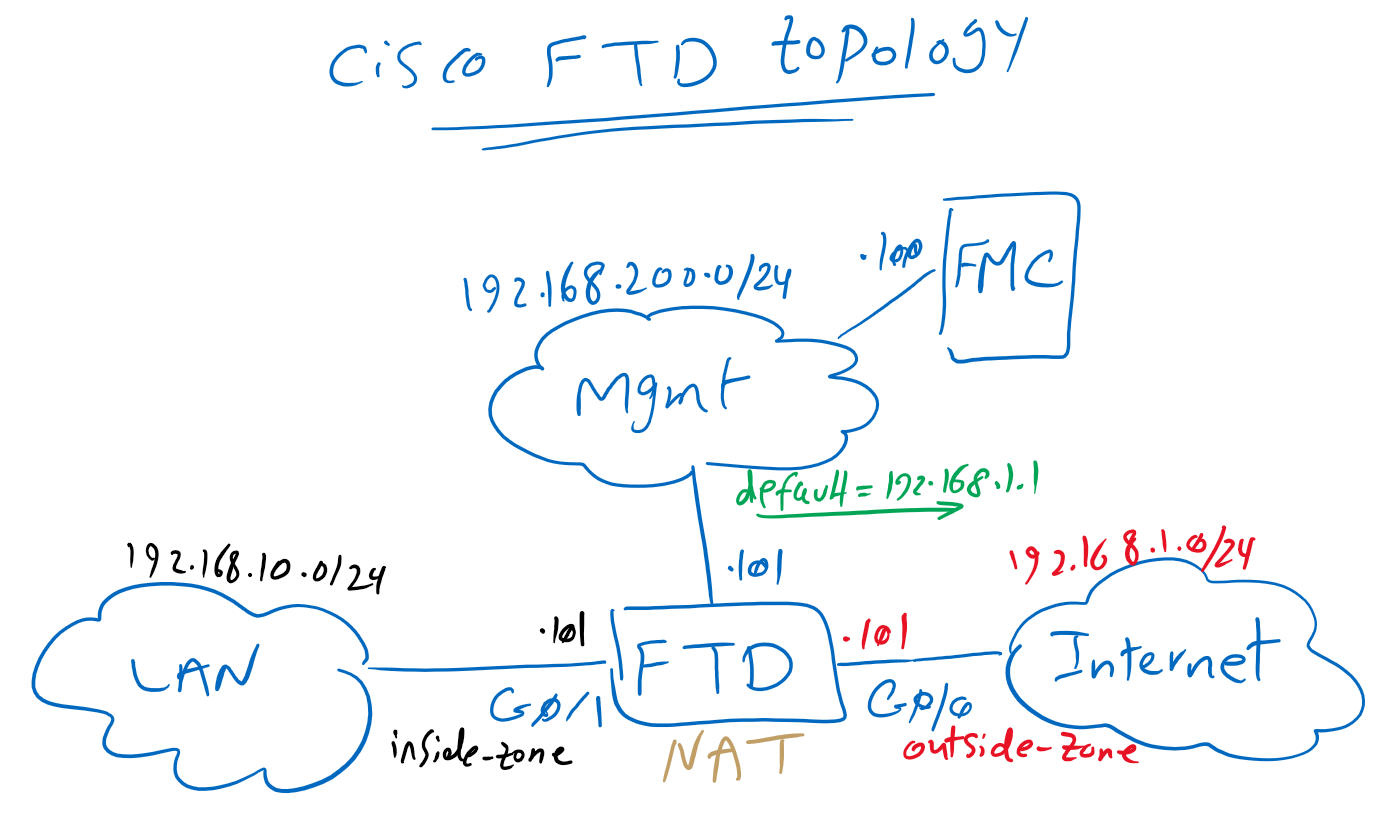
To review the topology, FTD connects inside zone with IP address range 192.168.10.0/24 to outside zone with IP address range 192.168.1.0/24 which has already internet access.
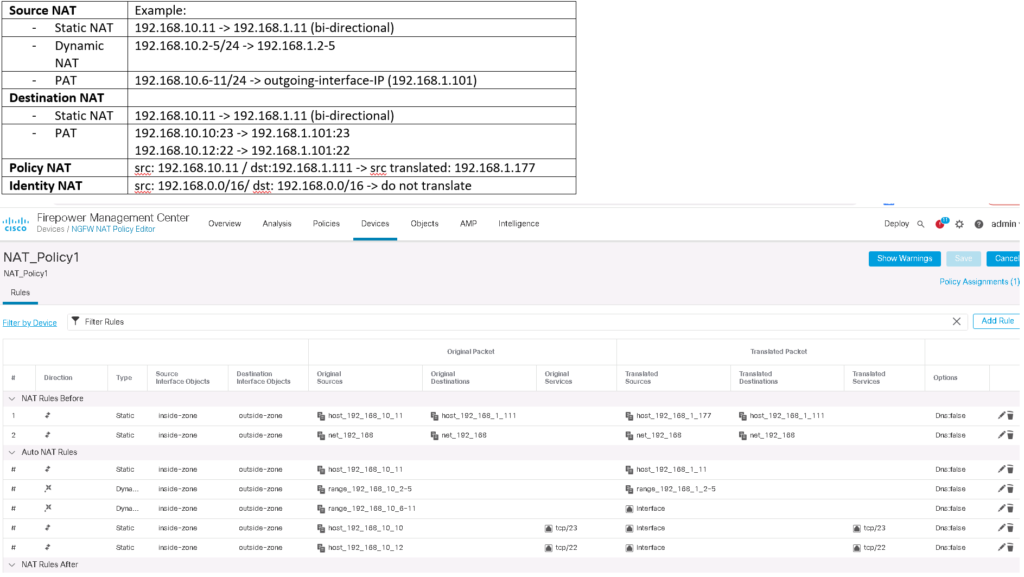
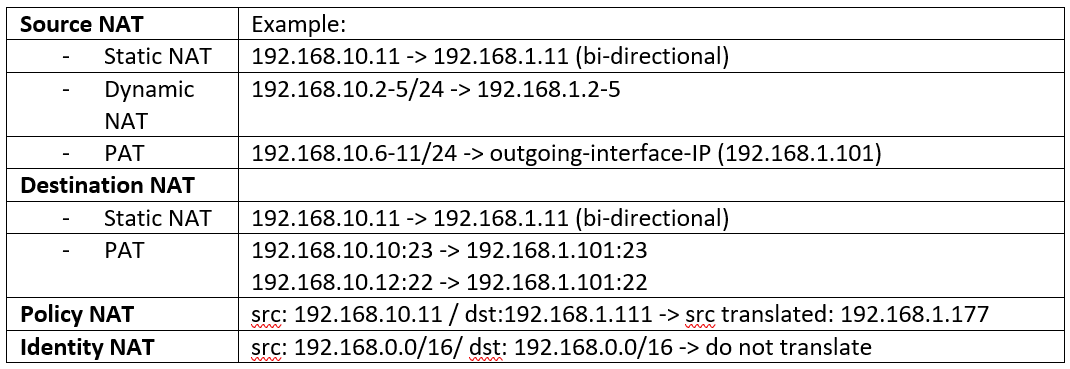
To give a configuration example for all these NAT types, I made a table with an example for each NAT type. in continue we will configure all of these examples one by one.
We will configure source NAT and destination NAT with Auto NAT and policy and identity NAT with manual NAT.
Cisco FTD Source NAT / Static NAT Configuration Example
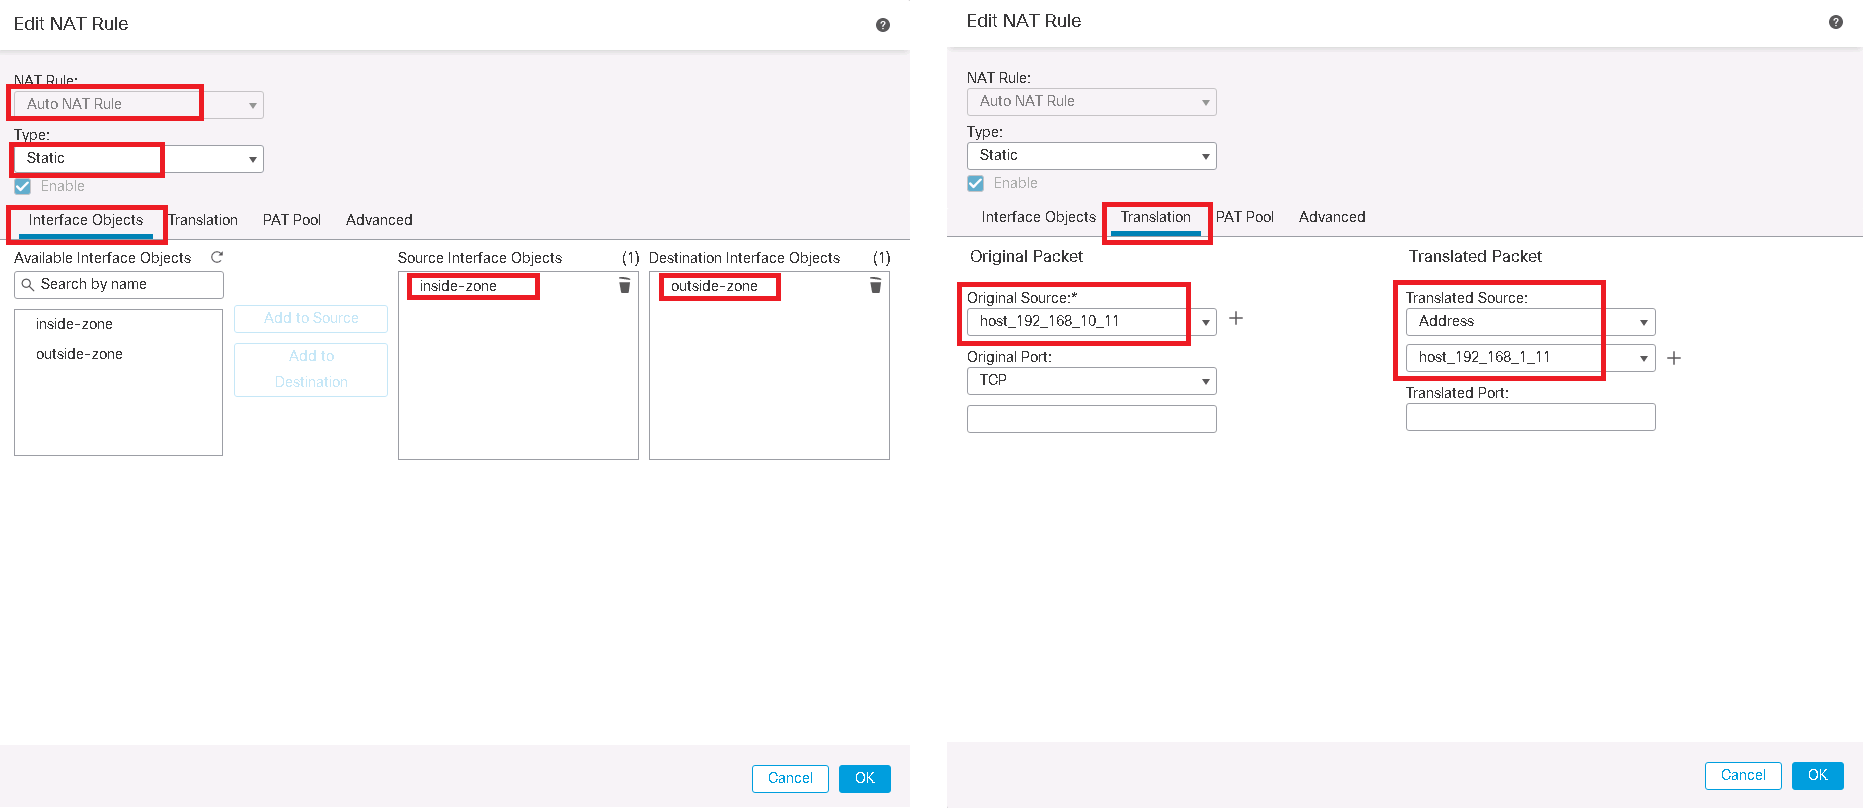
We start with static NAT. what we will configure in static NAT is to translate the IP address 192.168.10.11 in inside zone to 192.168.1.11 in outside zone.
There are two points to notice in static NAT.
First, Static NAT always has higher priority than dynamic NAT. So if an IP address is matched with both static and dynamic NAT, static NAT has more priority.
Second, Static NAT is by default bi-directional. In our example, not only 192.168.10.11 is translated to 192.168.1.11 for the traffic from inside to outside, but, when you access 192.168.1.11 from outside zone, you will be connected to 192.168.10.11.
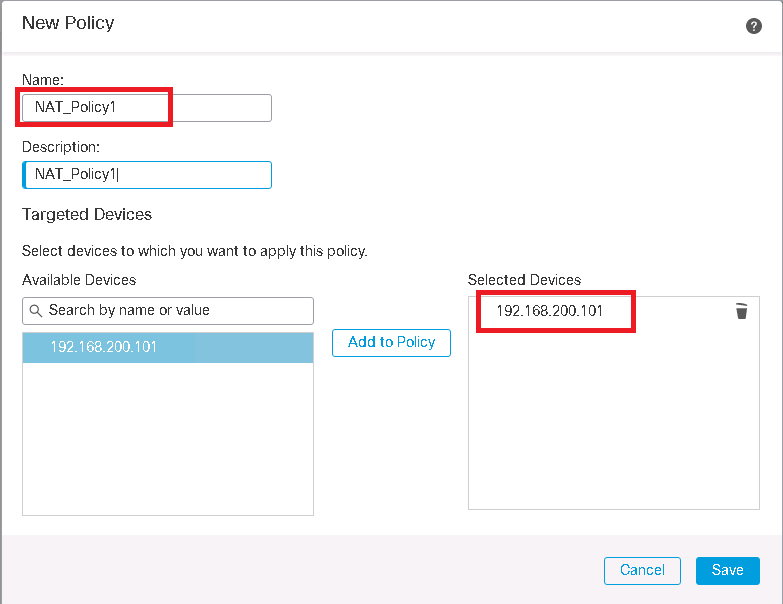
To implement NAT, for the first time we need to create a new policy and choose FTD device on which we will configure NAT rules. We have already created NAT_Policy1 in previous sections.
Devices -> NAT -> New Policy -> Threat Defense NAT -> New Policy
To implement static NAT, we have to add an Auto NAT rule.
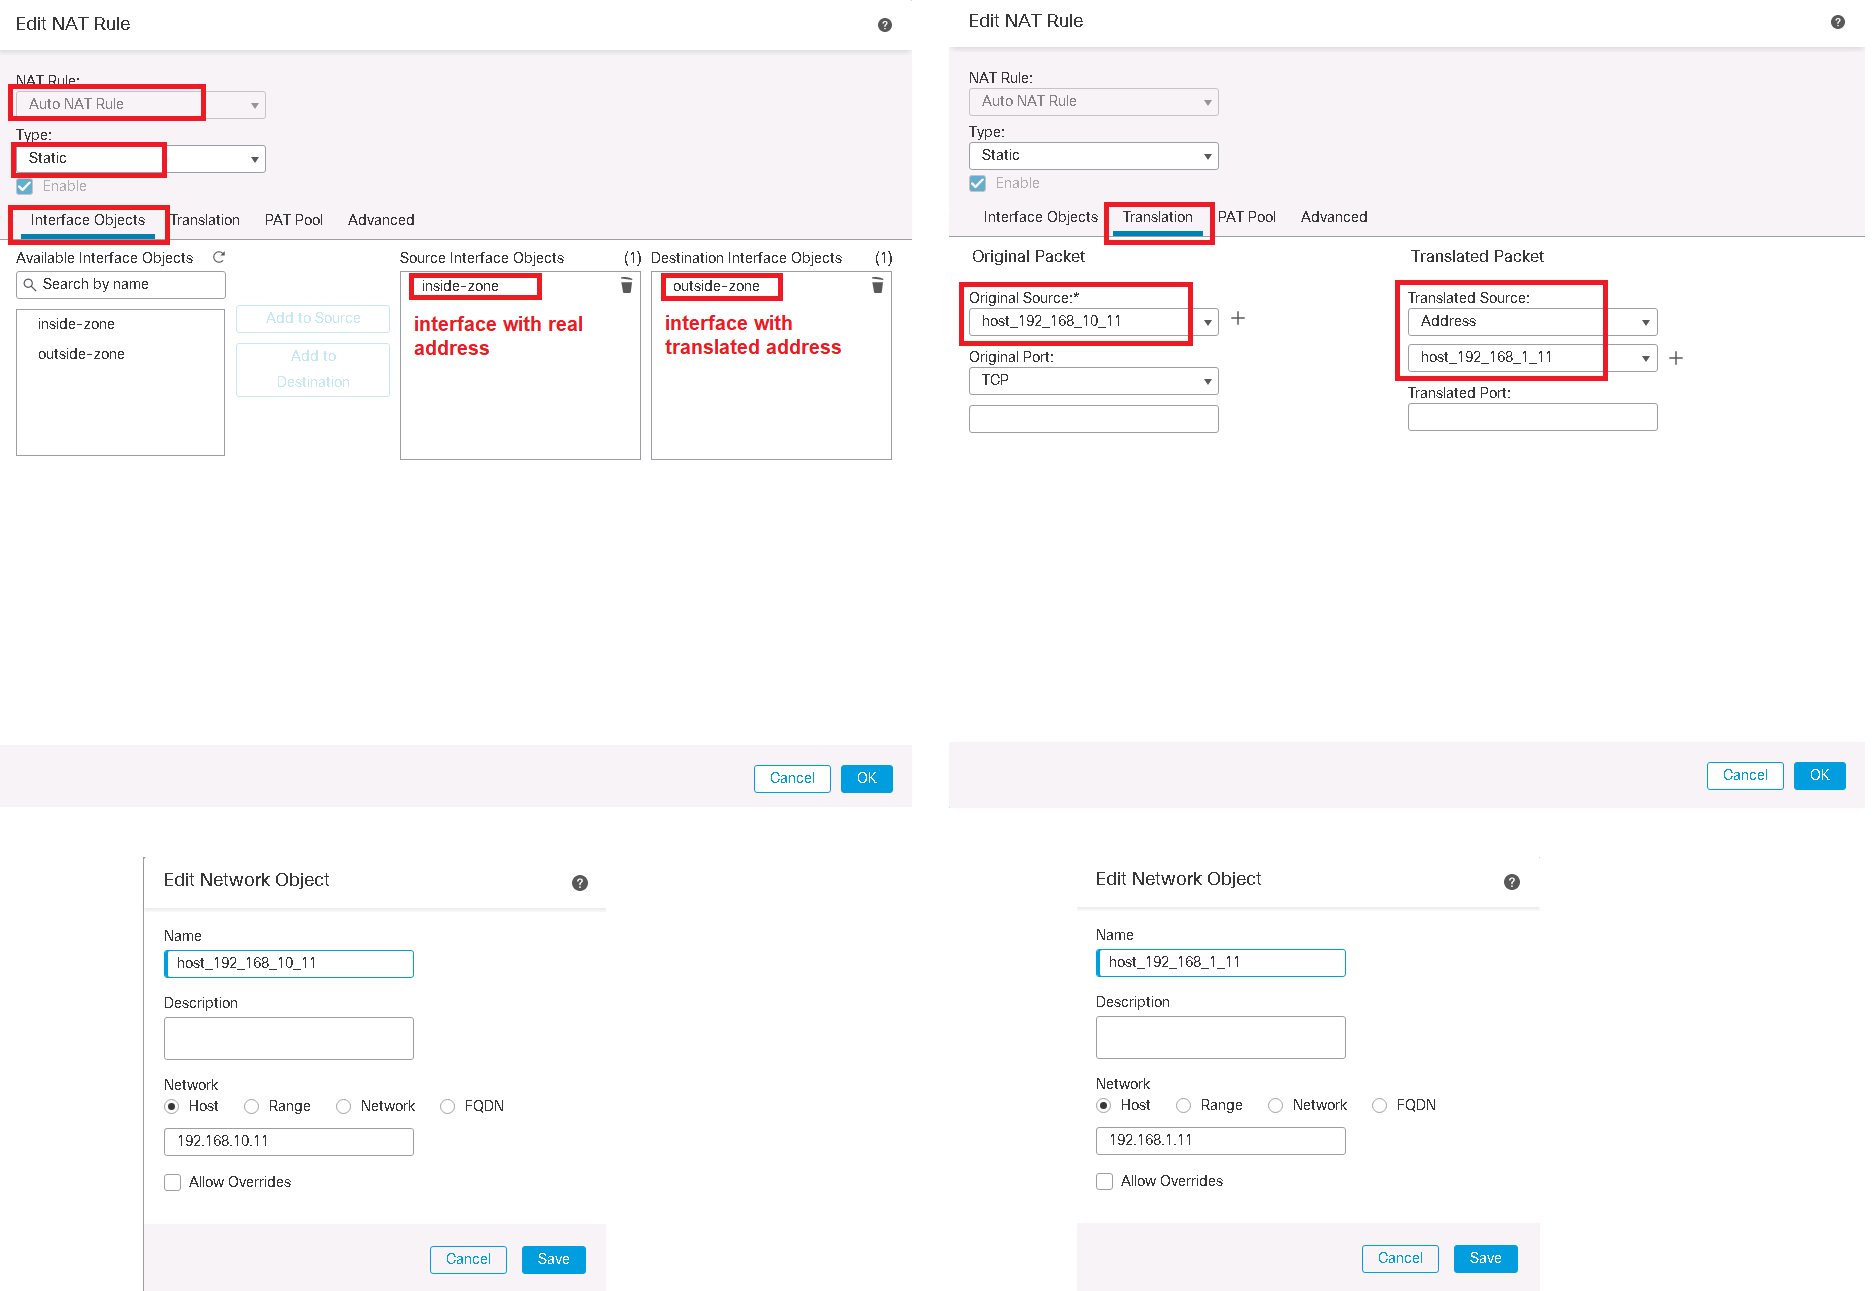
In interface objects Tab, “source interface object” is the object containing the real address and “destination interface object” is the object containing the translated address.
On the Translation tab, “Original Source” is an object that points to the real address and “Translated Source” is an object that points to the translated address. original source object and translated source object can contain more than one address, but the number of addresses must be the same in both objects.
To test our configuration, we send ping traffic from a computer behind FTD with address 192.168.10.11 to address 8.8.8.8. as you can see source address is translated to 192.168.1.11 when it is forwarded by FTD.

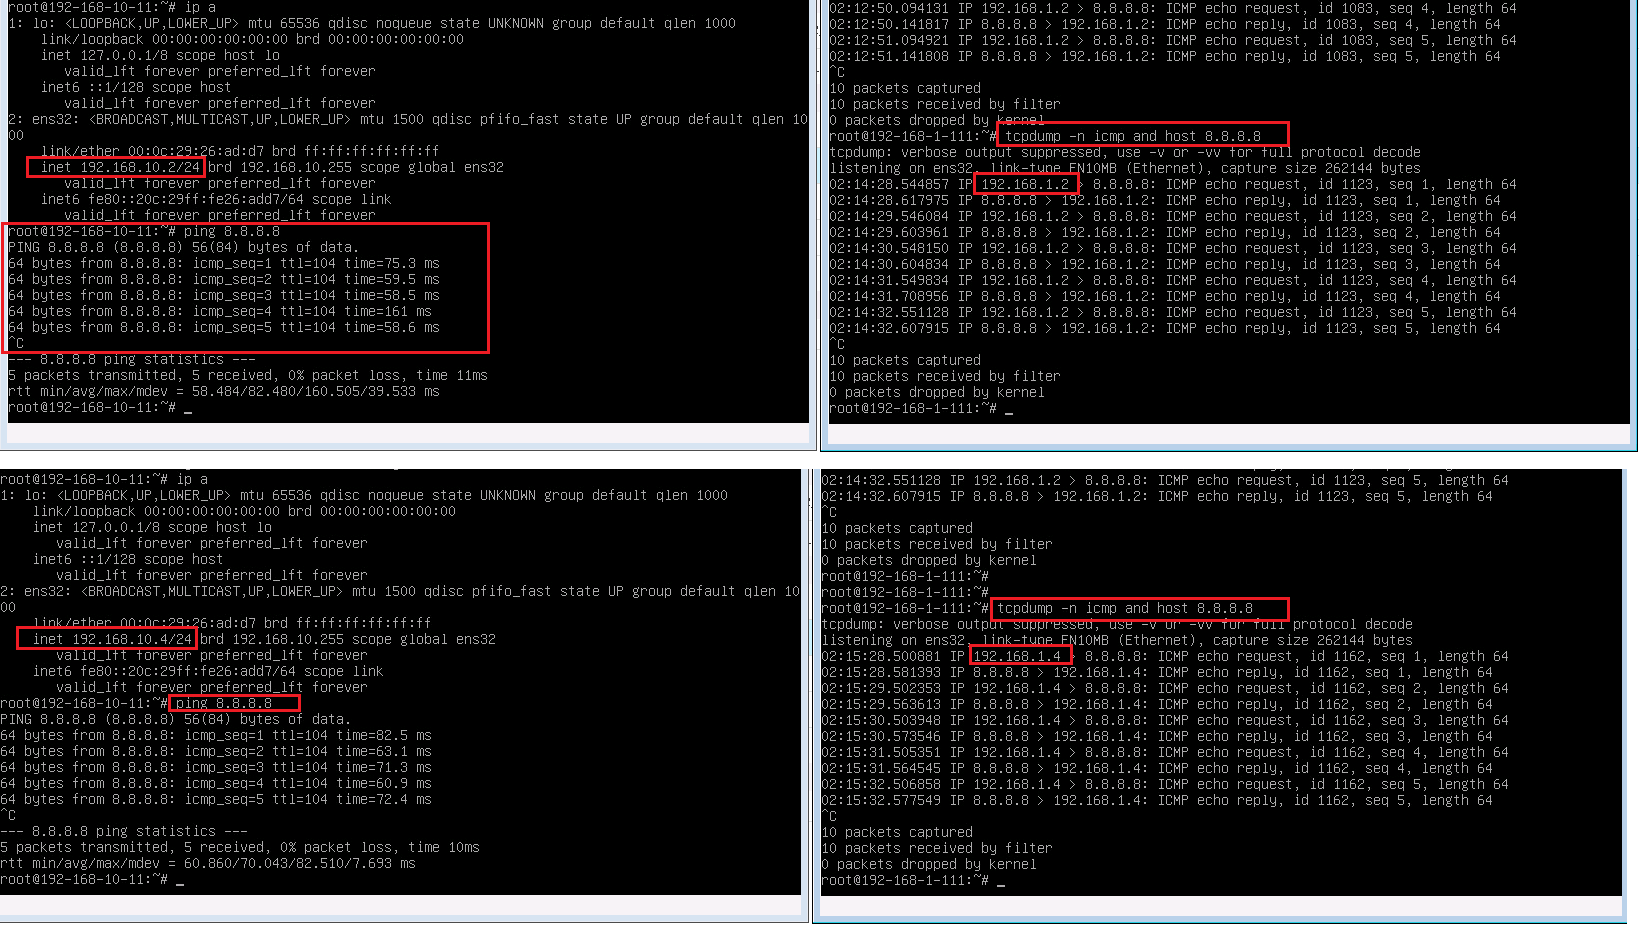
Cisco FTD Source NAT / Dynamic NAT Configuration Example
Dynamic NAT is the same as Static NAT and there is a one to one mapping between real address and translated address. The difference is that the translated address is chosen dynamically from the pool.
In our example we create two lists. One with IP address range from 192.168.10.2-5 for the real address and the list with IP address range from 192.168.1.2-5 for translated address.
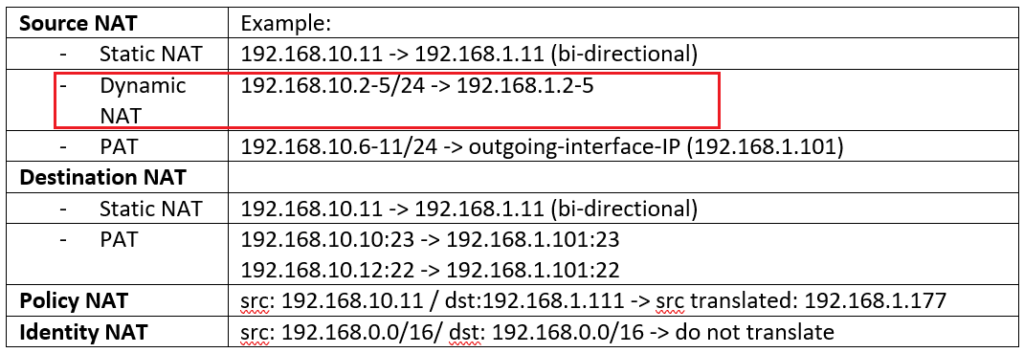

There is no need that the number of address be the same in both lists but if the number of translated address is less then the number of real addresses, then all real addresses cannot be translated at the same time.
When I ping from IP address 192.168.10.2 it is translated to 192.168.1.2 and when I ping from 192.168.10.4 then it is translated to 192.168.1.4.
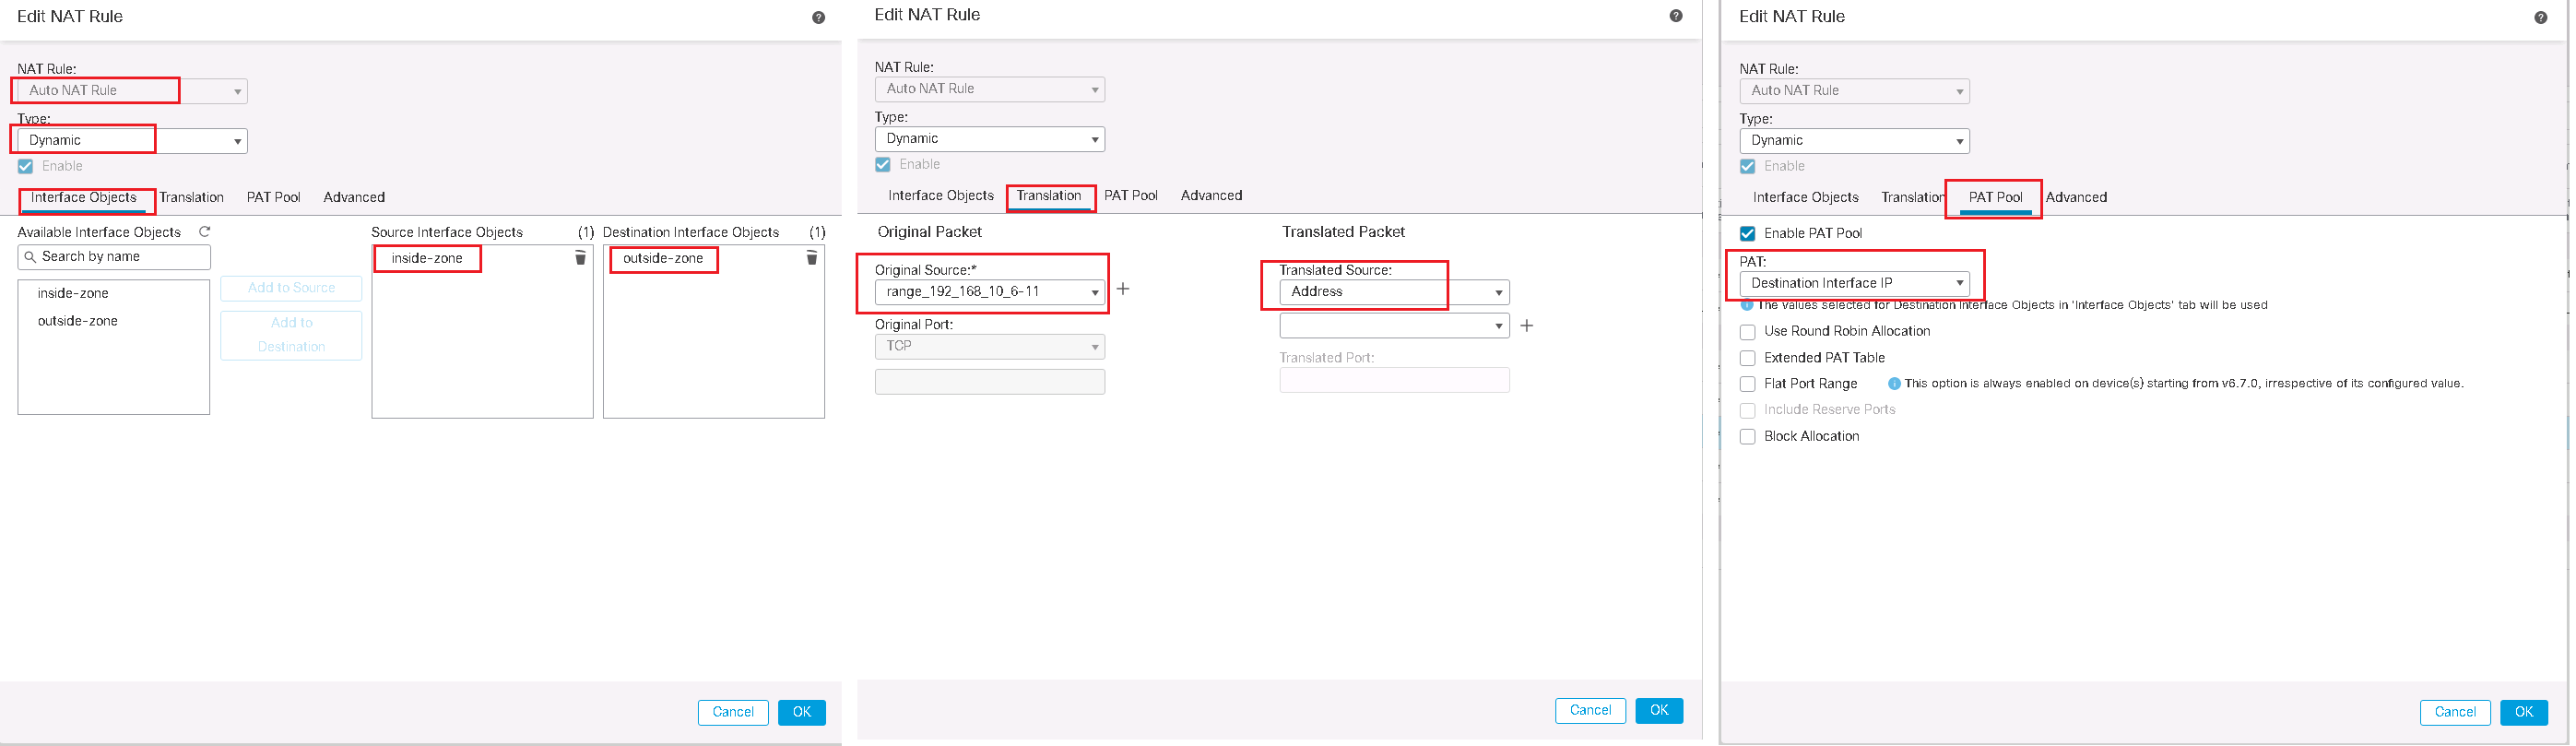
Cisco FTD Source NAT / PAT Configuration Example
With PAT, many addressed are mapped to a single or a few addresses.
In our example, we will configure the IP address range 192.168.10.6-11 to a single FTD outside interface IP address 192.168.1.101.
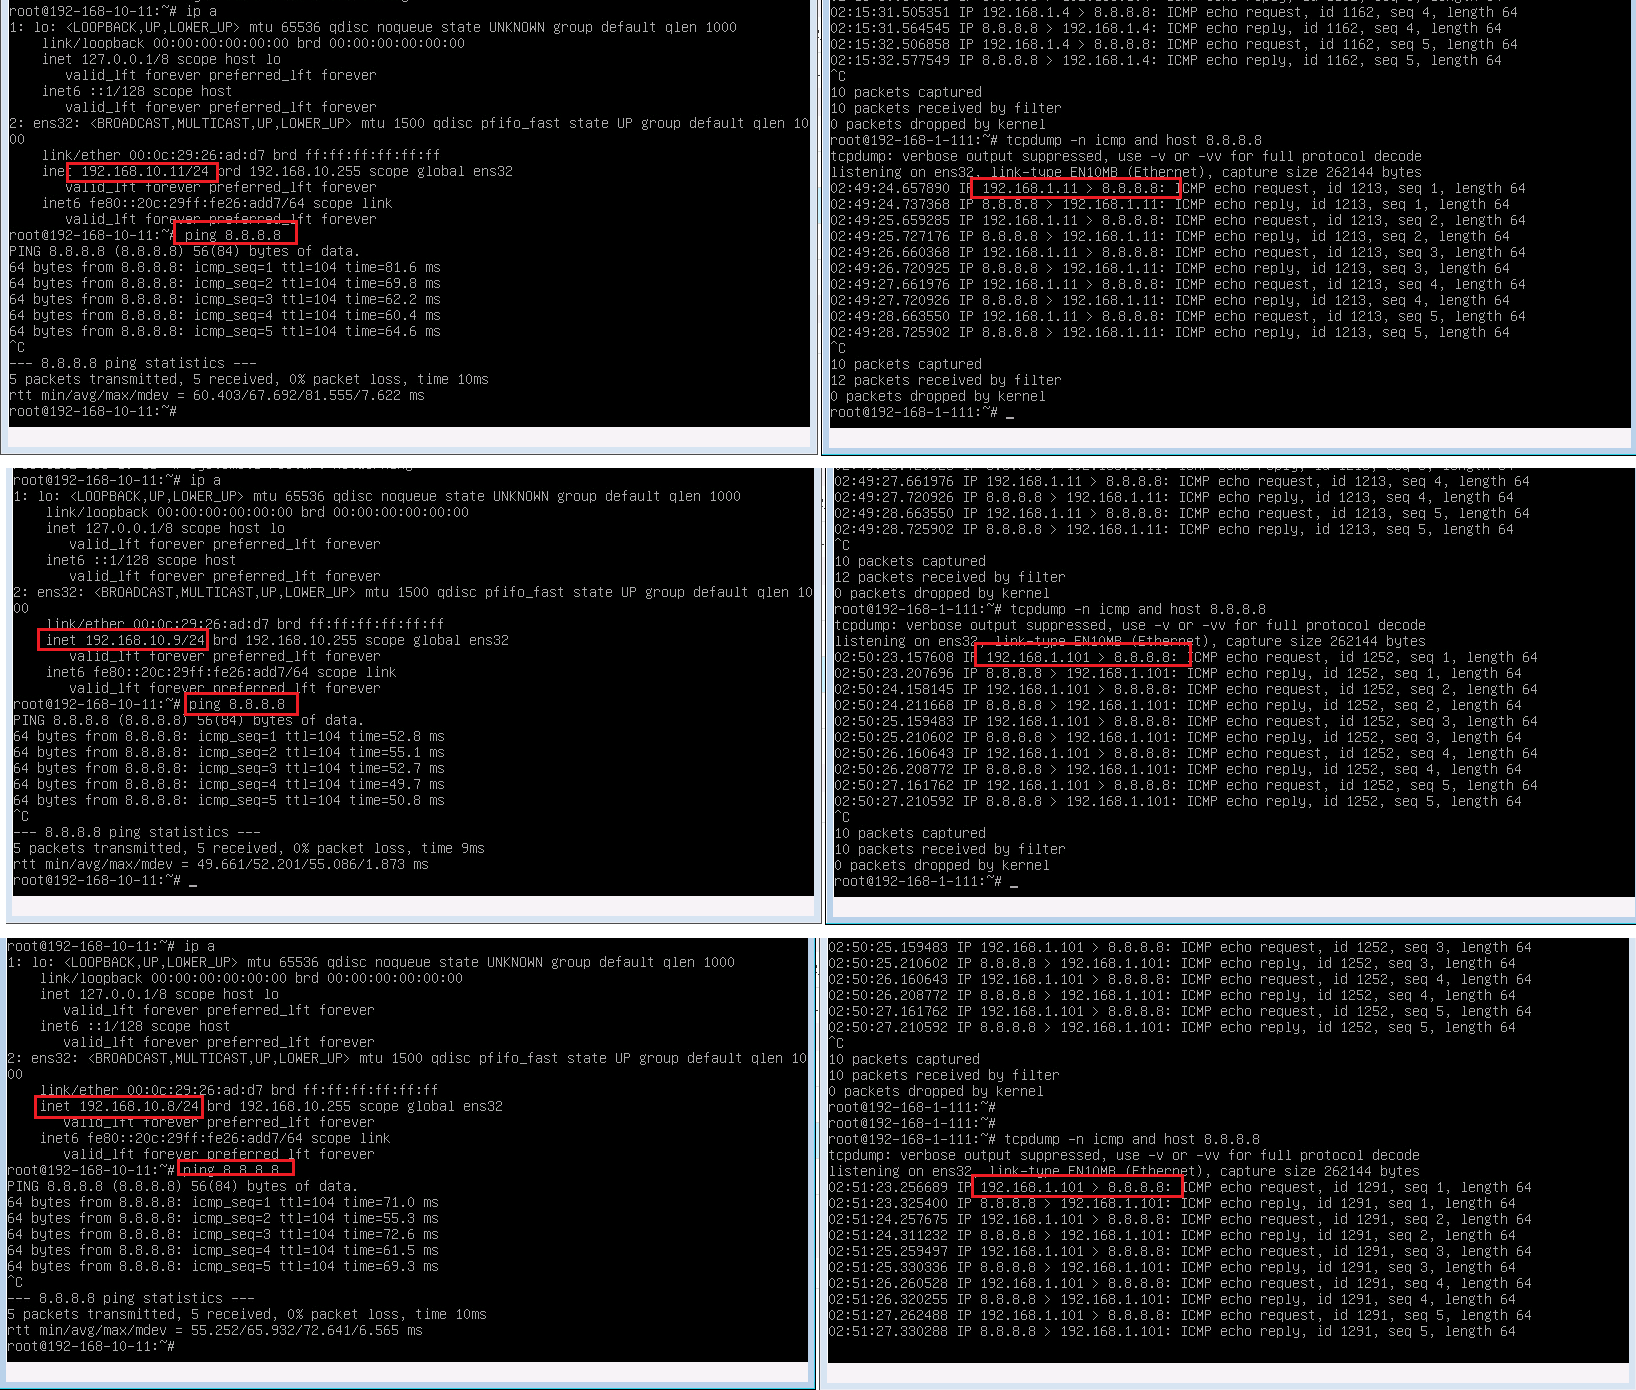
The IP address 192.168.10.11 is in both Static NAT rule and also PAT rule. I have created this by intension to show you that static NAT has more priority.
To test it, I ping it once with IP address 192.168.10.11, once with IP address 192.168.10.9 and once with IP address 192.168.10.8.
As the result show, IP address 192.168.10.11 is matched with static NAT rule and it is translated to 192.168.1.11. but 192.168.1.8 and 192.168.1.9 are translated to 192.168.1.101 which is the IP address of FTD outside interface as we have configured in PAT rule.
Cisco FTD Destination NAT / Static NAT Configuration Example
As it is mentioned earlier, Static NAT is by default bi-directional.
We have already created a Static NAT rule, which map the IP address 192.168.10.11 in inside zone to IP address 192.168.1.11 in outside zone. in this example, not only 192.168.10.11 is translated to 192.168.1.11 for the traffic from inside to outside, but, when you access 192.168.1.11 from outside zone, you will be connected to 192.168.10.11.

Just for a test, I ping from 192.168.1.88 to 192.168.1.11. tcpdump result shows that traffic is forwarded to 192.168.10.11.

Cisco FTD Destination PAT Configuration Example
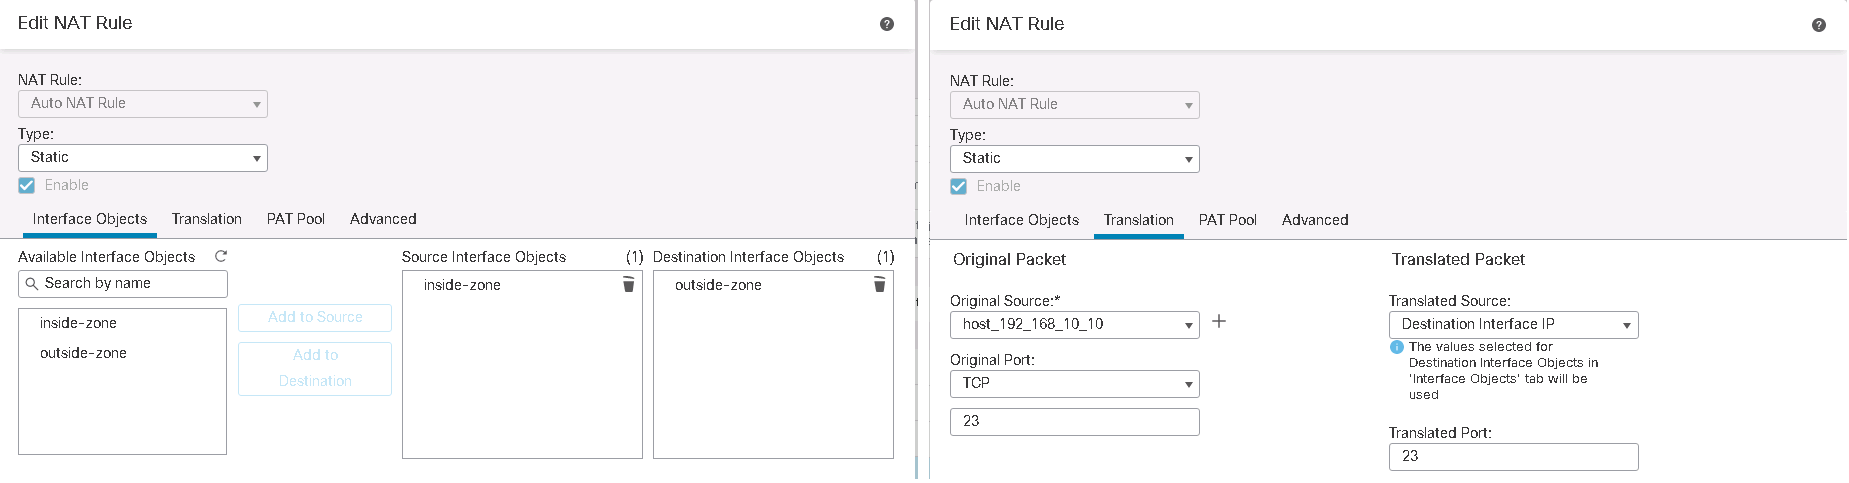
In Destination PAT Example, I am going to use outside interface IP address to publish two different services to inside zone.
When you access 192.168.1.101, port 23 from outside zone, then you will be connected to the server with IP address 192.168.10.10 to the same port in inside zone.
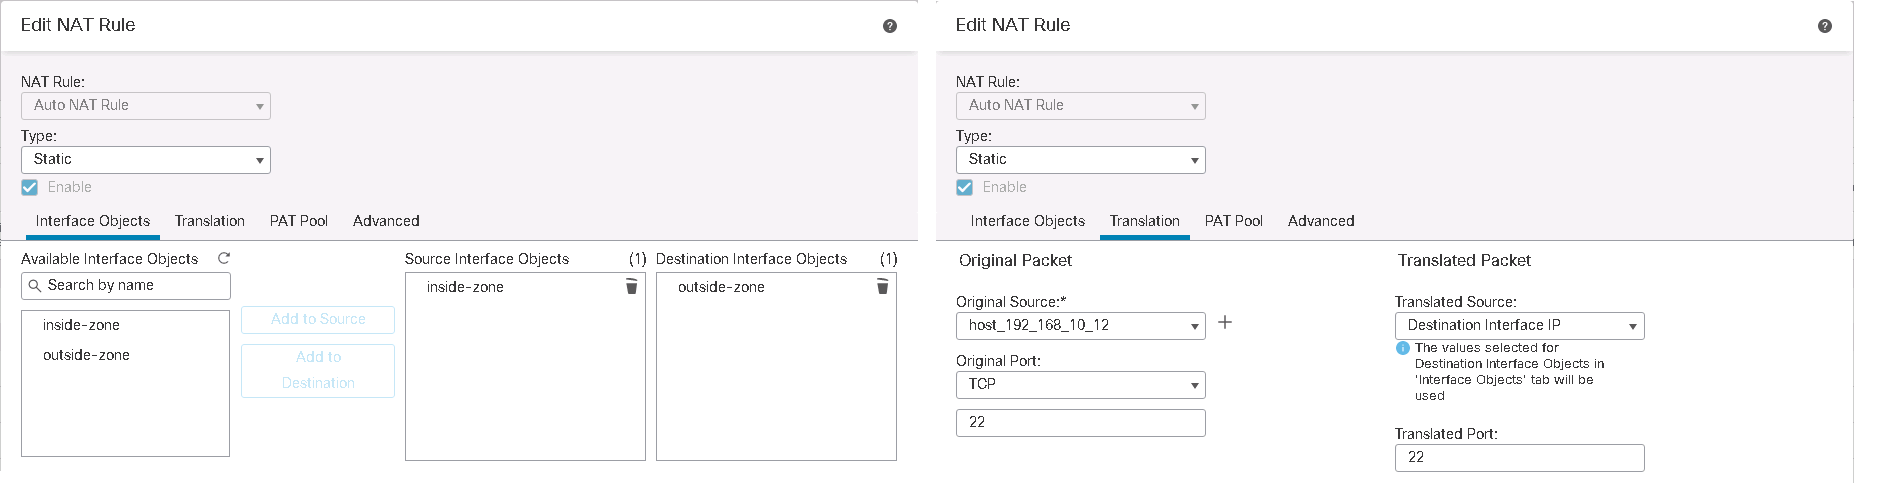
And when you access the same IP address 192.168.1.101 but with port number 22, then you will be connected to server with IP address 192.168.10.12 port 22, in inside zone.
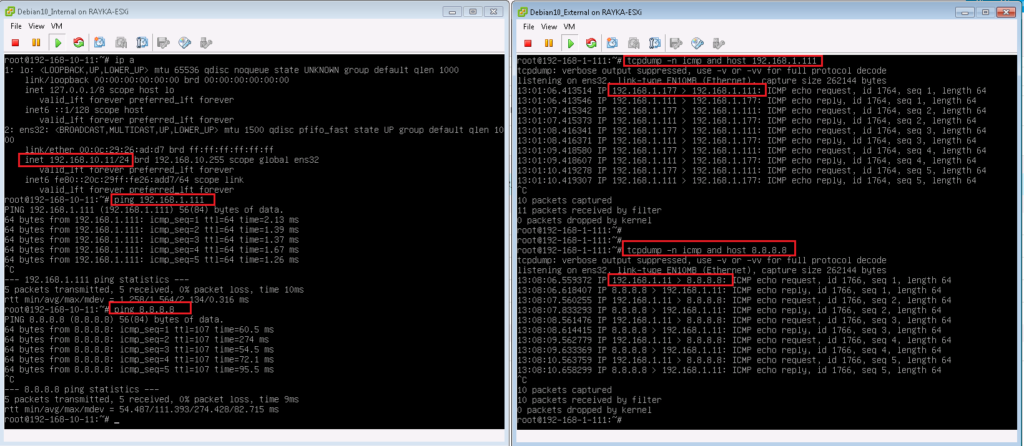
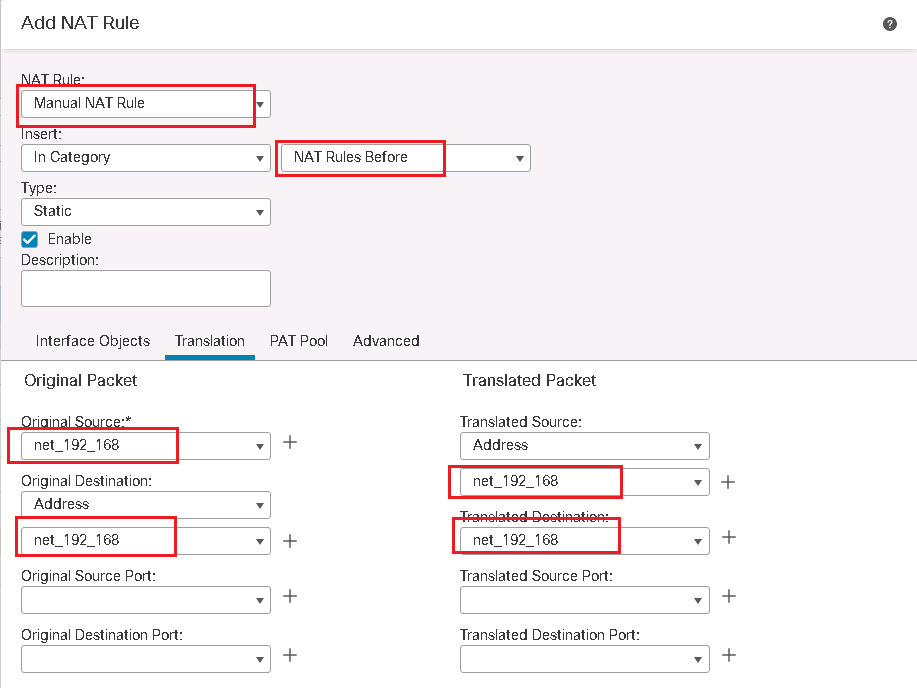
Cisco FTD Policy NAT Configuration Example
With policy NAT which is implemented by Manual NAT, we have more flexibility to match and translate or not to translate any of source and destination address.
In Manual NAT we have the option to configure rules, “before Auto NAT” or “after Auto NAT”.
when Manual NAT rules are configured before Auto NAT, then they have more priority than Auto NAT rules and they will be processed before Auto NAT.
but if Manual NAT rules are configured after Auto NAT then they have less priority and will be processed if traffic is not matched with any of Auto NAT rules.
In our example, the source IP address 192.168.10.11 will be translated to 192.168.1.177 but only when the destination of the traffic is 192.168.1.111. otherwise it will match static NAT rule which translate the source IP address 192.168.10.11 to address 192.168.1.11.

As a test, we ping from 192.168.10.11 to 192.168.1.111 to see the result. As the output of tcpdump shows, the source address is translated from 192.168.10.11 to 192.168.1.177 when destination is 192.168.1.111 but 192.168.10.11 is translated to 192.168.1.11 when destination is something else like 8.8.8.8
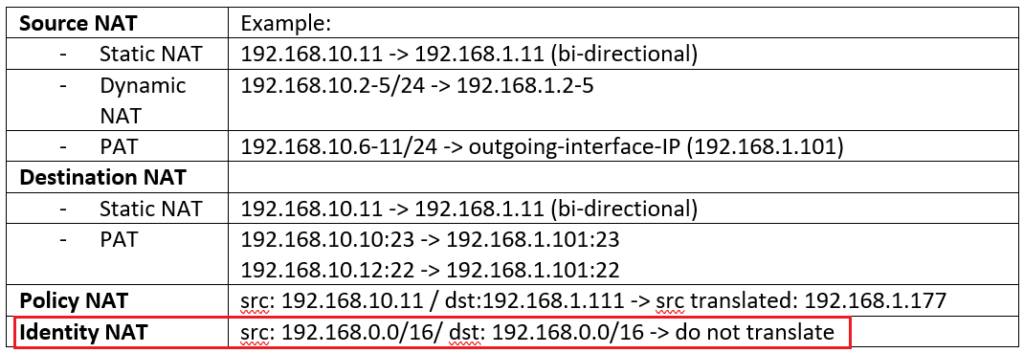
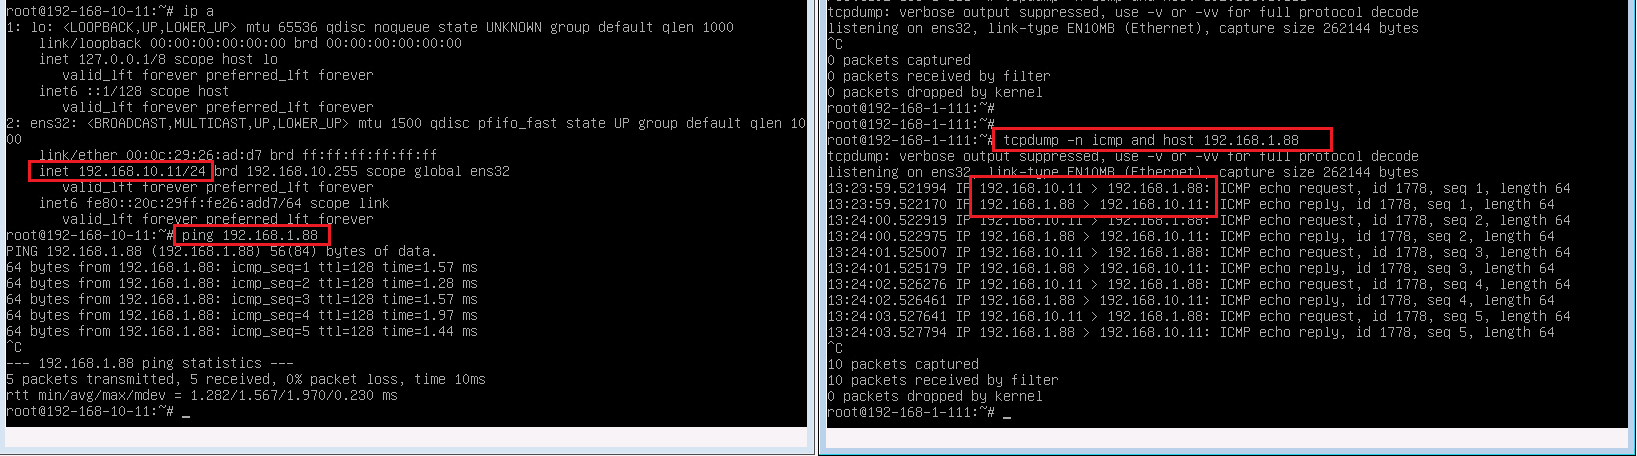
Cisco FTD Identity NAT Configuration Example
With Identity NAT, we have the option to exclude some traffic from NAT.
One application of identity NAT is to be implemented over VPN connections, since traffic over VPN connections does not typically need to be translated. In addition, most VPN technologies are not compatible with NAT technology.
Therefor it happens a lot to implement identity NAT which exclude some traffic to be translated.
In our example, traffic between 192.168.0.0/16 in the inside zone and 192.168.0.0/16 in the outside zone are exempt from NAT because they are internal subnets.
Just to test it, I send a ping traffic from 192.168.10.11 to 192.168.1.88. the result of tcpdump shows that the traffic is not translated at all.
final NAT configuration
finally we have 5 rules in Auto NAT and 2 rules in Manual NAT to implement our configuration Example.